Guides & FAQ

Short, practical guides with real screens from the app, from your first launch to loans, bank SMS and backups. Each one says why the feature exists, gives an everyday example, and shows the steps.

Start hereEverydayLoans & paymentsSmart toolsSettingsFAQ

Nothing matches that. Try a simpler word, like “budget” or “loan”.

Start here

The one idea behind SimpleMoney

Every transaction answers two separate questions: what was the money for? (a category, like Food) and where did it come from? (an account, like Cash or HDFC Bank). Most apps mix the two up. SimpleMoney keeps them apart.
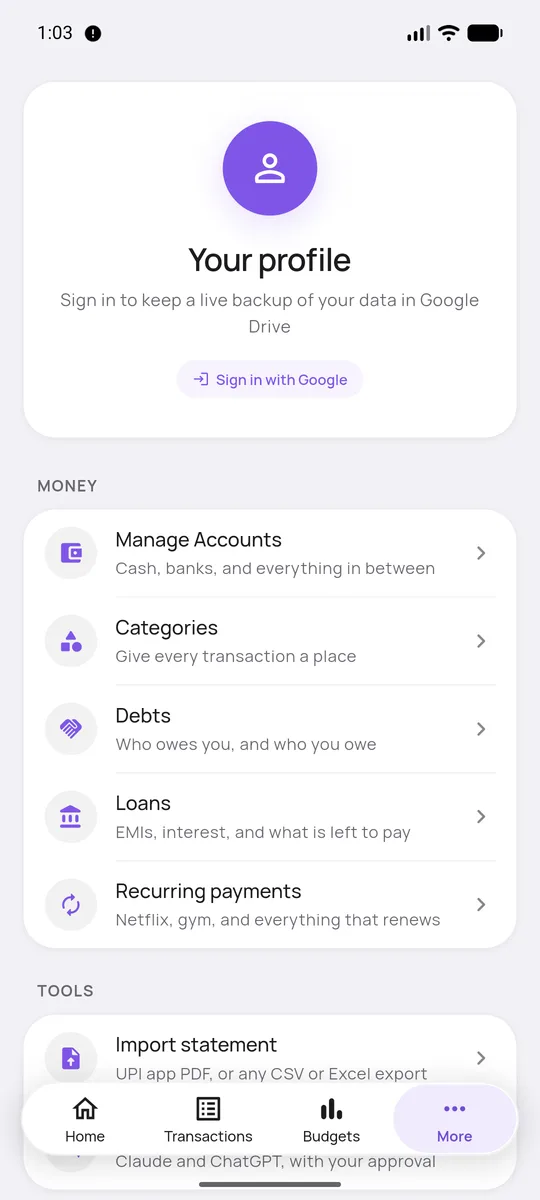
Everything you set up lives under More
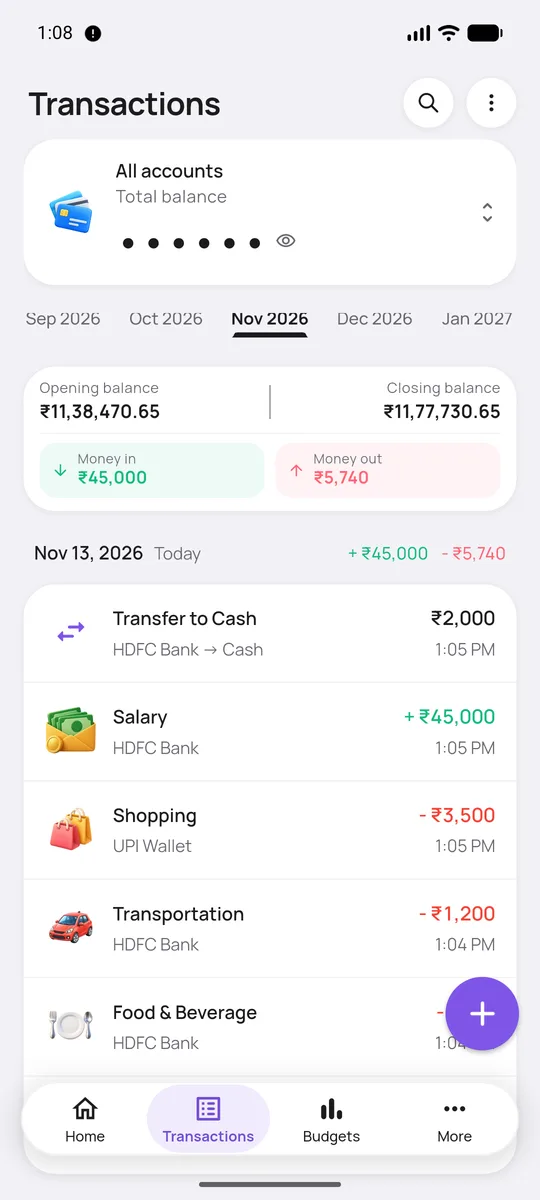
Transfers sit in the list but stay out of “Money out”

For example

You spend ₹500 on dinner from HDFC Bank and ₹200 on tea in cash. Food shows ₹700 for the month. HDFC Bank goes down by ₹500 and Cash by ₹200. Later you take ₹5,000 out of an ATM. That is a transfer from the bank to Cash. It only moves money, so it is never counted as spending.

That is the whole idea: three kinds of transaction (expense, income and transfer), any number of accounts, and categories that belong to no account.

The four tabs

Home shows how your month is going. Transactions is your statement. Budgets shows your limits. More holds everything else: accounts, categories, debts, loans, recurring payments, import, the AI assistant and settings.

The first time you open the app

Why it’s there

A short welcome sets up the few things the app needs. Every step except the currency is optional, and you can change all of it later.

What you see
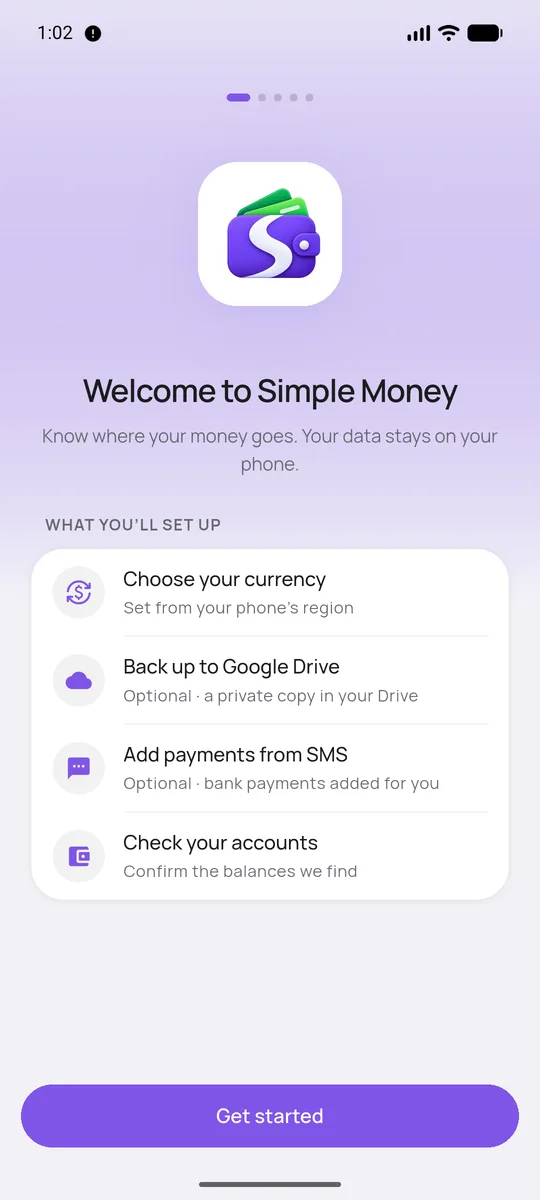
The welcome screen lists what you’ll set up. Tap Get started.
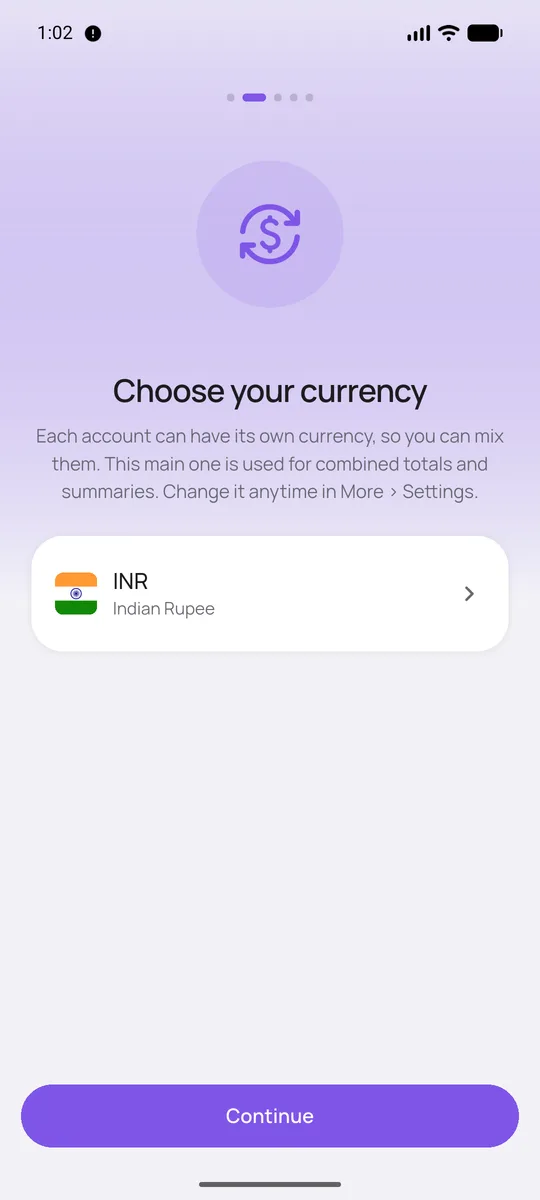
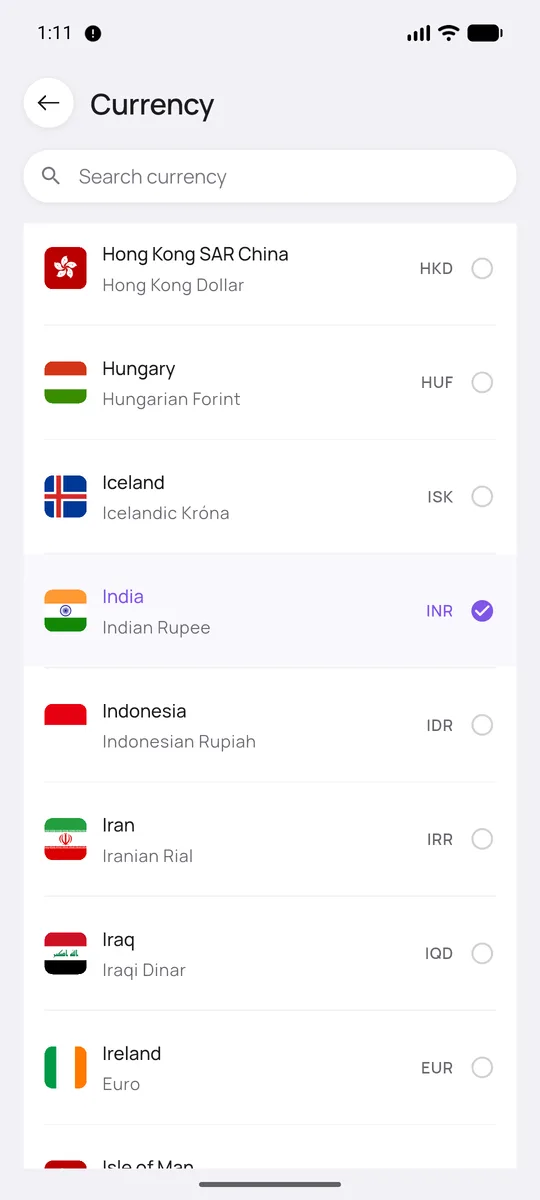
Choose your currency. It is picked from your phone’s region. This is the main currency used for combined totals.
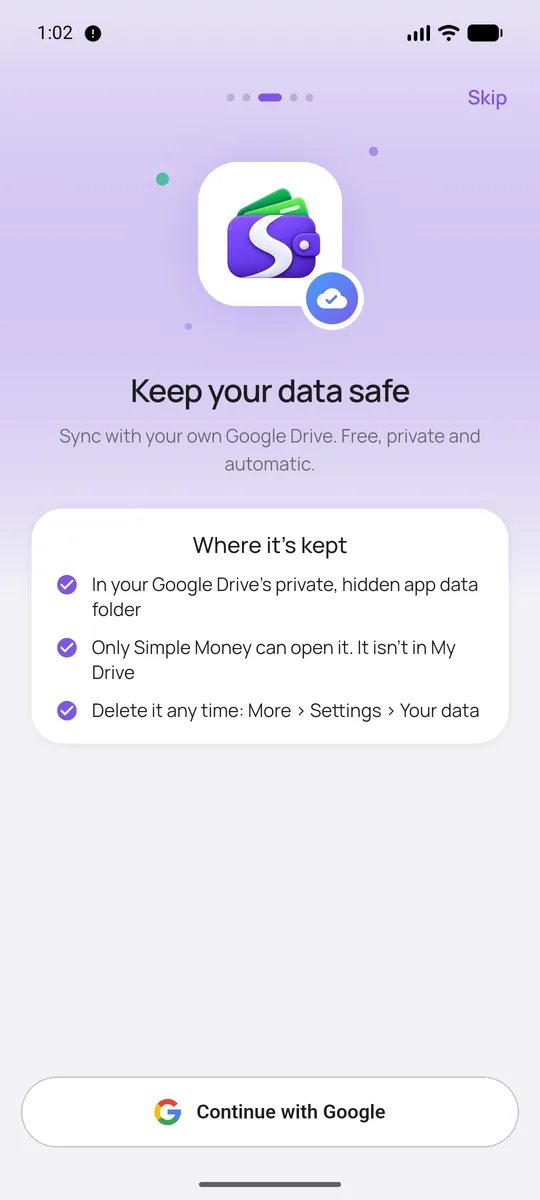
Keep your data safe. Sign in with Google to back up to your own Drive, or tap Skip.
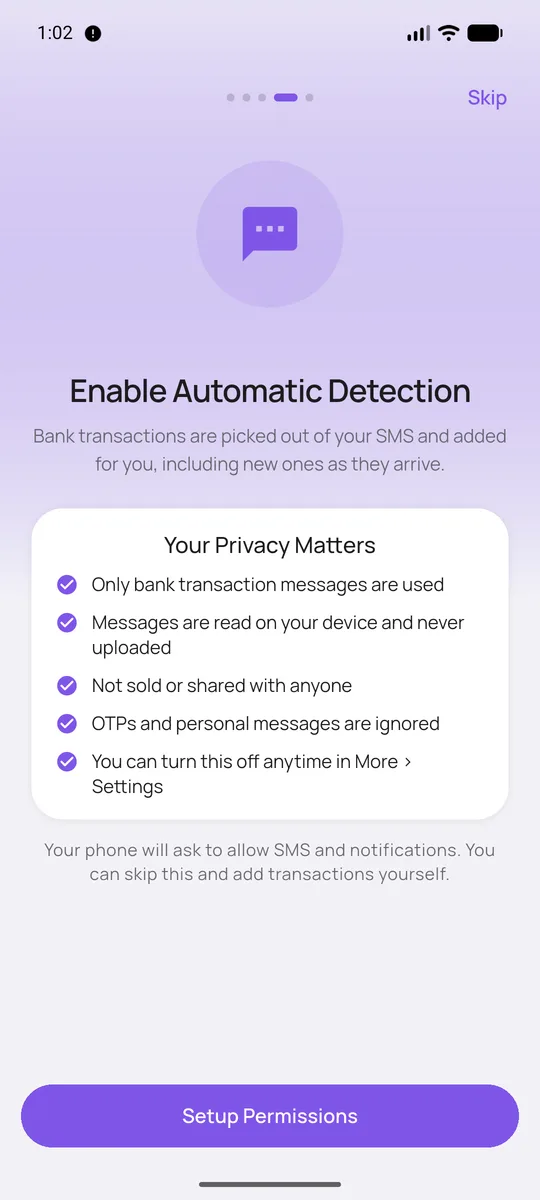
Enable Automatic Detection. Allow SMS and notifications so bank payments are added for you, or tap Skip and add them yourself.

If you allow SMS, the app reads your bank messages, finds your accounts and fills in the balances it can. It then asks you to check each balance. Banks don’t always send the latest balance, so a quick check is worth it.

Everything works without signing in and without the internet. You can turn any of these on later in More → Settings.

Add your first account

Why it’s there

An account is anywhere money sits: cash in your wallet, a bank account, a credit card, a UPI wallet. Giving each one its real balance lets the app tell you how much you actually have.

For example

You keep cash at home, a salary account and a wallet app. Add all three with today’s balances, and the total matches what you really own.

How to
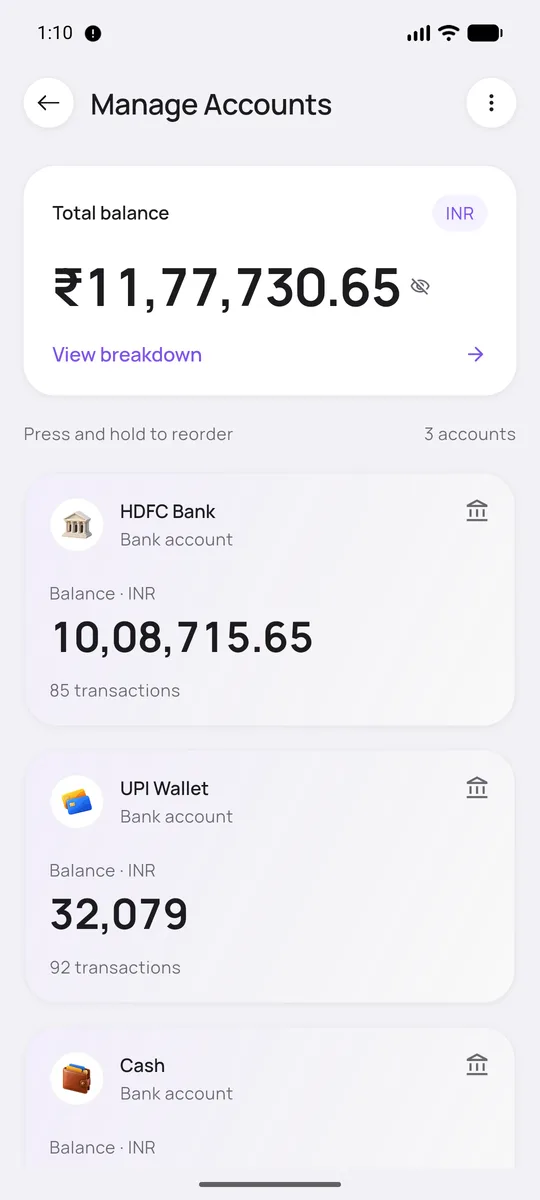
Open More → Manage Accounts. You see the combined balance and every account. Press and hold an account to drag it into a new order.
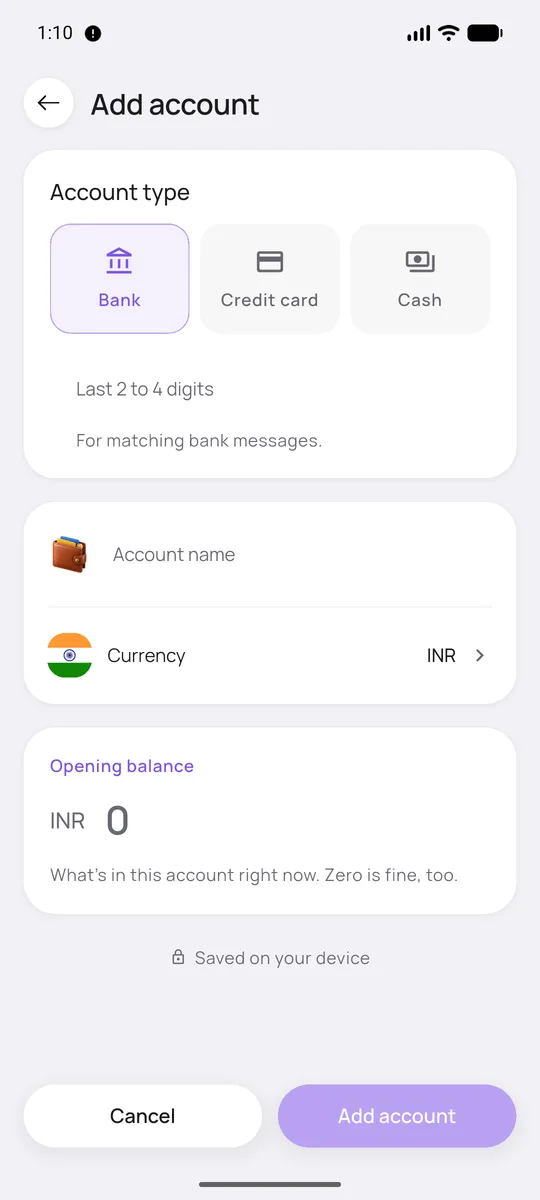
Tap Add account. Choose Bank, Credit card or Cash, type a name, and enter what’s in it right now. Zero is fine.
Tap Currency if it isn’t your usual one. The list works offline and you can search it.

More than one currency

Each account has its own currency. You can keep a rupee account, a dollar account and a riyal account side by side, and each one shows its balance in its own currency. Choose the currency when you add the account.

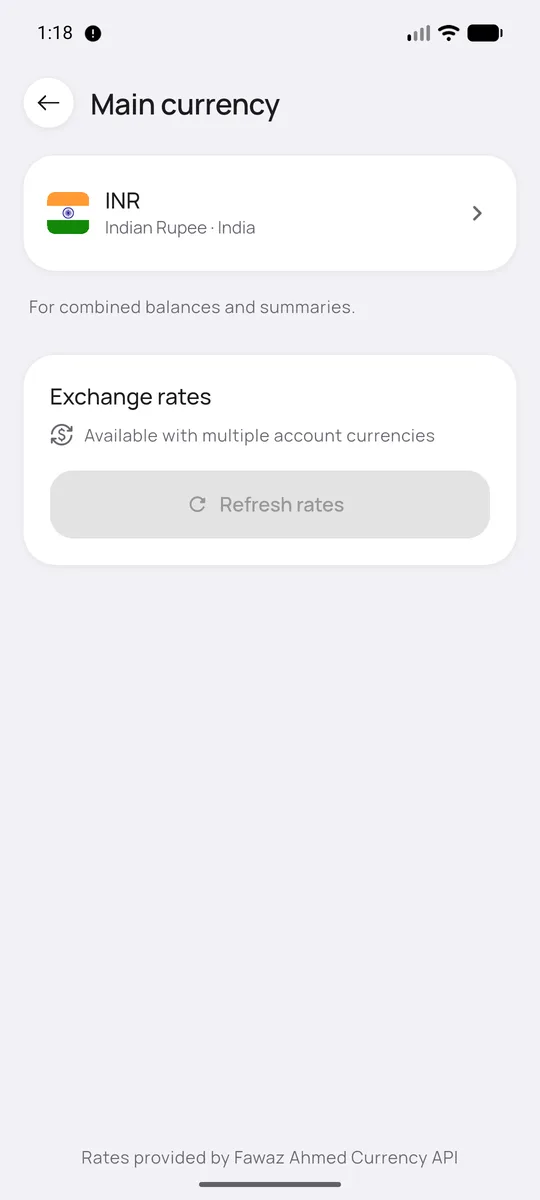
Your main currency is used for combined totals, which are shown with a ≈ sign as an estimate. You can change it in More → Settings → Main currency. Exchange rates are only downloaded once you have accounts in two or more currencies. See Use more than one currency for the full story.

For a bank or card, you can add the last 2 to 4 digits of the account number. The app uses them to match bank SMS to the right account.

Closing an account later? Open it and archive it. It disappears from pickers and totals, but its old transactions stay readable. Archived accounts are under the ⋮ menu on the accounts page.

Record an expense or income

Why it’s there

If logging a coffee takes a minute, nobody keeps doing it. Each step asks one question and moves on, so a normal expense takes a few seconds.

For example

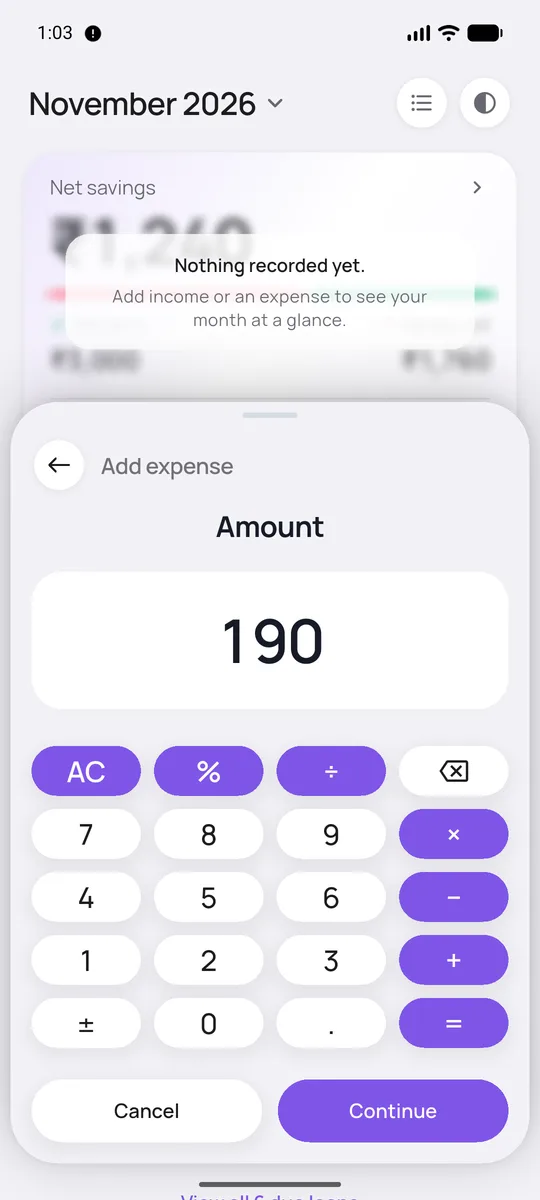
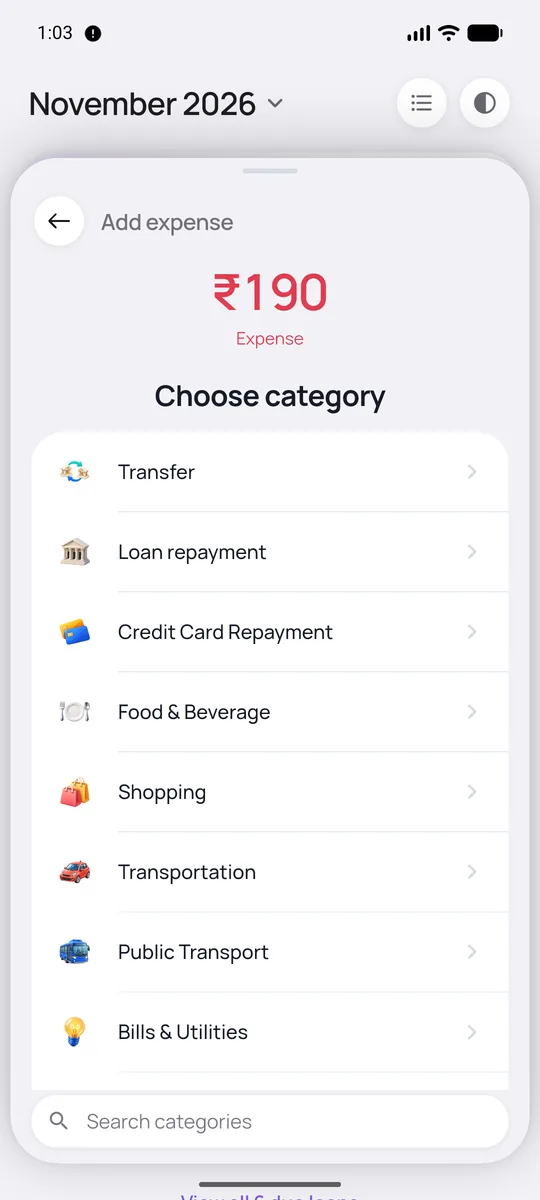
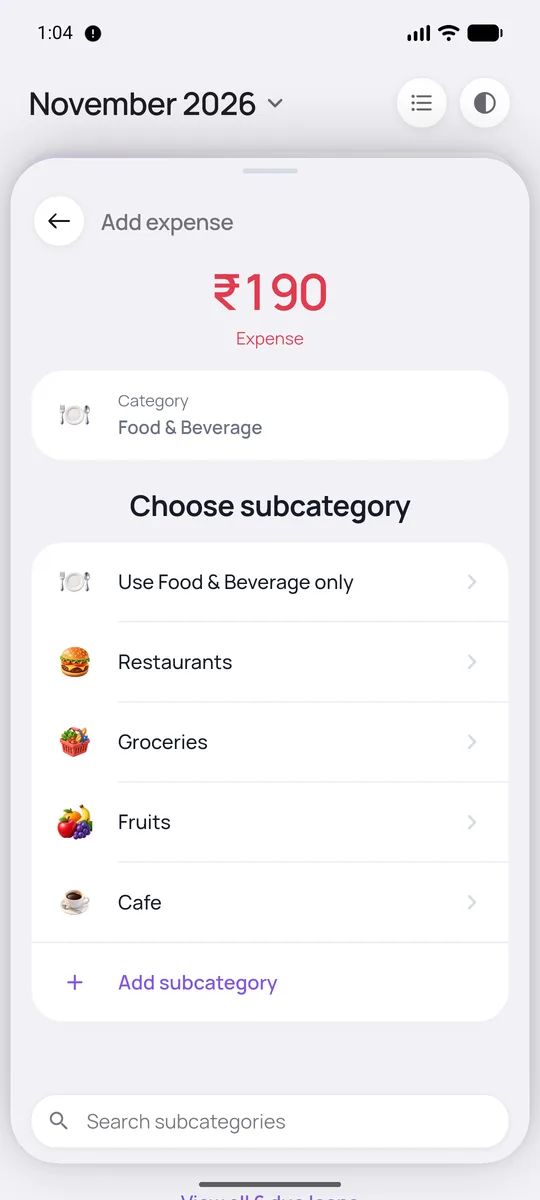
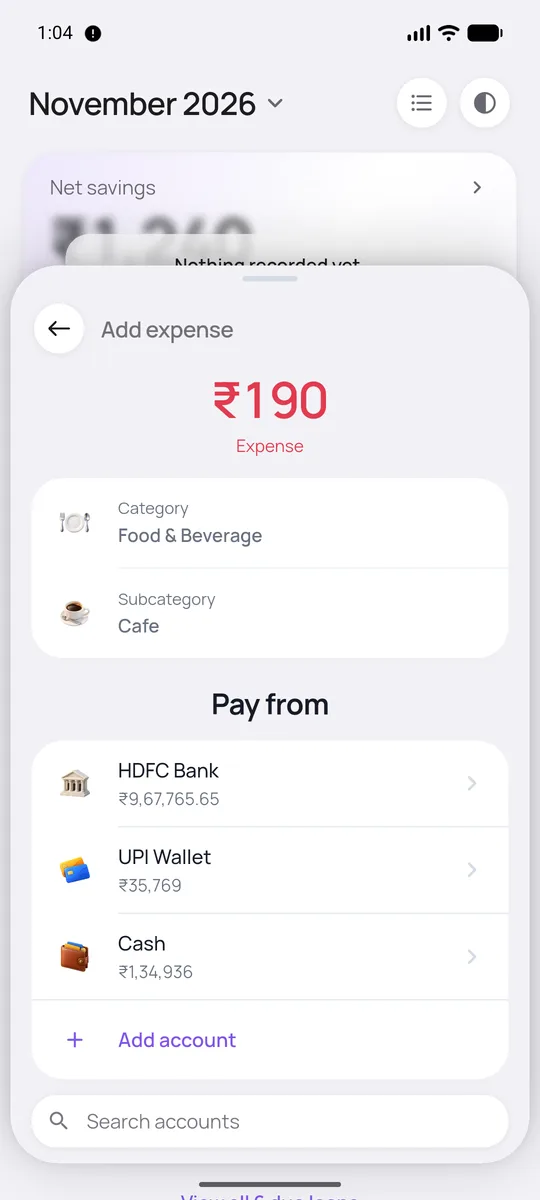
You pay ₹190 for a filter coffee from your UPI wallet. Tap +, type 190, choose Food & Beverage, then Cafe, then UPI Wallet, and save.

How to
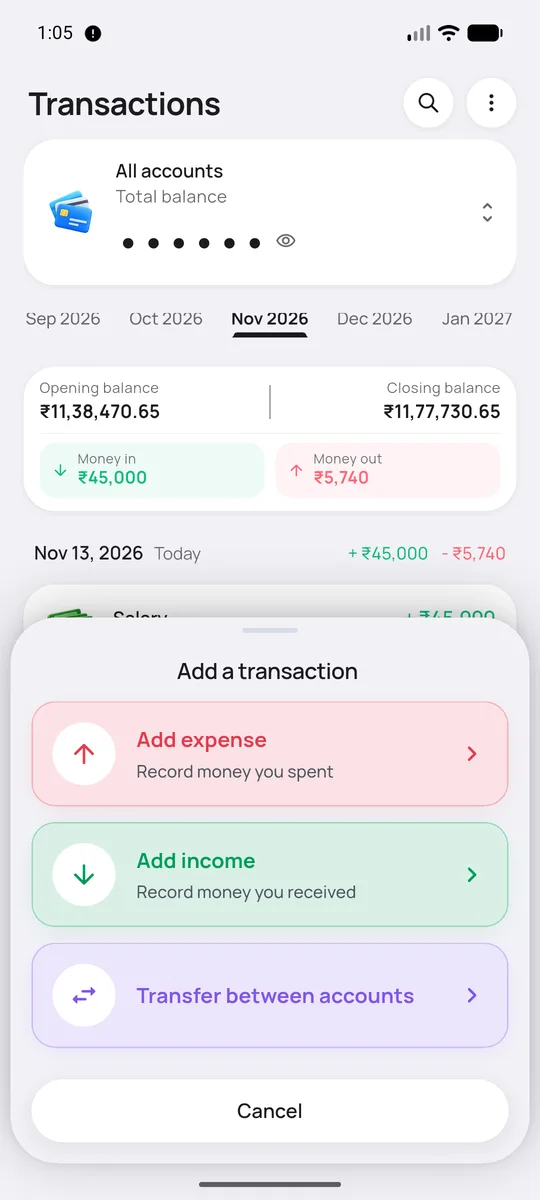
Tap the purple + and choose Add expense.
Type the amount. The keypad can also add, subtract, multiply and divide. Tap Continue.
Pick a category. There is a search box at the bottom if the list is long.
Pick a subcategory, or “Use … only” to keep it general. You can also add a new subcategory here.
Choose the account you paid from.
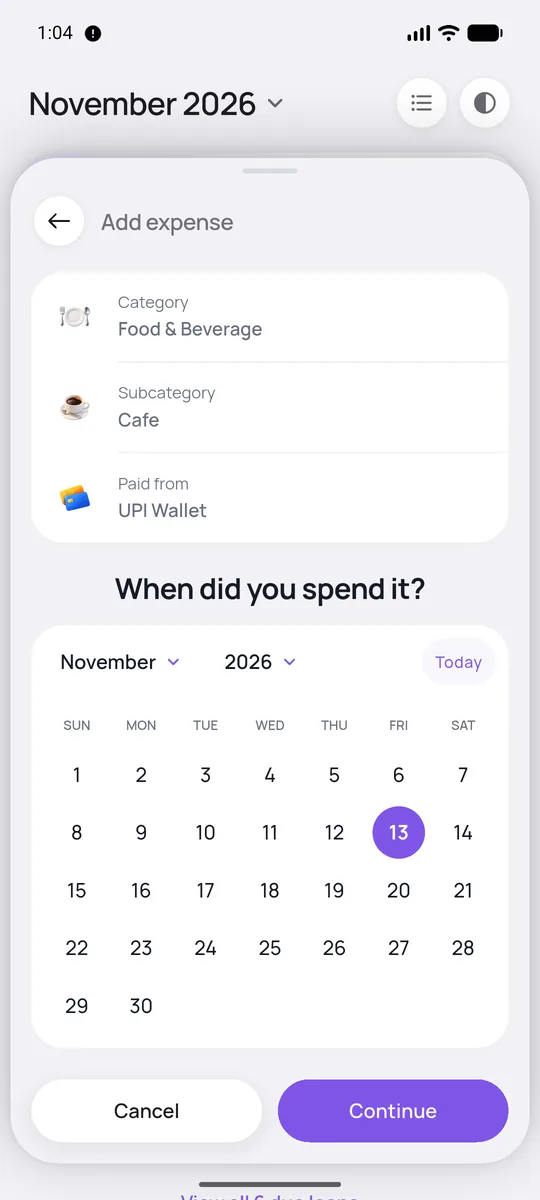
Today is already selected. Pick another day if you’re catching up.
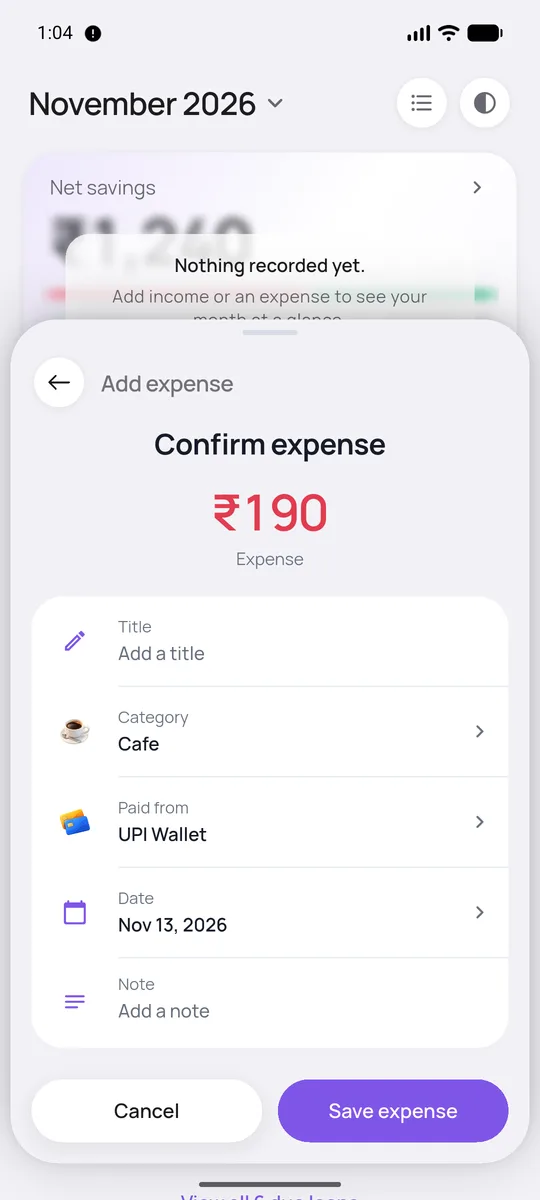
Check it over. Add a title or note if you like, then tap Save expense. Balances, budgets and charts update straight away.

Income

Add income works the same way. Instead of a category you choose a source (Salary, Business, Gifts and so on) and the account the money went into.
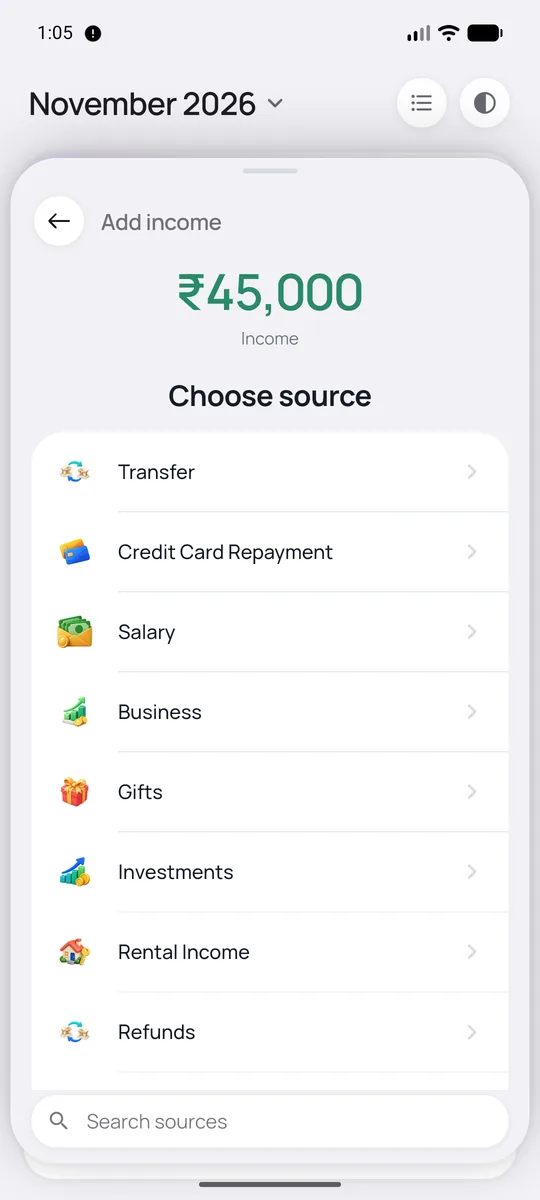
Choosing where the income came from

Tap any transaction later to edit or delete it. Deleting reverses its effect on the account balance.

Everyday

Move money between accounts

Why it’s there

Withdrawing cash or topping up a wallet doesn’t make you any poorer. Recording it as a transfer keeps both balances right without inflating your spending.

For example

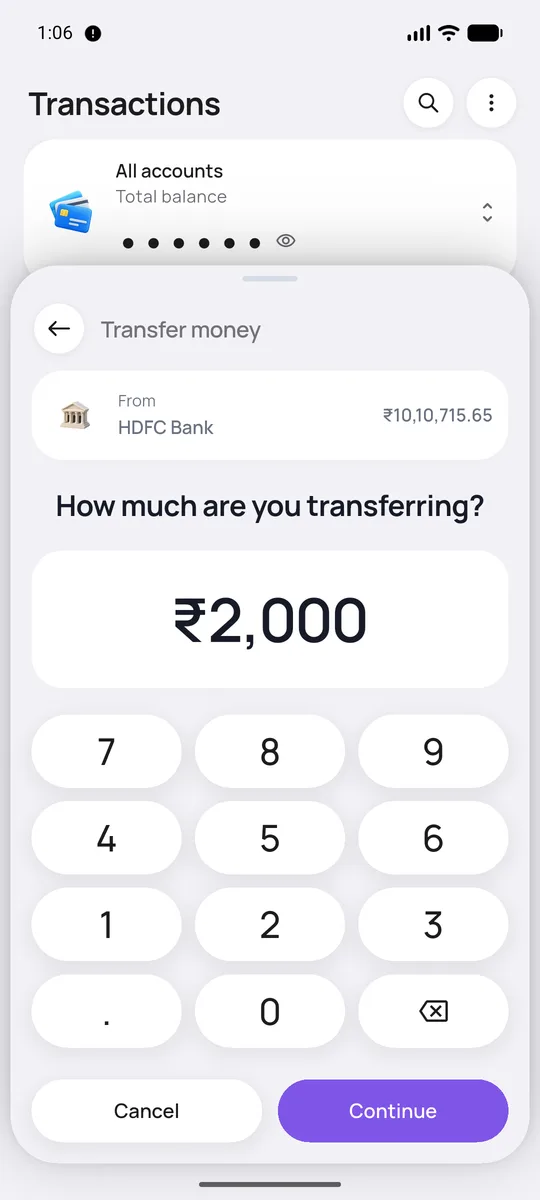
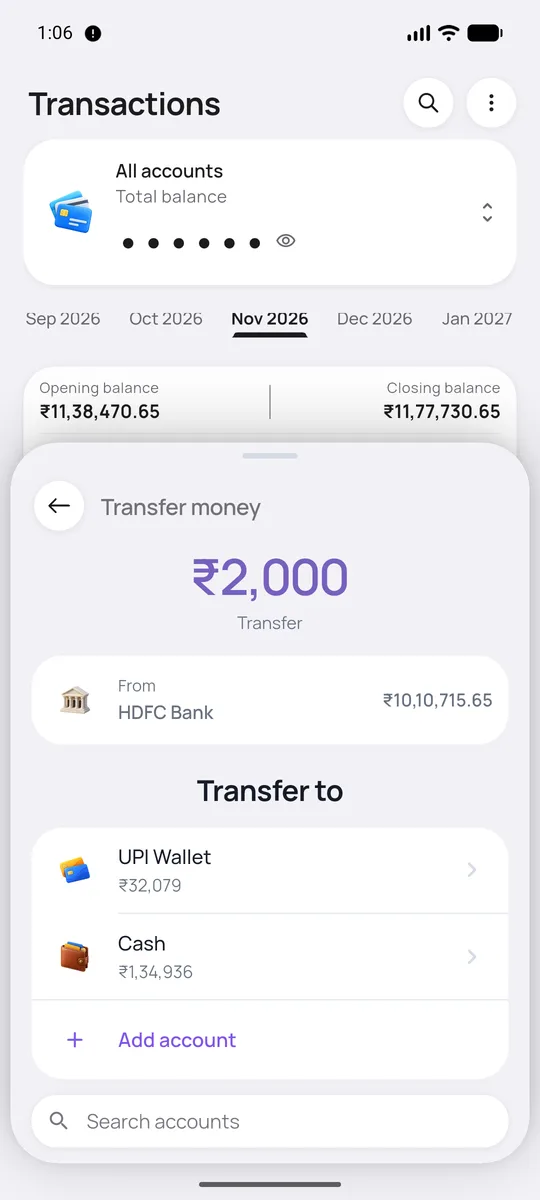
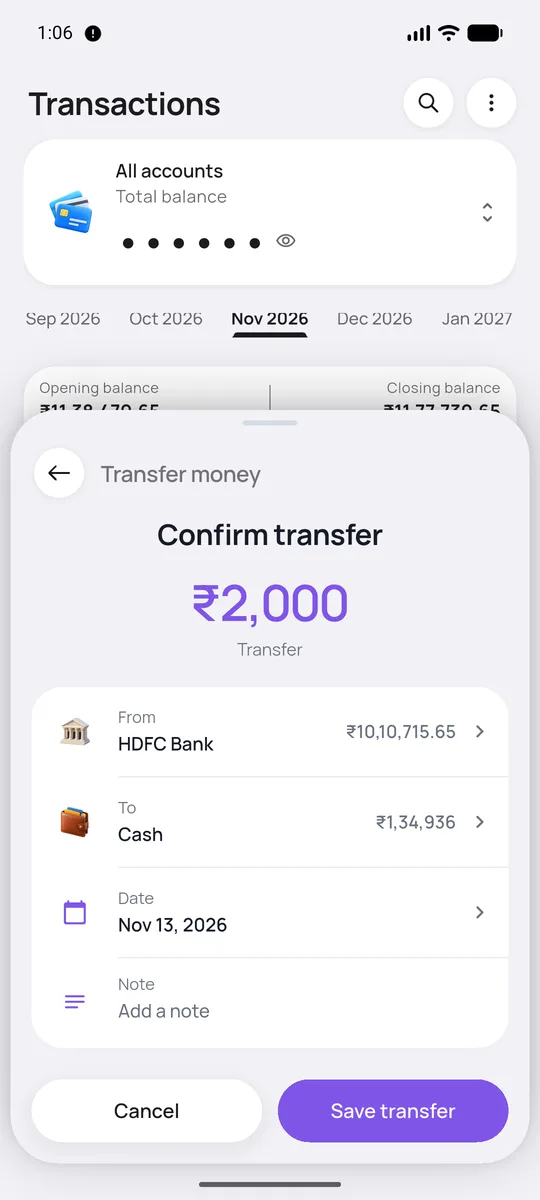
You take ₹2,000 out of an ATM. HDFC Bank drops by ₹2,000, Cash rises by ₹2,000, and “Money out” for the month does not move.

How to
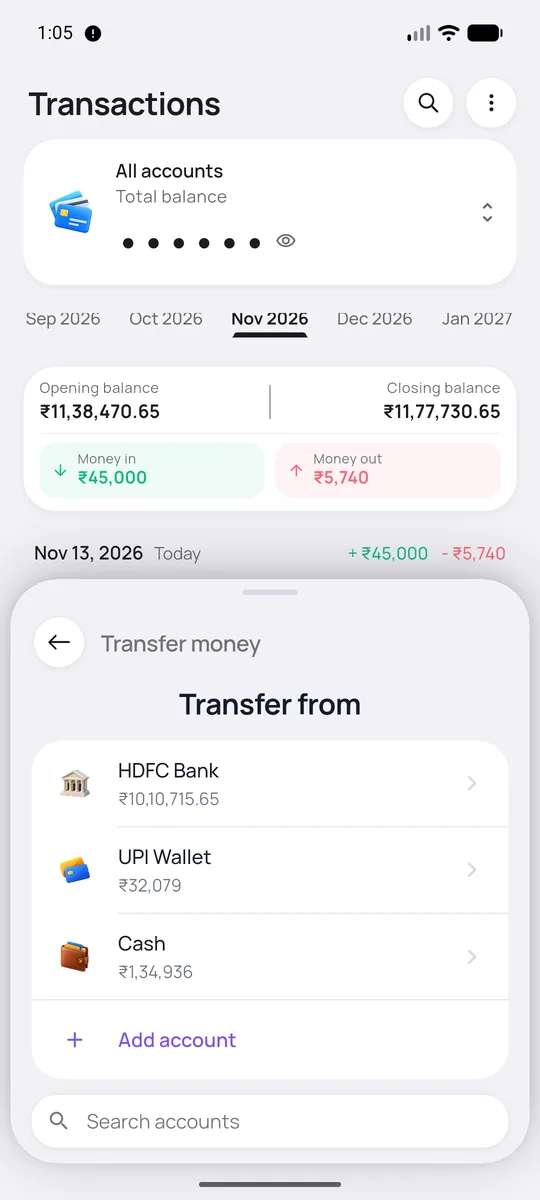
Tap +, then Transfer between accounts. Choose the account the money leaves.
Enter how much.
Enter how much.
Choose where it goes, then confirm the date.
Review and tap Save transfer.

If the two accounts use different currencies, you are also asked how much actually arrived. The latest exchange rate is filled in as a starting point.

Shape your categories

Why it’s there

A sensible set of categories is ready on day one, but everyone’s life is different. You can rename, add, nest and re-icon them until the reports read the way you think.

For example

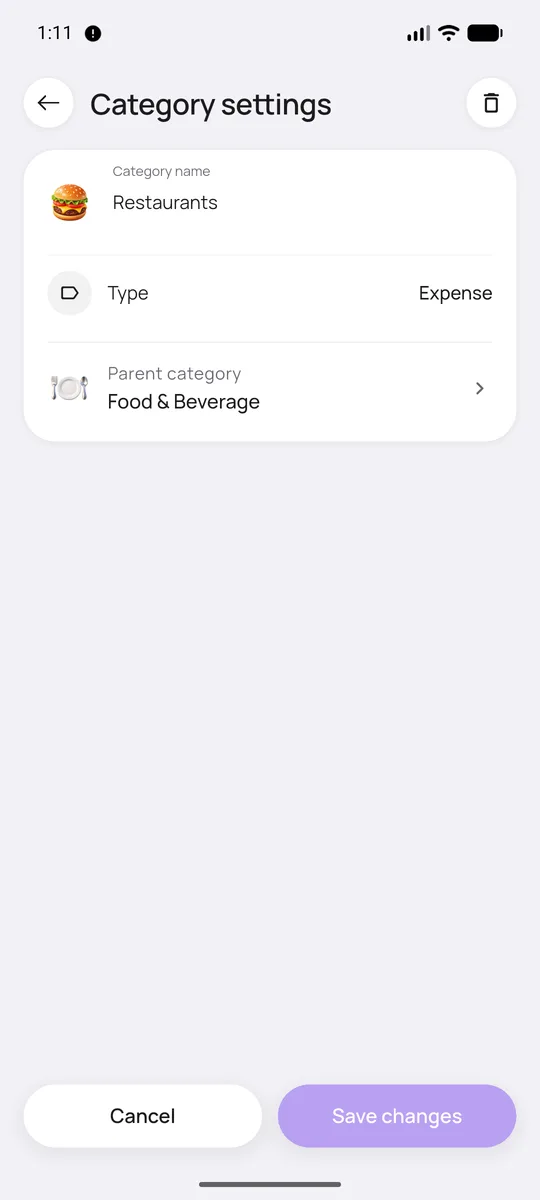
You want coffee separated from groceries. “Cafe” sits under Food & Beverage, so it still counts toward your food total while showing on its own line.

How to
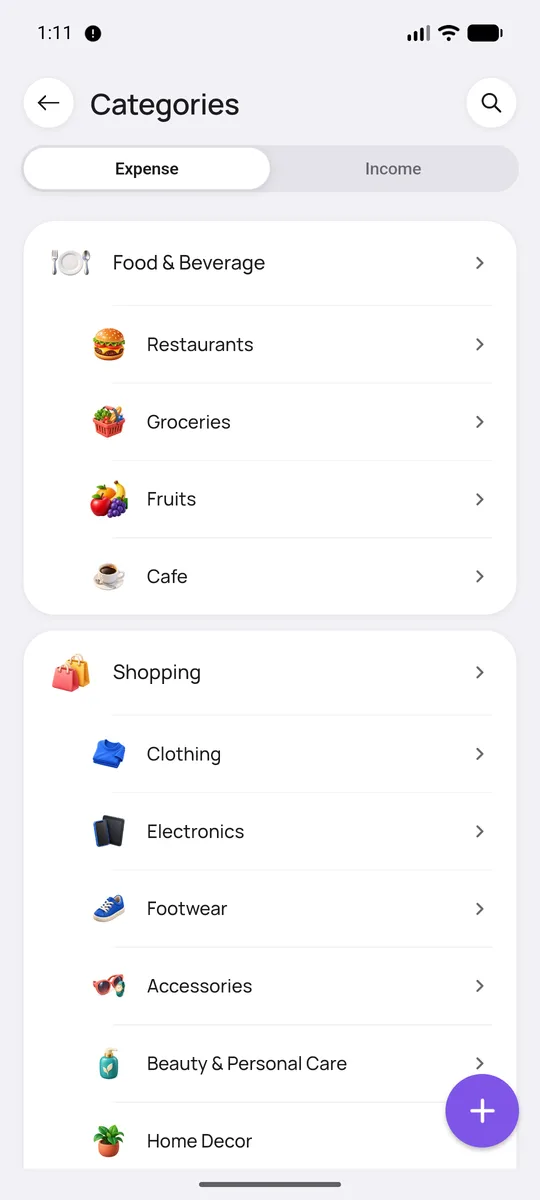
Open More → Categories. Expense and income have separate tabs. Use the magnifier to search.
Tap a category to rename it, or to move it under a parent. Tap + on the list to add a new one.
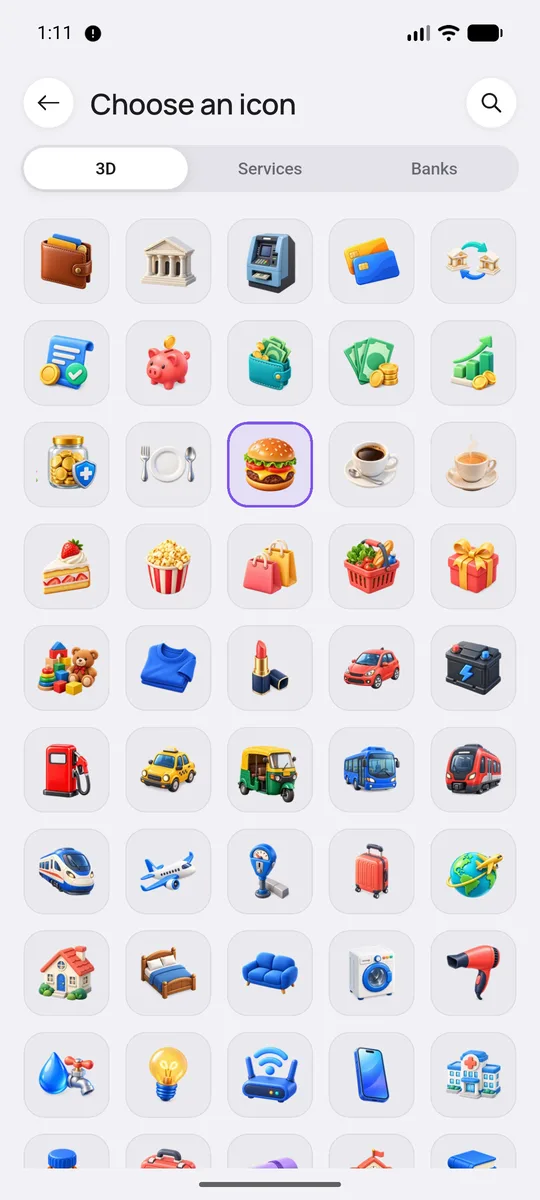
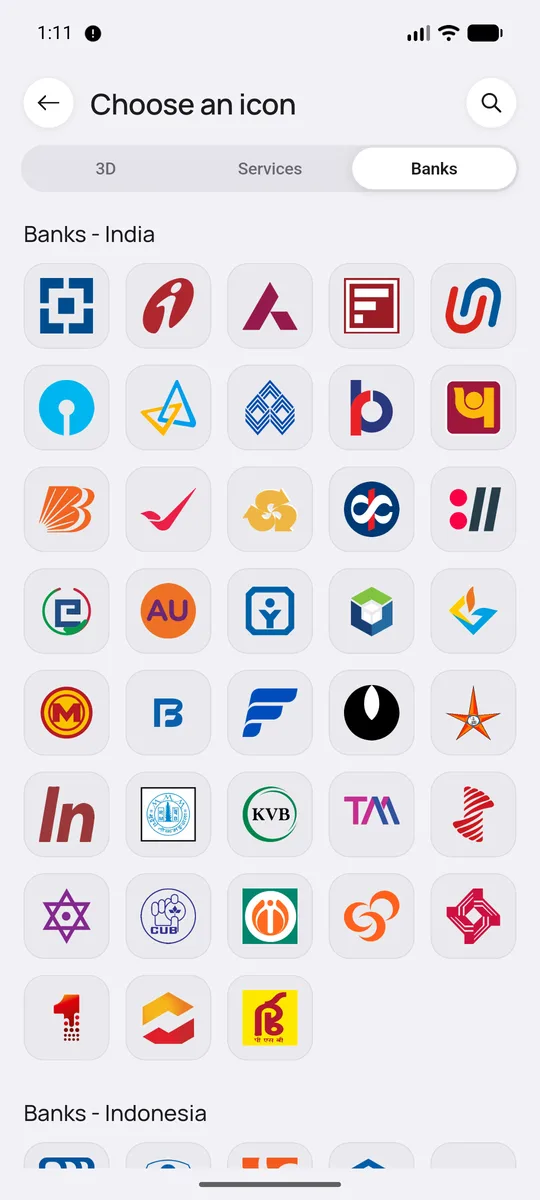
Tap the icon to choose another. The 3D tab has everyday icons, and you can search them.
The Services and Banks tabs have real brand and bank logos from many countries. Tap the magnifier at the top to search for an icon by name.
Find and filter transactions

Why it’s there

The Transactions tab is your statement. Month tabs answer “what happened in August?”, and the opening and closing balance let you check the app against your bank.

For example

Your card bill looks high. Pick that account, scroll the month, and the duplicate charge is easy to spot.

How to
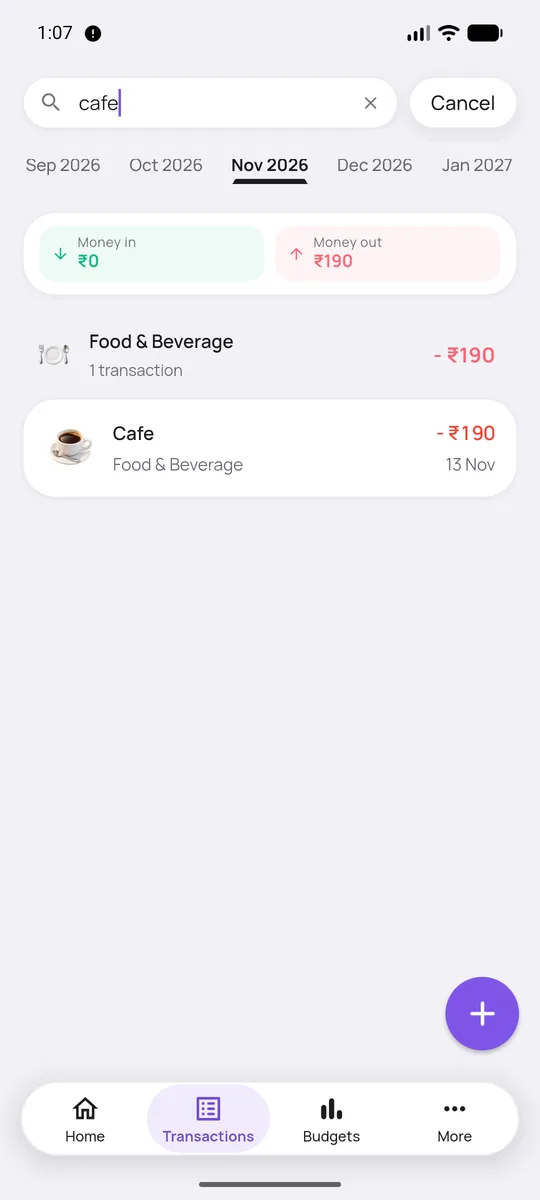
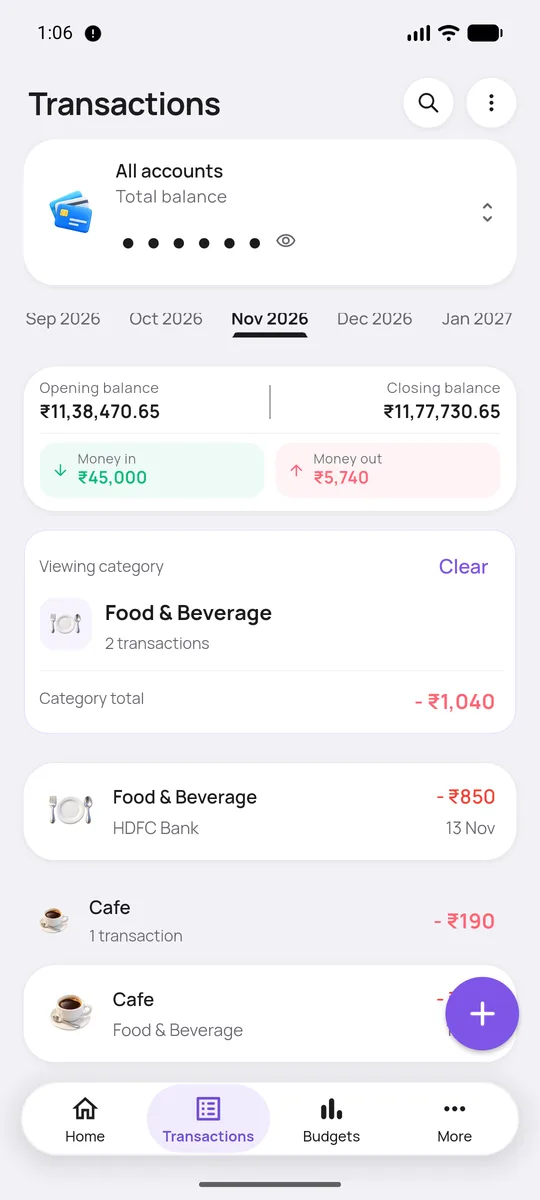
Swipe the month tabs. The cards show opening balance, closing balance, money in and money out. Tap the eye to show or hide your balance.
Tap the magnifier and type. Results stay grouped by day.
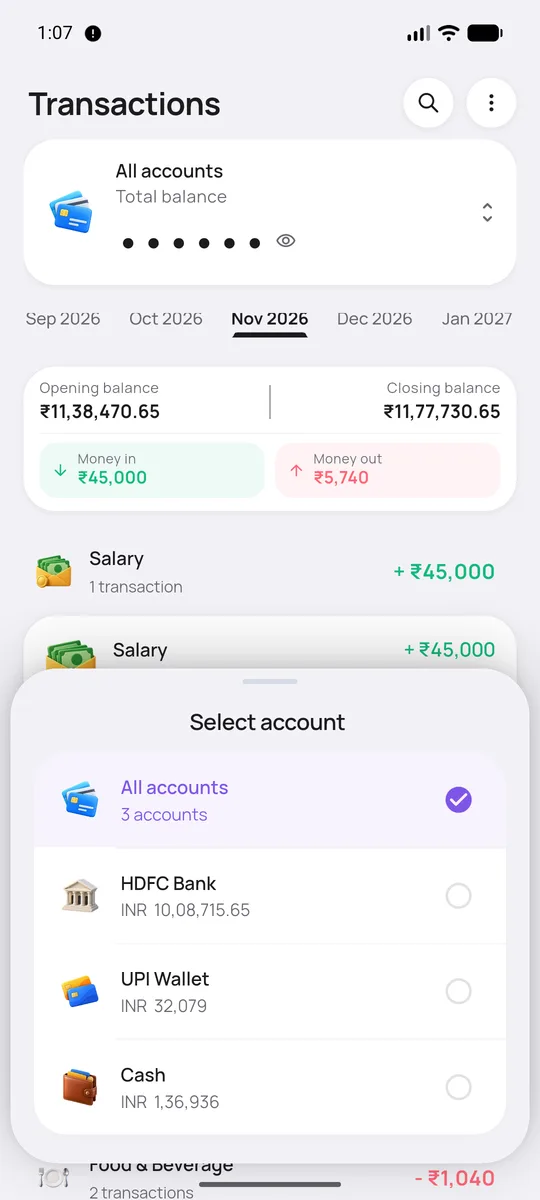
Tap the account card at the top to look at one account or all of them.
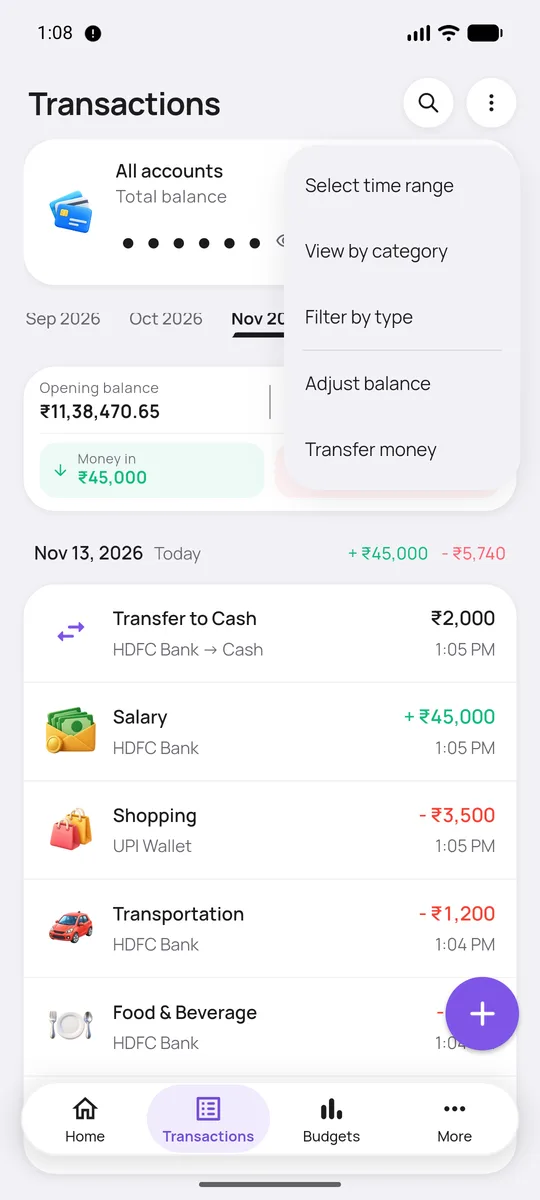
The ⋮ menu has Select time range, View by category, Filter by type, Adjust balance and Transfer money.
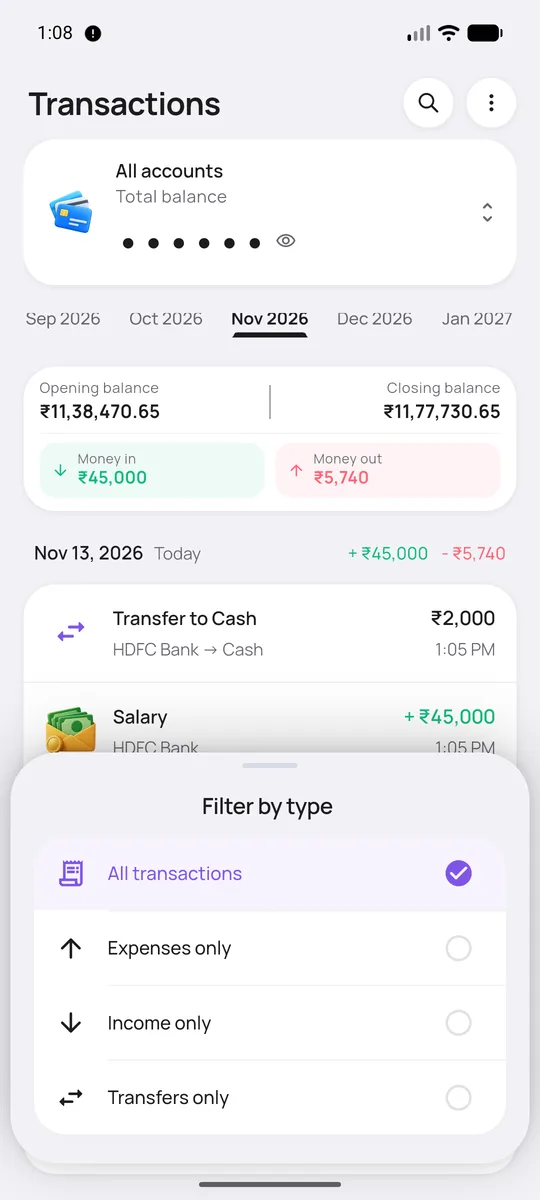
Filter by type shows only expenses, income or transfers.
View by category totals each category and breaks it down by subcategory. Once it is on, the menu offers View by transaction to go back.

Select time range lets you look at a quarter, a custom range or all time.

Fix a balance that’s drifted

Why it’s there

Sometimes the app and your bank disagree and you don’t want to hunt for the missing entry. Adjust balance corrects the number directly, without inventing a fake transaction.

For example

Your wallet shows ₹1,340 in the app but there’s ₹1,300 in it. Set the balance to 1,300 and move on.

How to
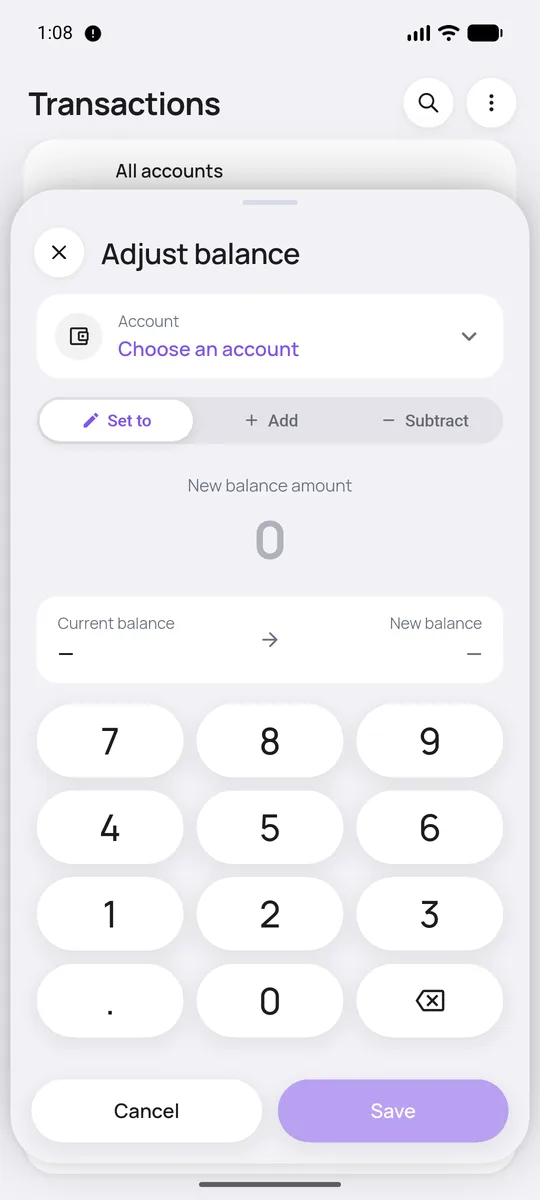
On Transactions, open the ⋮ menu and choose Adjust balance. Pick the account, then choose Set to, Add or Subtract and type the amount. You see the current and new balance before you save.
Set a monthly budget

Why it’s there

Knowing you spent ₹3,900 on food is trivia. Knowing you have ₹1,100 left for the next 22 days is a decision. Budgets are part of the app, not a paid extra.

For example

You give Food & Beverage ₹5,000 a month. Nine days in, the app tells you if you are spending faster than usual and shows what is safe to spend each day.

How to
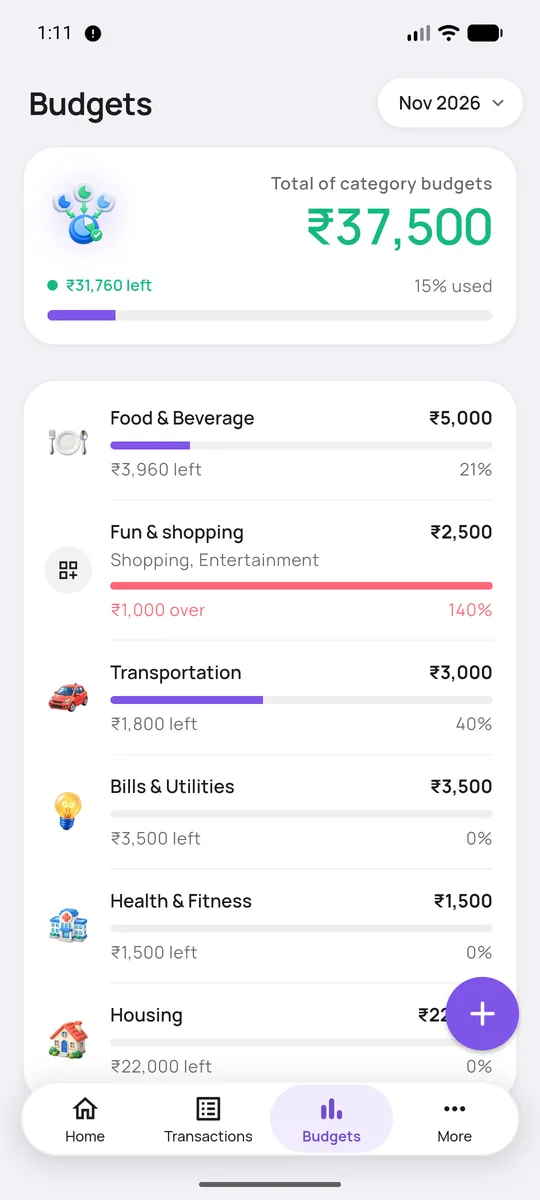
Open the Budgets tab. You see the total, then each budget with how much is left. Tap + to add one.
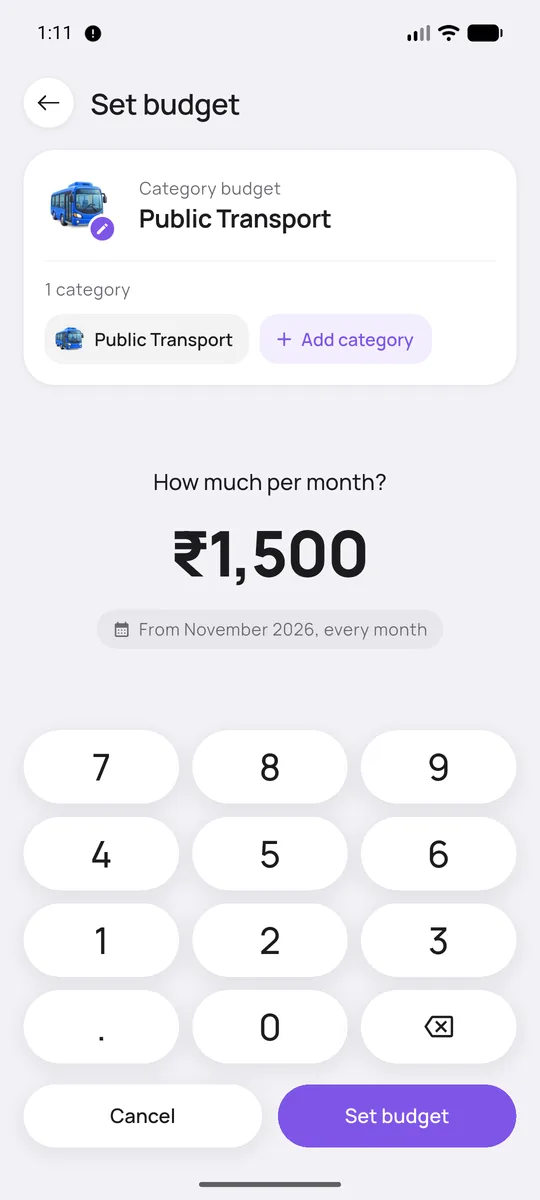
Choose a category, then enter the monthly amount. It repeats every month from now on. Tap Add category to put several categories under one limit.
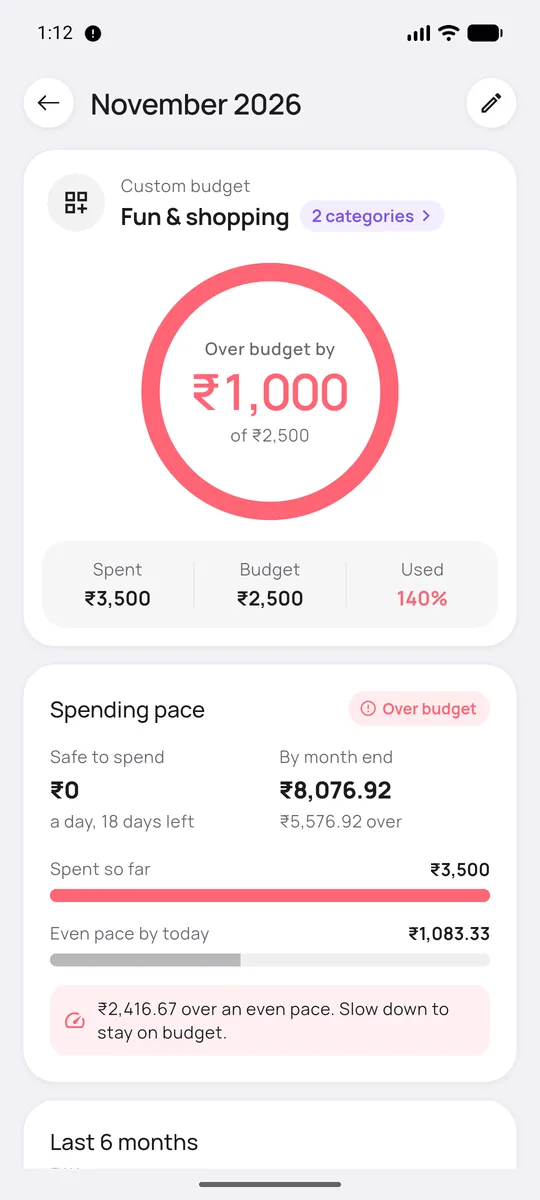
Tap a budget to see spent, budget and percent used. Here a budget is over by ₹1,000.
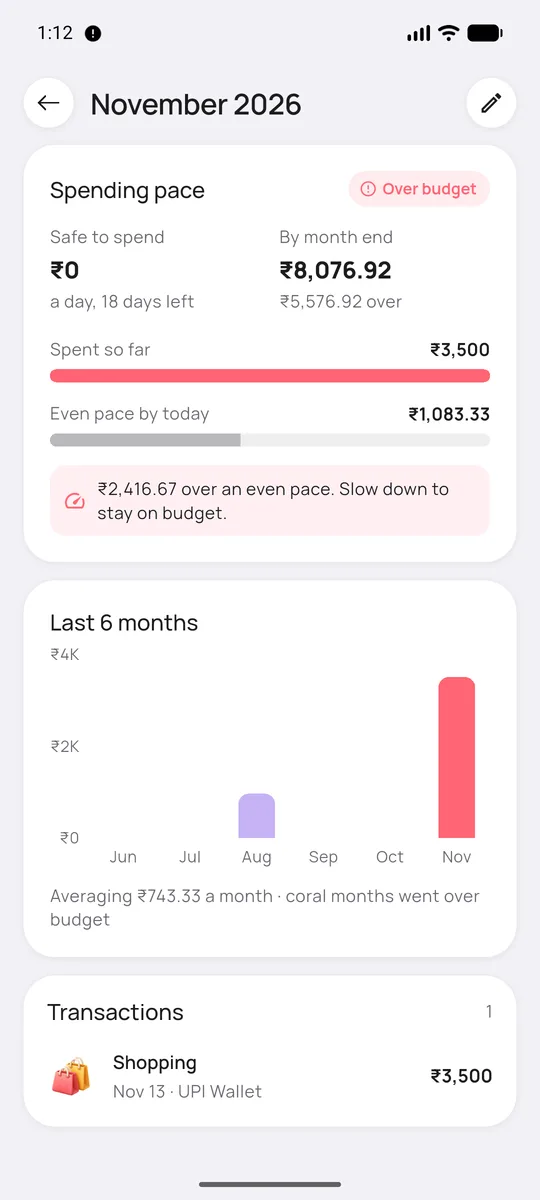
Scroll down for your spending pace, a safe amount to spend per day, and the last six months.

Transfers never count against a budget. Use the month selector at the top to look back.

The free version allows up to 7 budgets. After that the app offers to show a short ad, or you can go Pro for unlimited budgets.
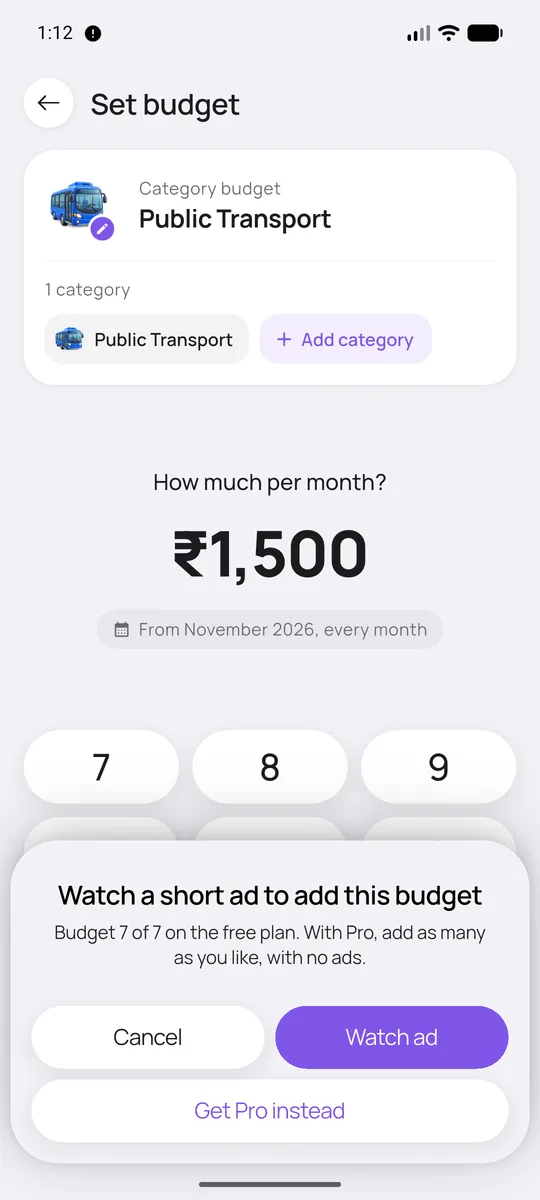
The prompt when you go past 7 budgets on the free plan
Read the Home screen

Why it’s there

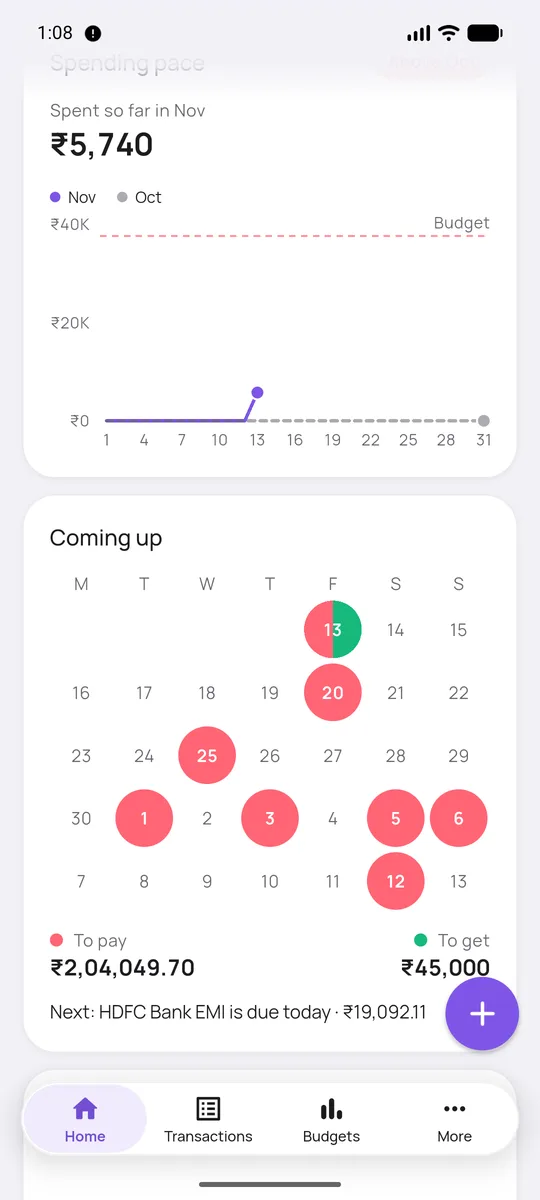
Most days you only want to know one thing: am I okay this month? Home answers that, then shows what is due and where the money went.

For example

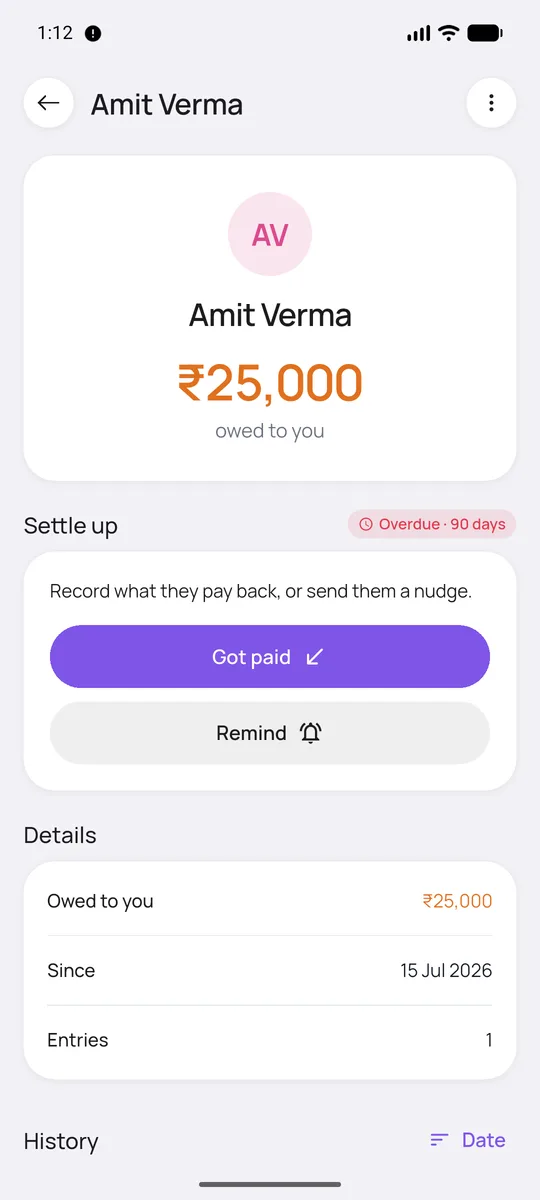
On the 13th you open the app and see that three loan EMIs are overdue, a friend still owes you ₹25,000, and this month’s spending is running above last month.
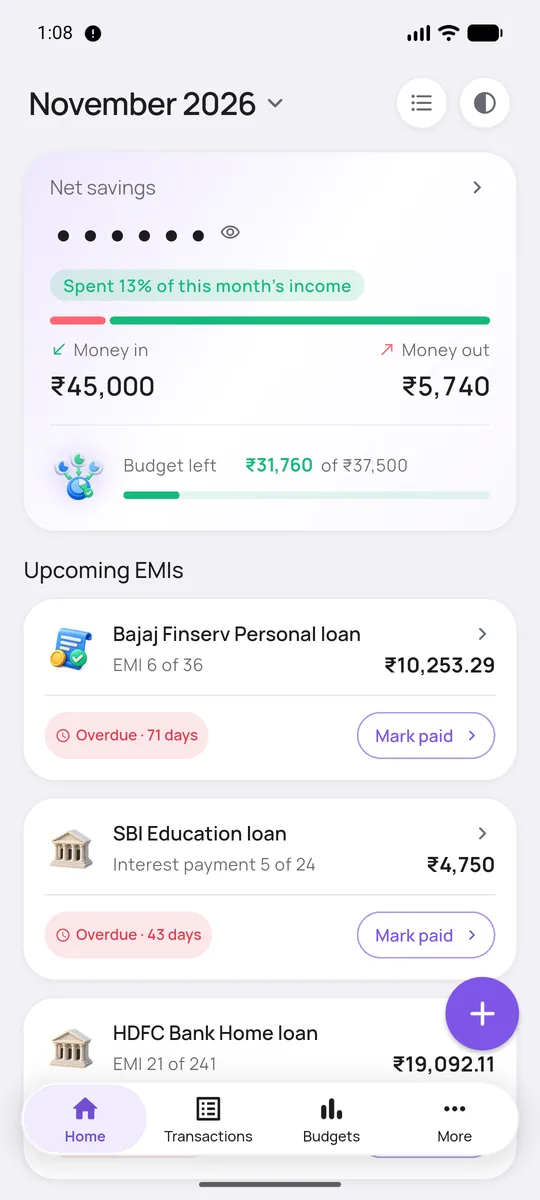
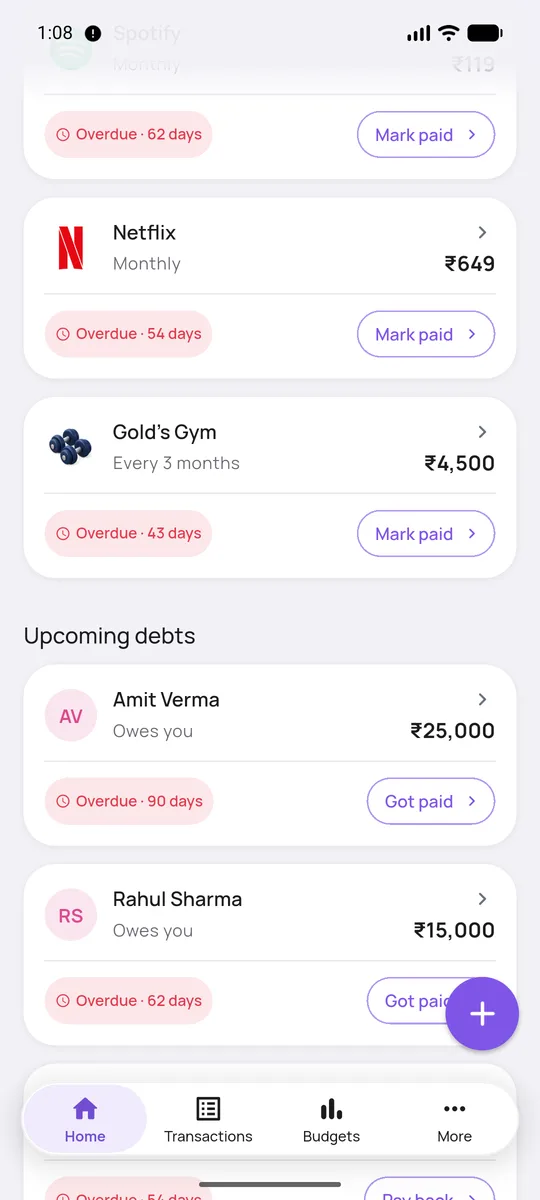
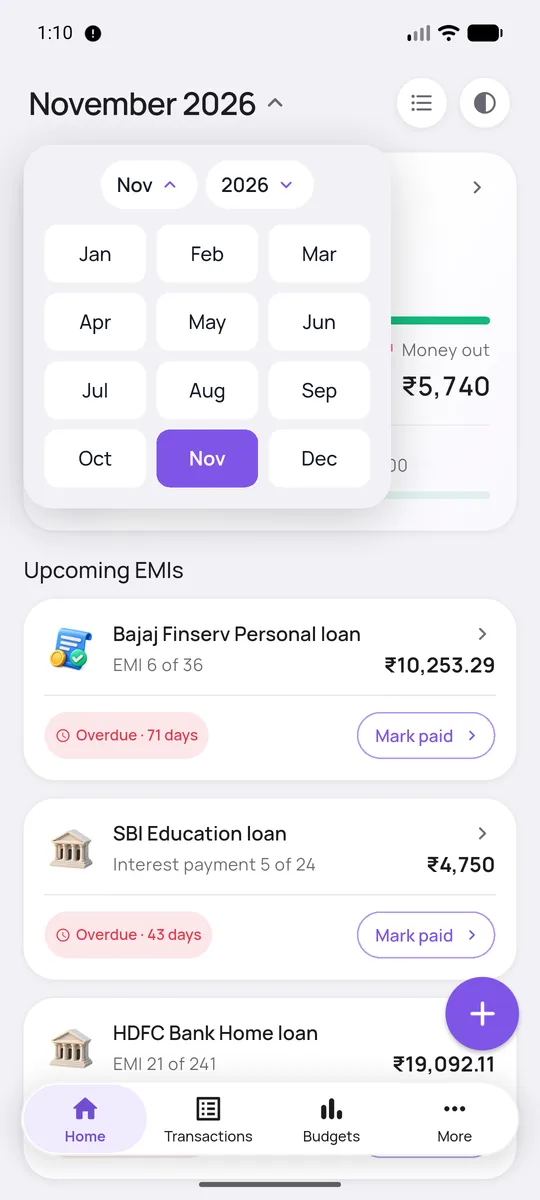
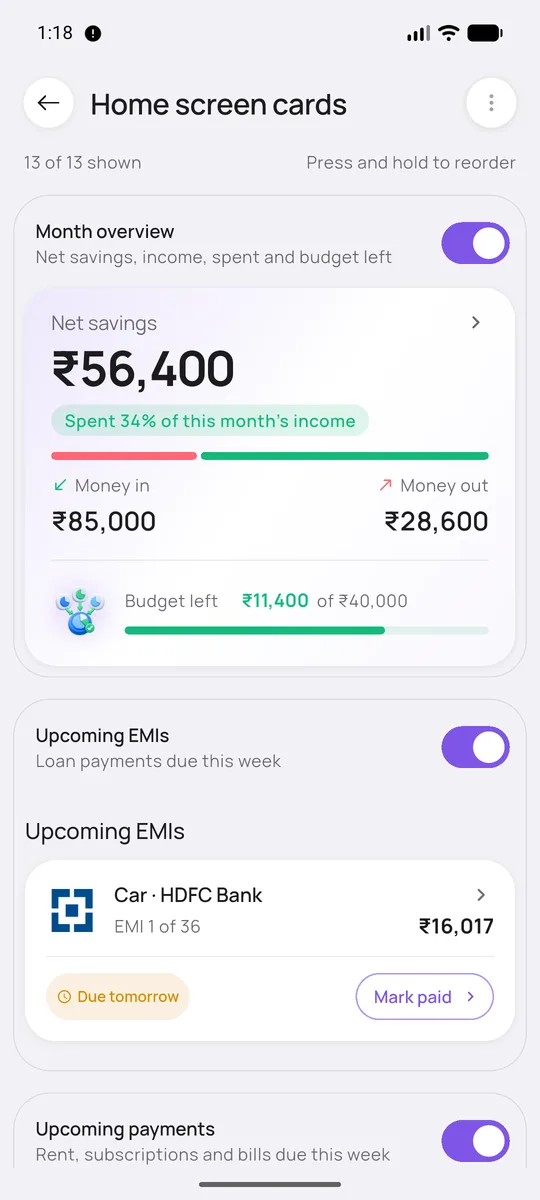
Month overview. Net savings, money in and out, and how much budget is left. Below it, upcoming loan EMIs with a Mark paid button.
What’s due. Upcoming recurring payments and debts people owe you, each with a one-tap action.
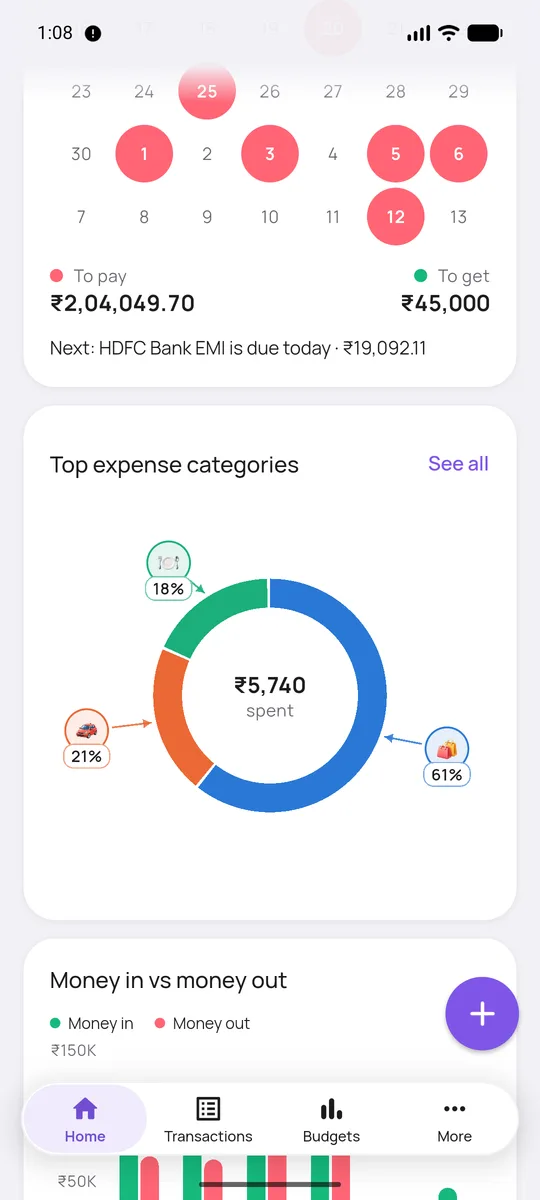
Spending pace compares this month with last month. Coming up is a calendar of what you have to pay and what you are due to get.
Top expense categories on a ring chart. Tap See all for the full list.
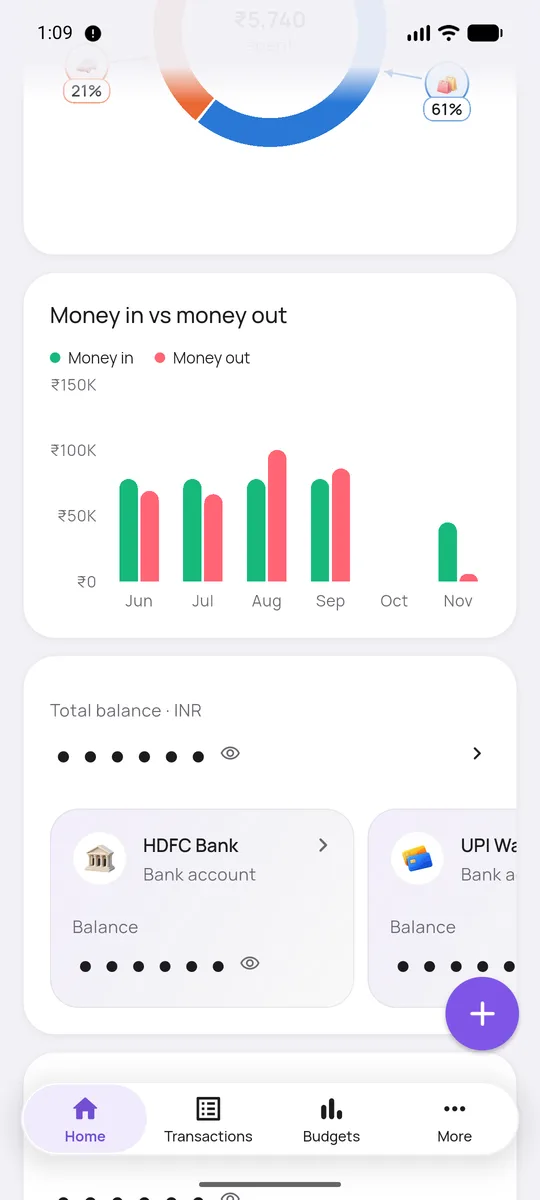
Money in vs money out for the last six months, then your accounts.
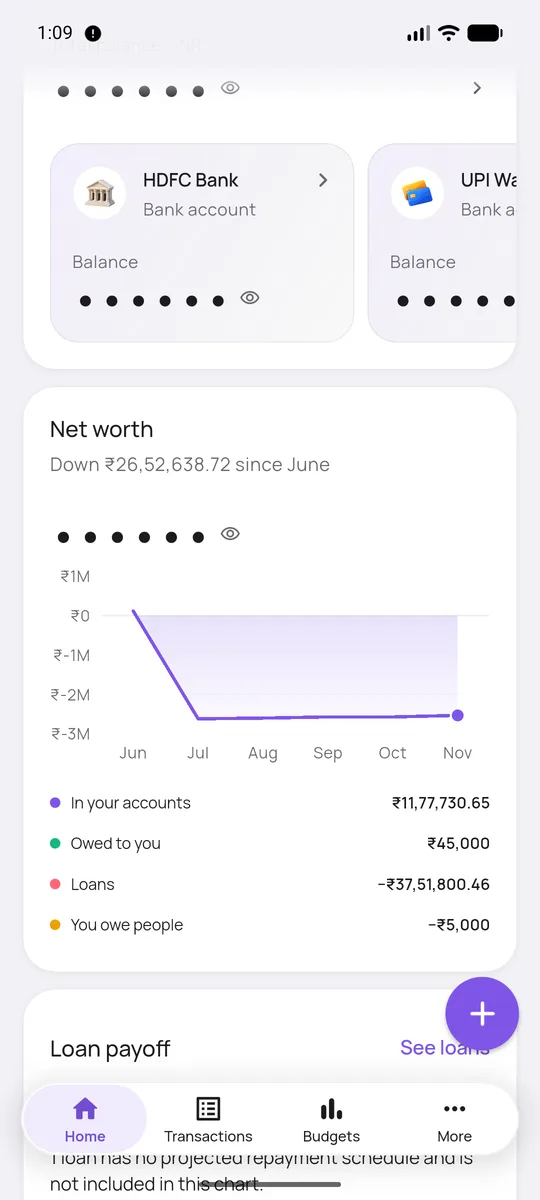
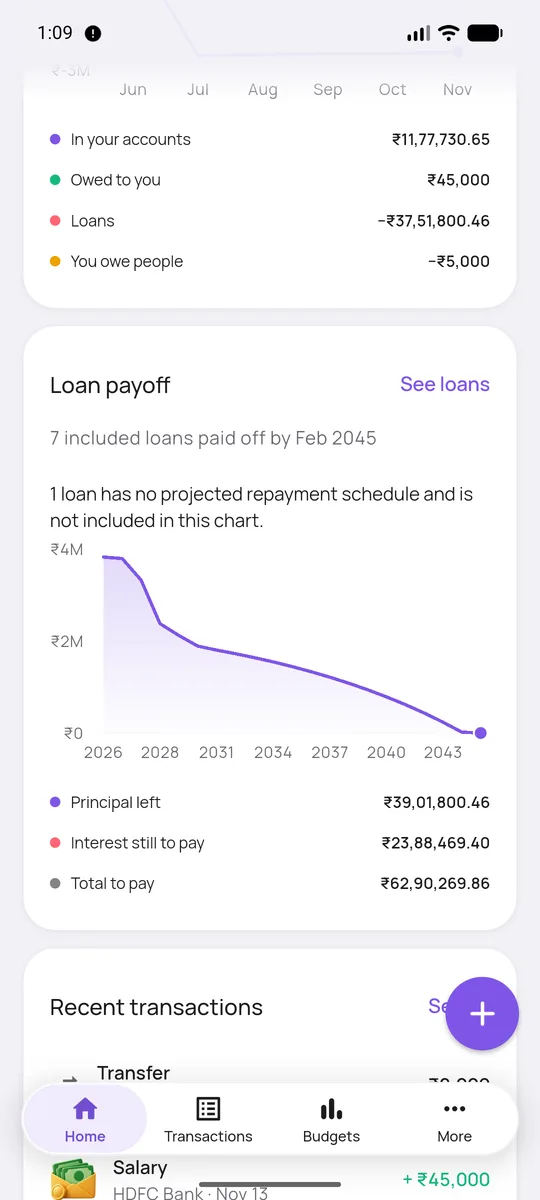
Net worth and how it has changed, with what you own and what you owe.
Loan payoff shows when your loans will be paid off, then your recent transactions.

Make it yours

Tap the month at the top to jump to any other month.
In More → Settings → Home screen cards, press and hold to reorder. Switch off any card you don’t need.

Amounts show as dots until you tap the eye. That is the default, and you can change it in Settings → Security.

Loans, debts & recurring payments

Track a loan and its EMIs

Why it’s there

A loan is more than a monthly debit. You want to know how much principal you have cleared, what the interest is costing, and when it ends. The app handles fixed EMIs, interest-only loans and flexible repayments.

For example

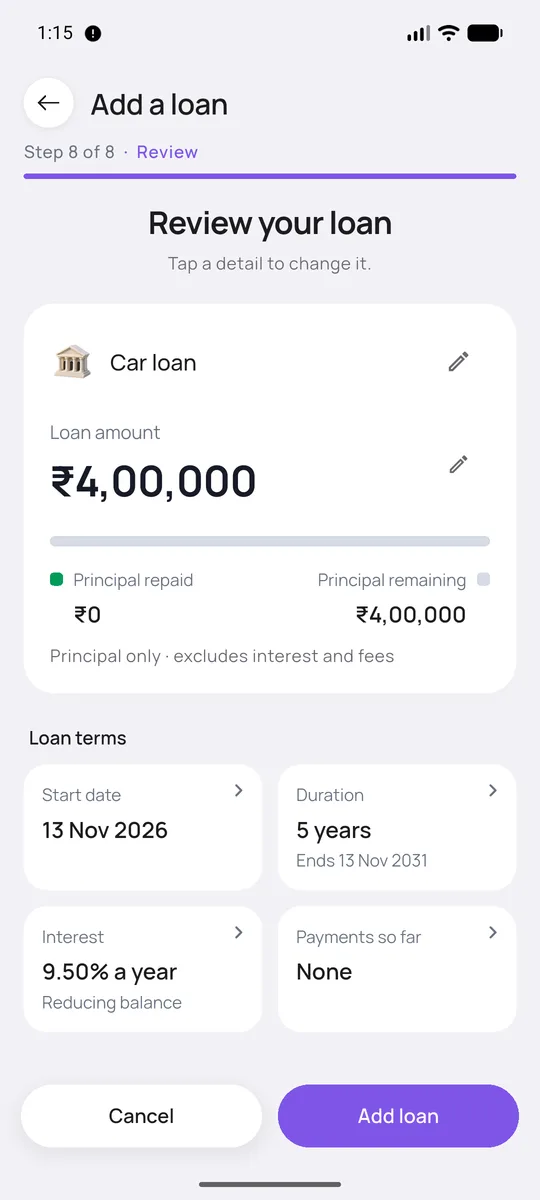
You take a ₹4,00,000 car loan at 9.5% a year for five years. You answer a few questions, the app reminds you before each due date, and the payoff chart shows the loan shrinking.

Add a loan

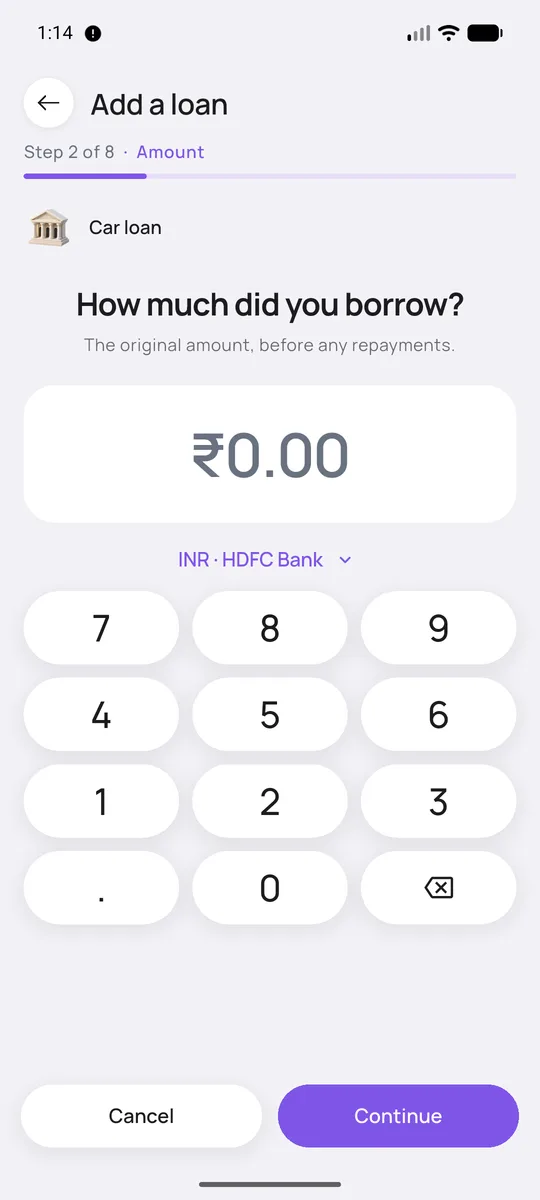
Open More → Loans and tap +. The app asks one question at a time, in 8 short steps.
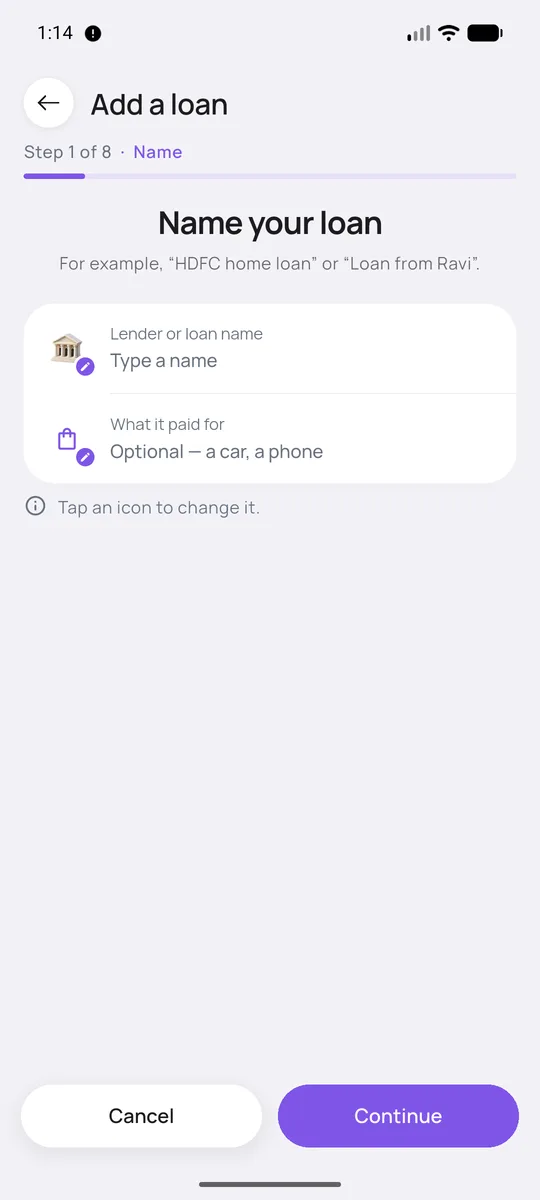
Step 1. Name the loan, like “HDFC home loan” or “Loan from Ravi”.
Step 2. How much did you borrow?
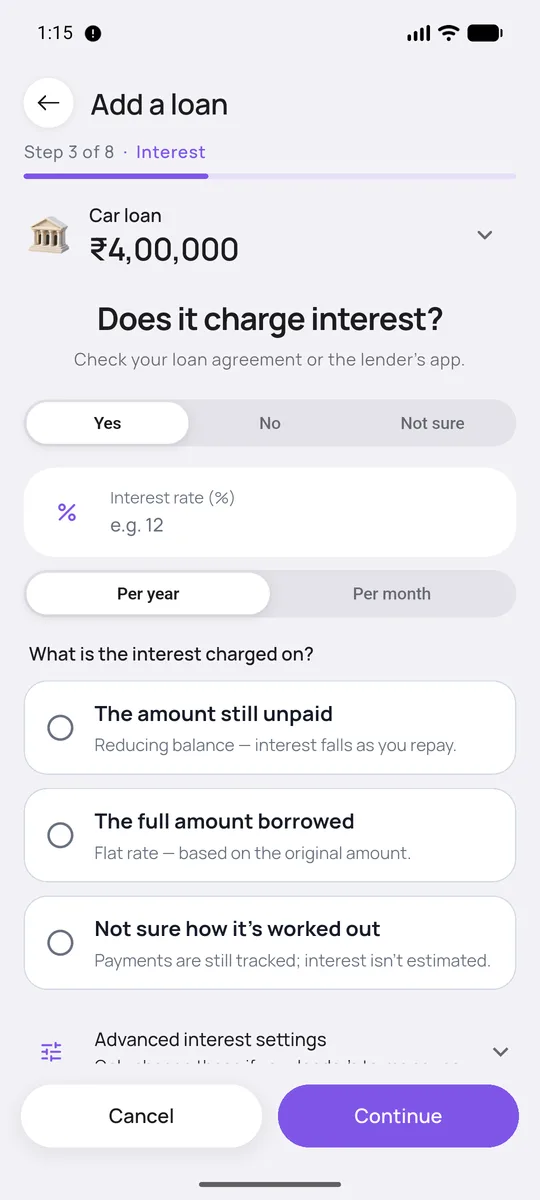
Step 3. Does it charge interest? Say whether it is a yearly or monthly rate, and whether it is charged on the unpaid amount or the full amount.
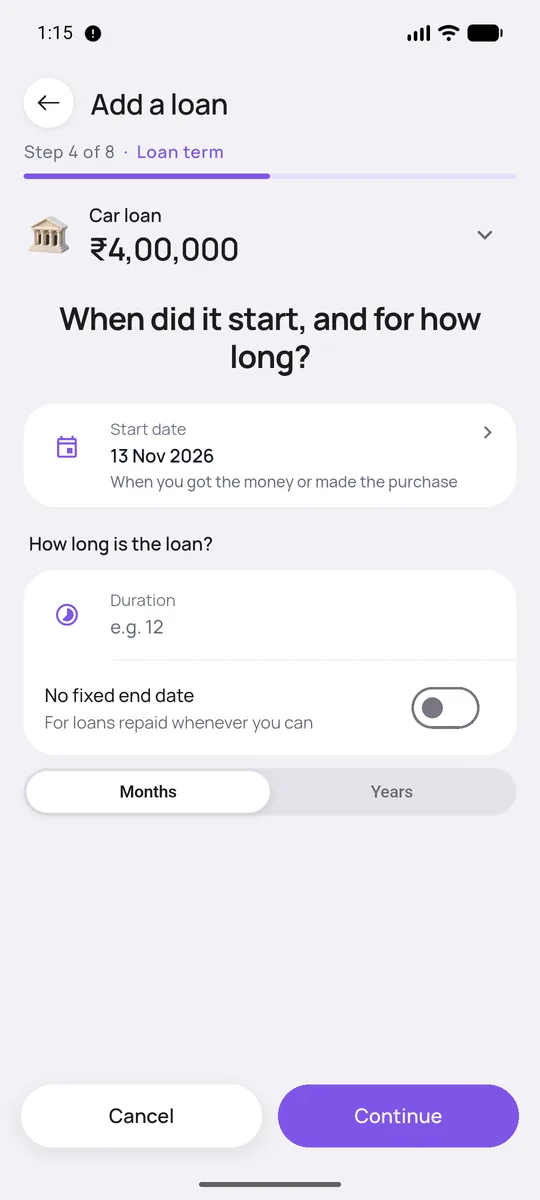
Step 4. When did it start and how long is it? Or choose “No fixed end date”.
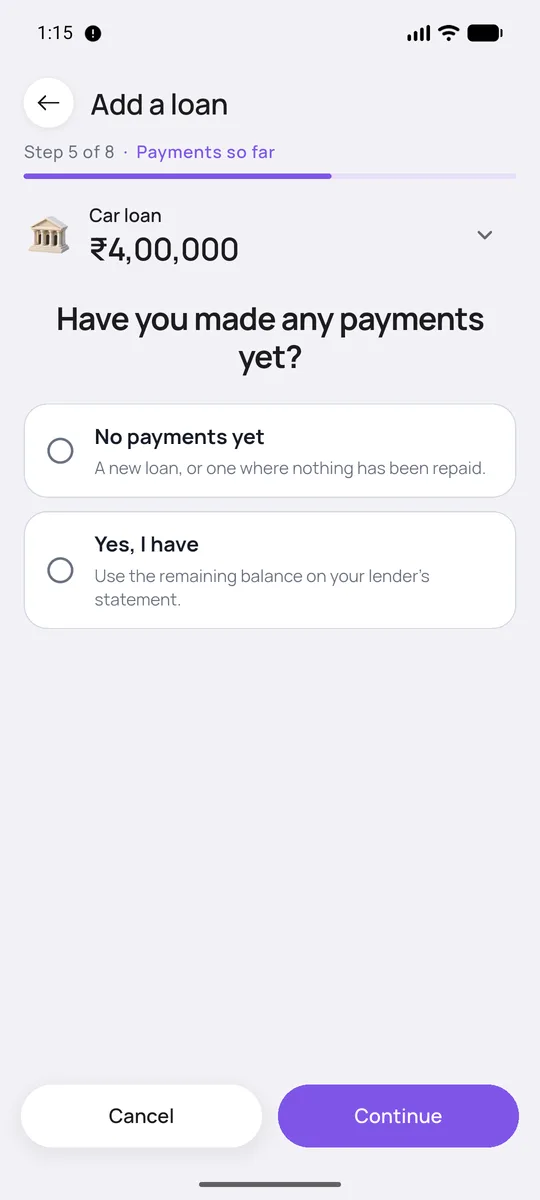
Step 5. Have you made any payments yet? If yes, use the remaining balance from your lender’s statement.
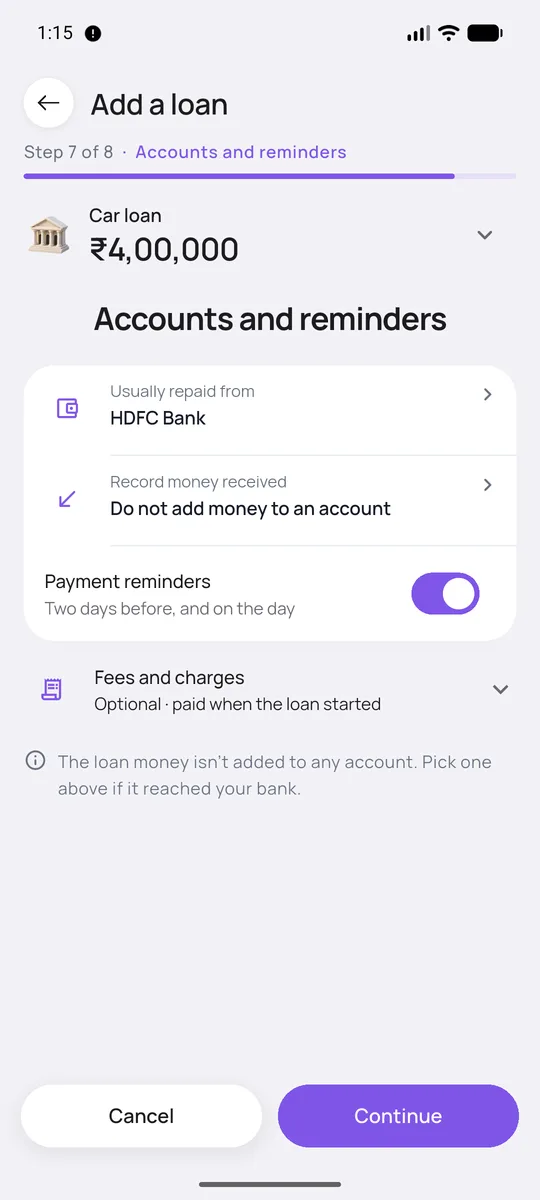
Steps 6 and 7. Fixed EMI or flexible payments, then which account you repay from and whether to remind you. Reminders come two days before and on the day.
Step 8. Review everything. Tap any detail to change it, then Add loan.

Use it every month

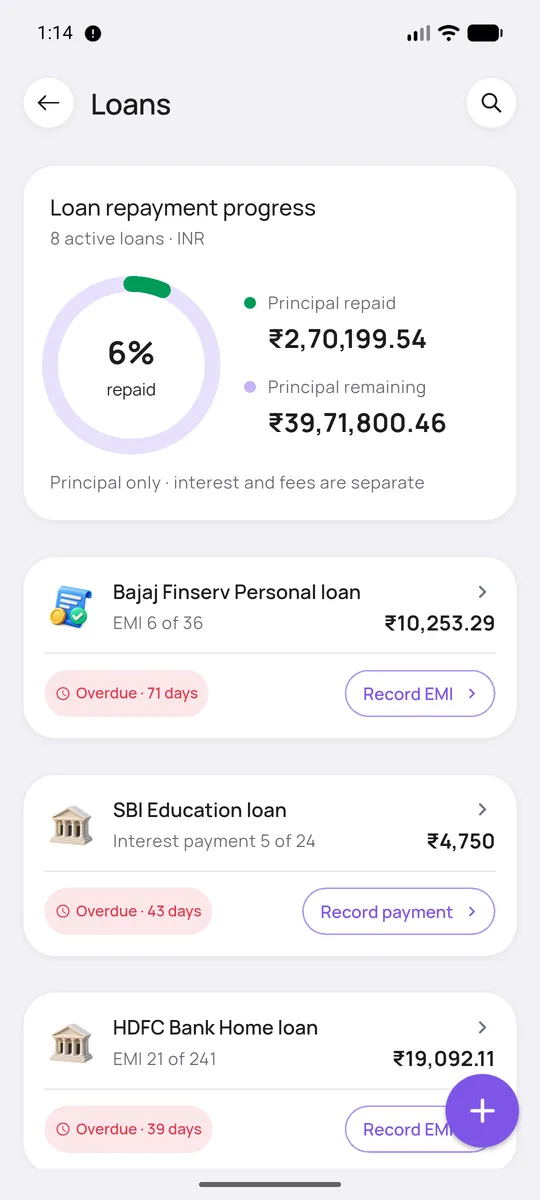
More → Loans shows how much principal is repaid overall and what is due next.
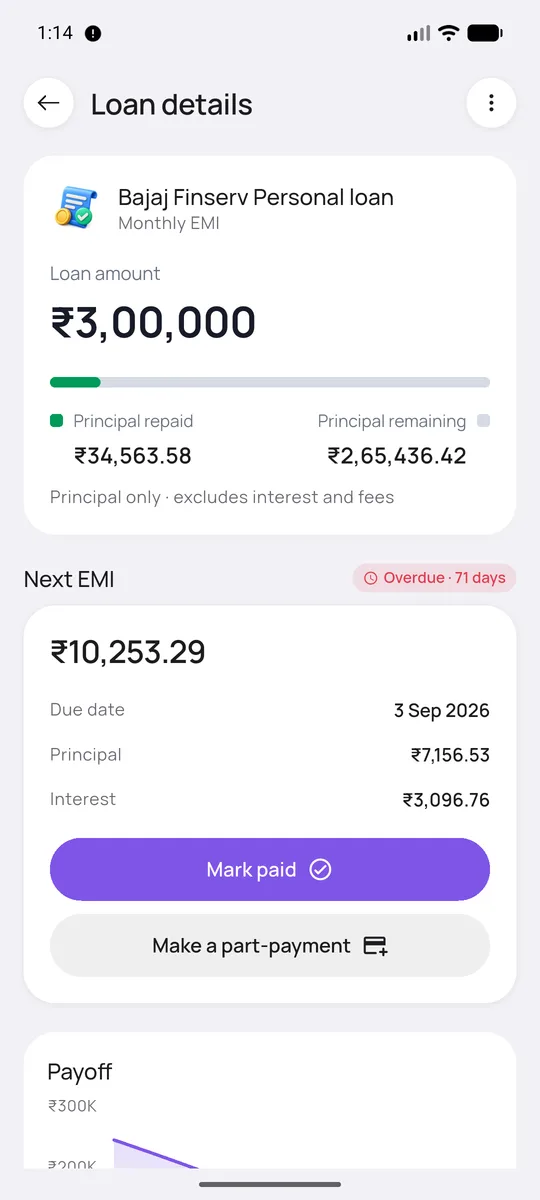
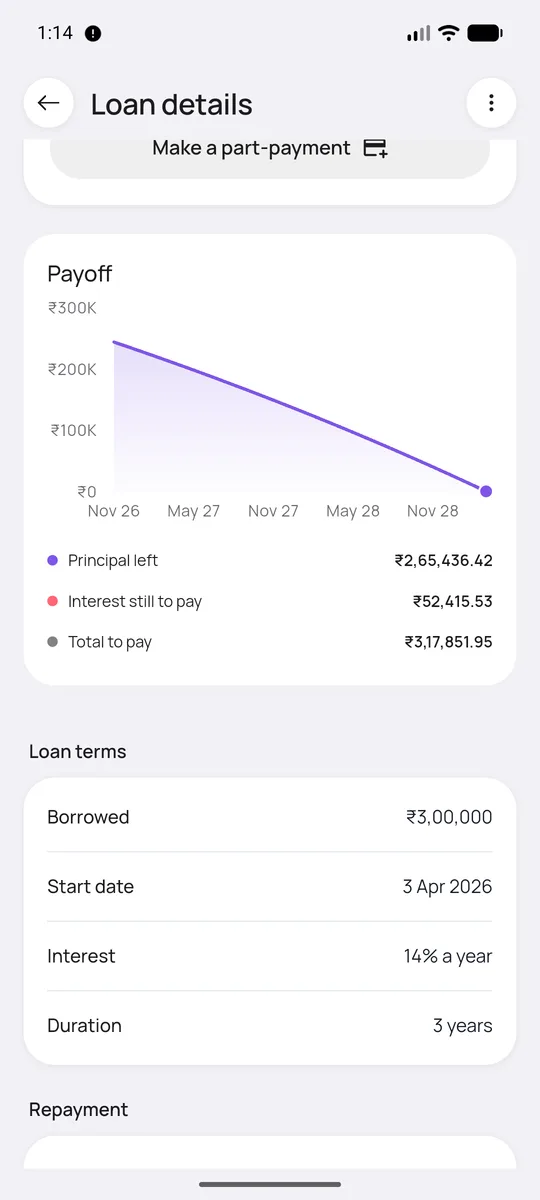
Open a loan for the next EMI, with its principal and interest split. Mark paid records it. Make a part-payment pays extra.
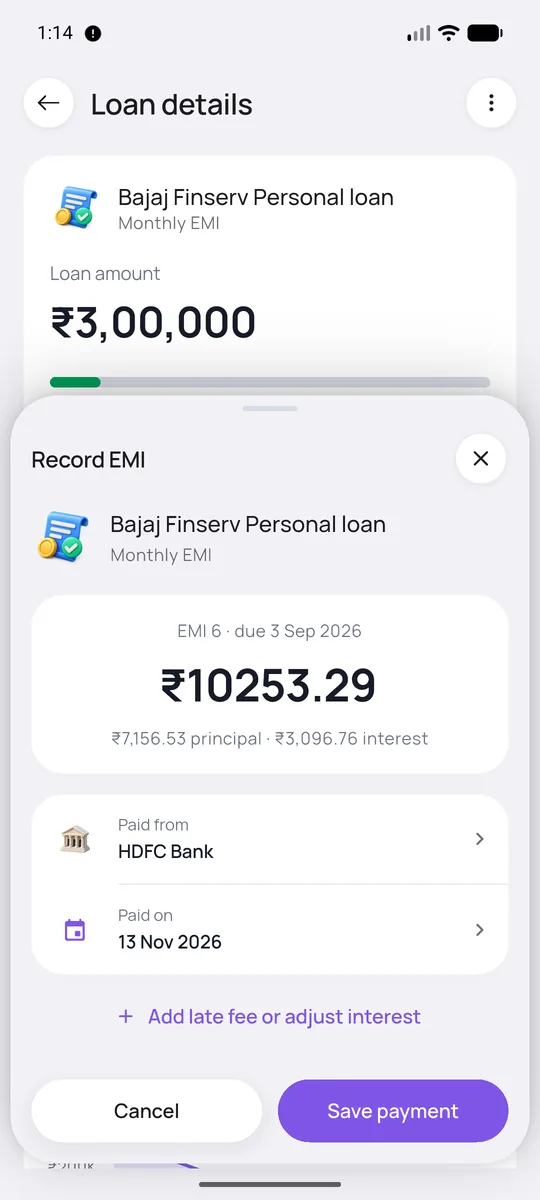
Tap Record EMI from the list or Home. Check the account and date, or tap “Add late fee or adjust interest”.
Scroll down for the payoff chart and the loan terms.

If the money landed in your bank (a personal or gold loan), you can add it to an account. For a home or car loan the lender pays the seller, so nothing is added. Late fees and interest adjustments are never added to your principal.

Keep track of money lent and borrowed

Why it’s there

Informal loans between friends and family are the ones that get forgotten. Tracking them per person means “how much does Amit owe me?” always has an answer.

For example

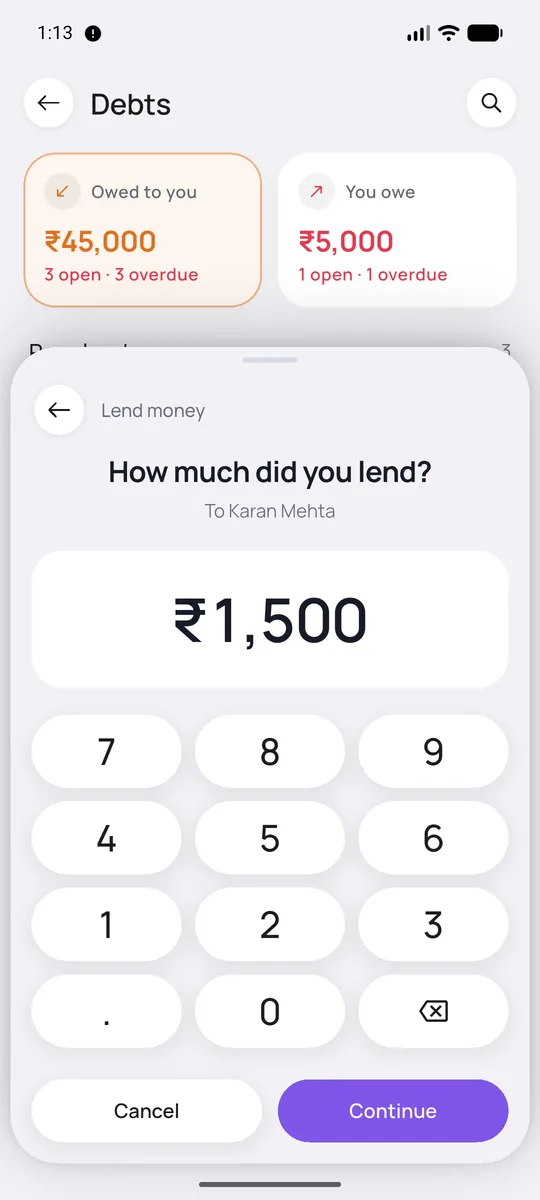
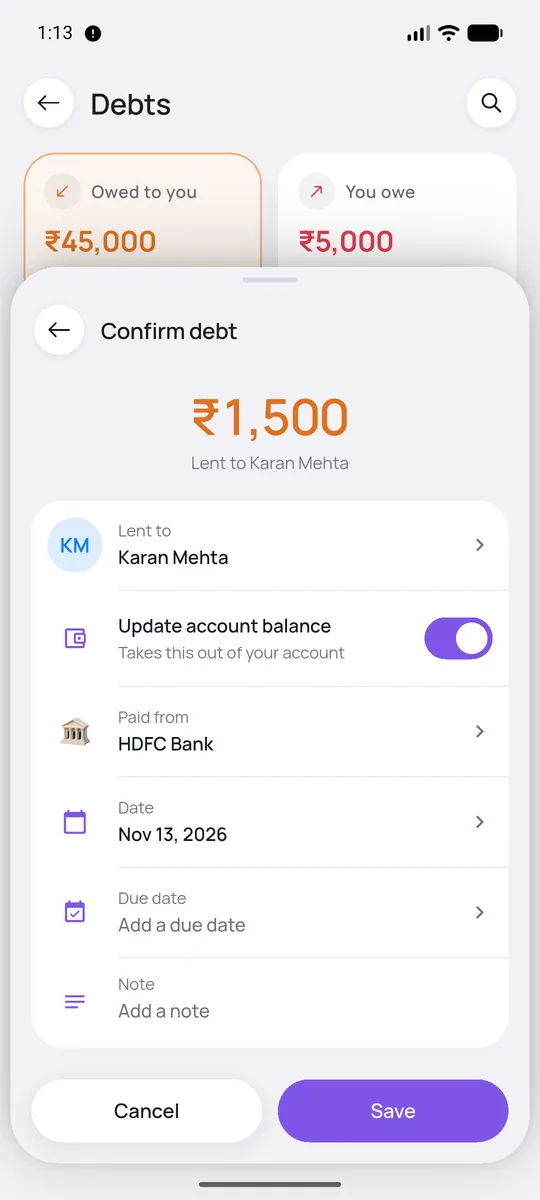
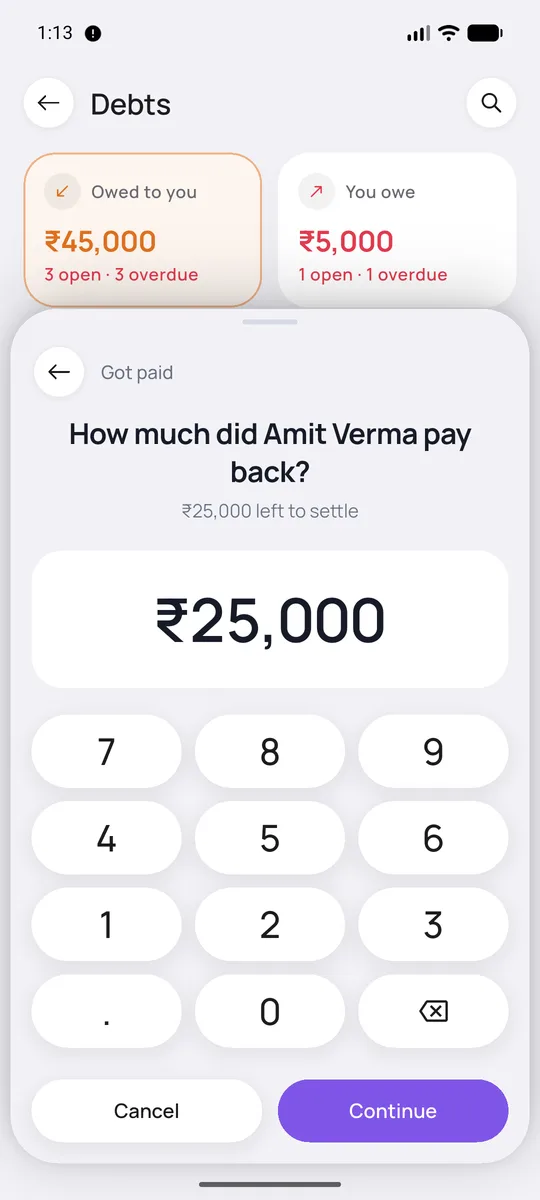
You lend Karan ₹1,500. Later he pays back part of it. You tap Got paid and the balance with him drops.

How to
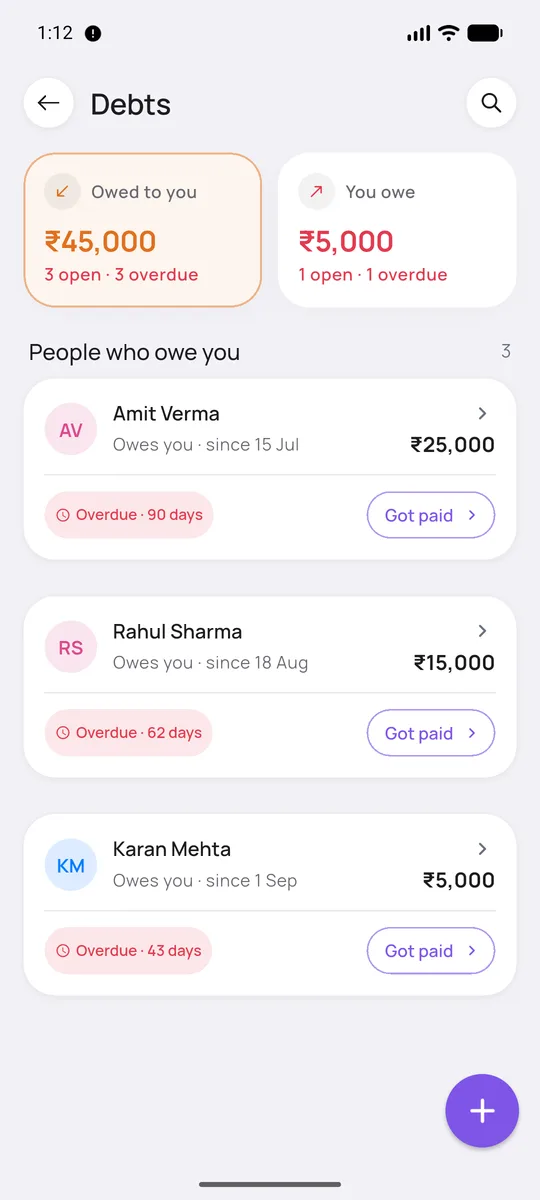
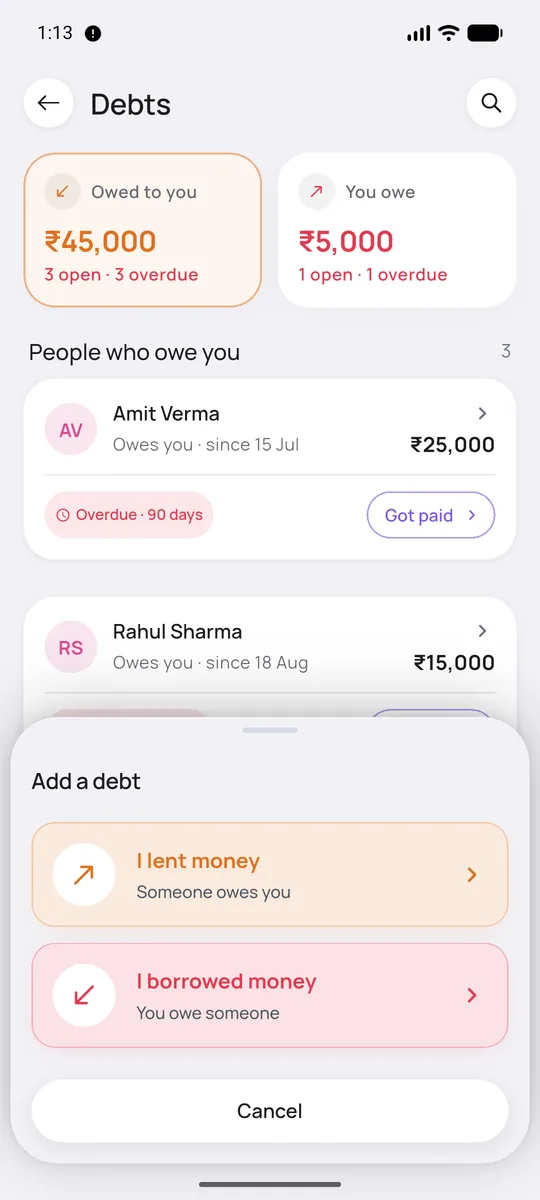
Open More → Debts. The top cards show what is owed to you and what you owe. Below are the people, with days overdue.
Tap + and say whether you lent or borrowed.
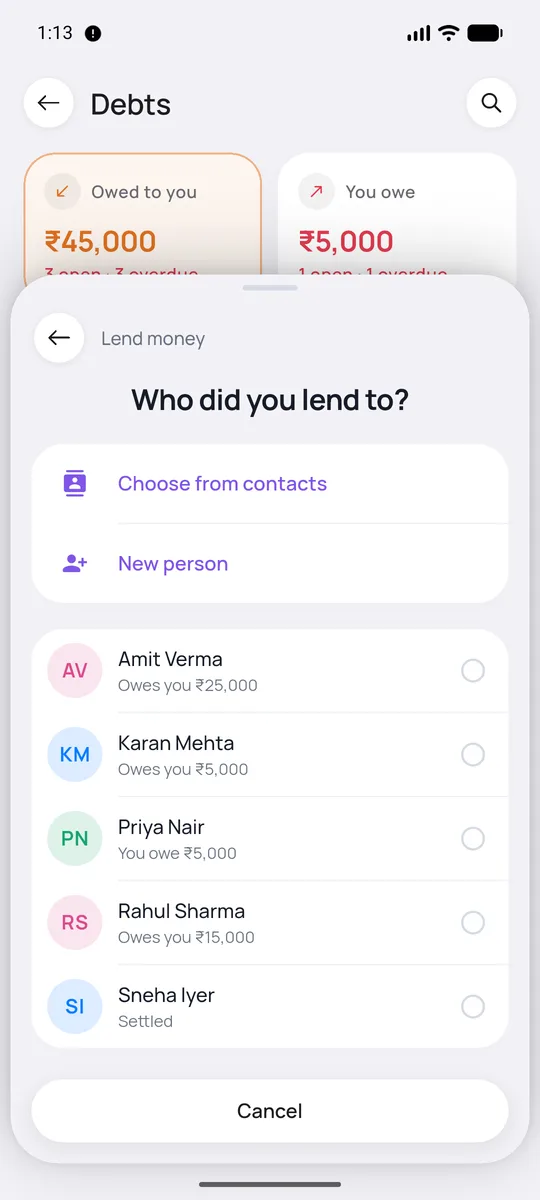
Pick the person. Add someone new, or choose from your contacts.
Type the amount.
Type the amount.
Confirm. Add a due date if you want a reminder.
Open a person to record a repayment, send a reminder, or see the history.
Tap Got paid and enter how much they paid back. The balance updates.

“Choose from contacts” uses Android’s own picker, so the app only ever sees the one person you pick and needs no contacts permission. Switch off Update account balance if you just want a record without touching an account.

Stay ahead of recurring payments

Why it’s there

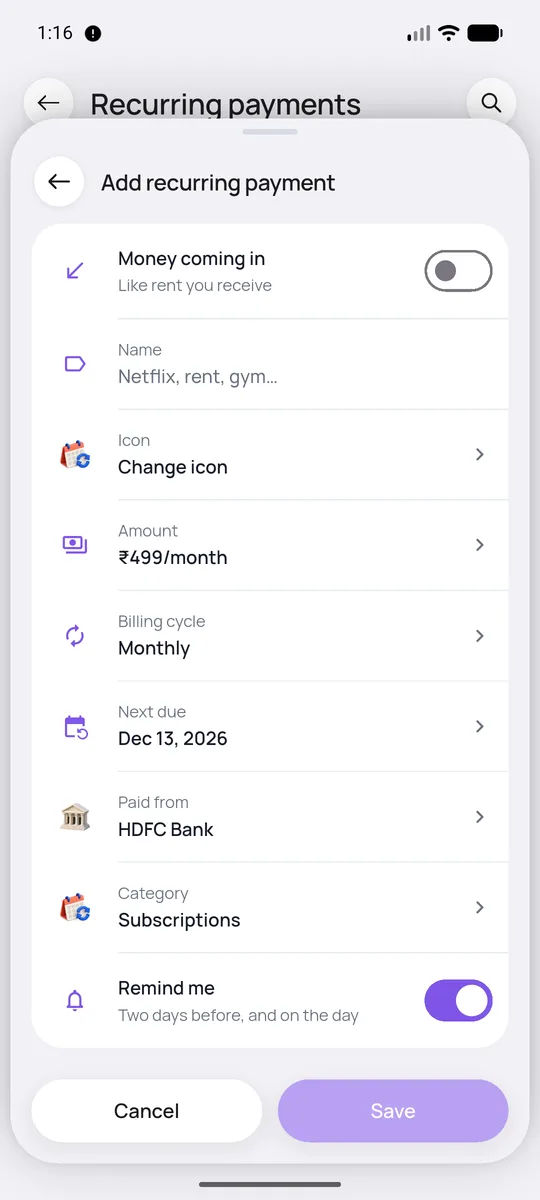
Netflix, a gym, rent, an insurance premium or a SIP. Small repeating payments are easy to forget and add up fast. One list, and a six-month chart, shows what is coming before it hits. It also works for money that comes in, like rent you receive.

For example

The chart shows January is your heaviest month, because a quarterly gym fee lands with the monthly ones. You see it a month ahead.

How to
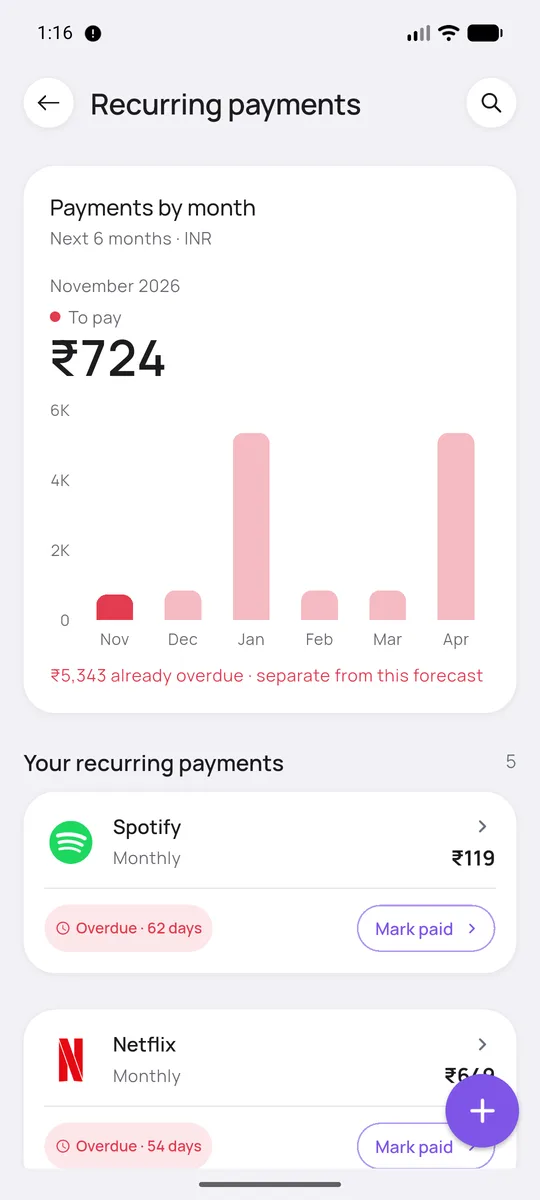
Open More → Recurring payments. The chart shows the next 6 months. Paused ones are marked.
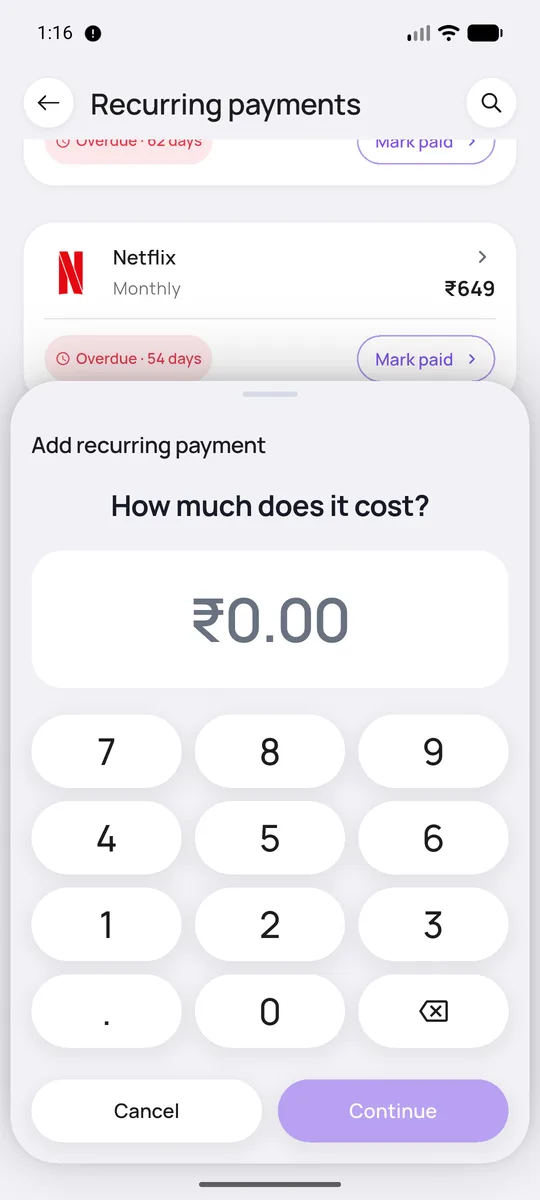
Tap + and enter the price.
Fill in the name and icon, how often it repeats, the next due date, the account and the category. Switch on Money coming in for income like rent. Keep Remind me on to get a reminder two days before and on the day.
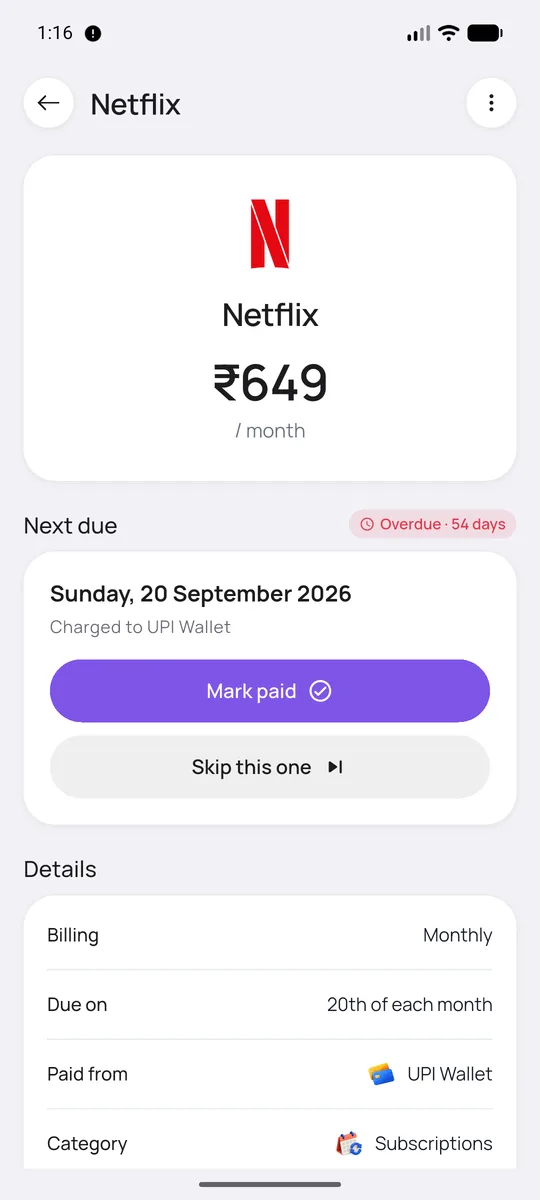
Open one to see what it costs over a year, Mark paid, or Skip this one.
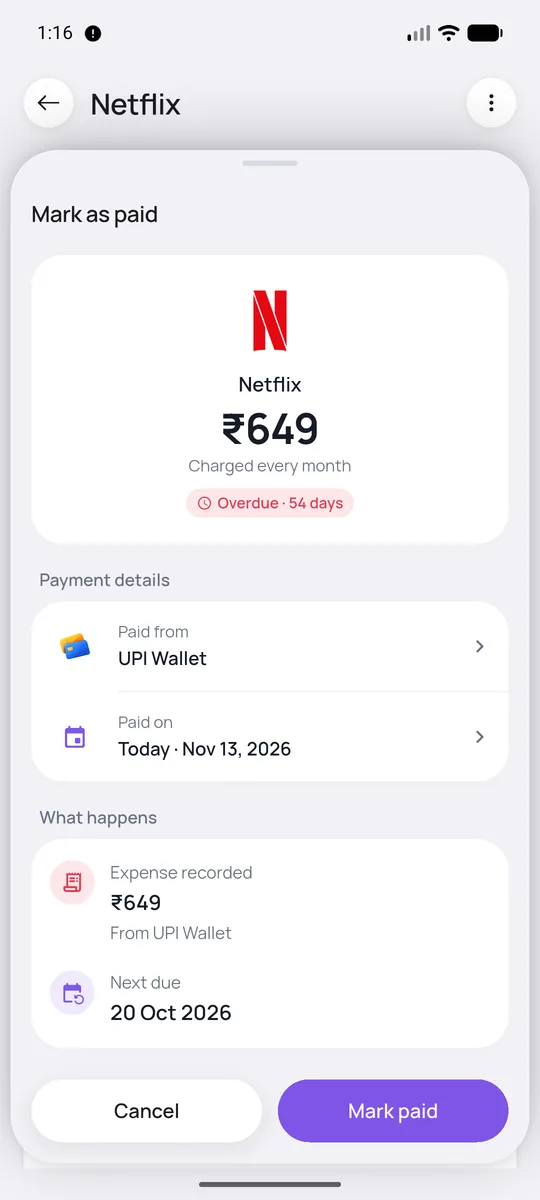
When you tap Mark paid, you see exactly what happens: an expense is recorded from your account and the next due date moves forward.

Automatic & smart tools

Add payments from bank SMS

Why it’s there

Typing in every payment is the part most people give up on. Your bank already texts you each one. With your permission, SimpleMoney reads those messages on your phone and adds the transactions for you.

For example

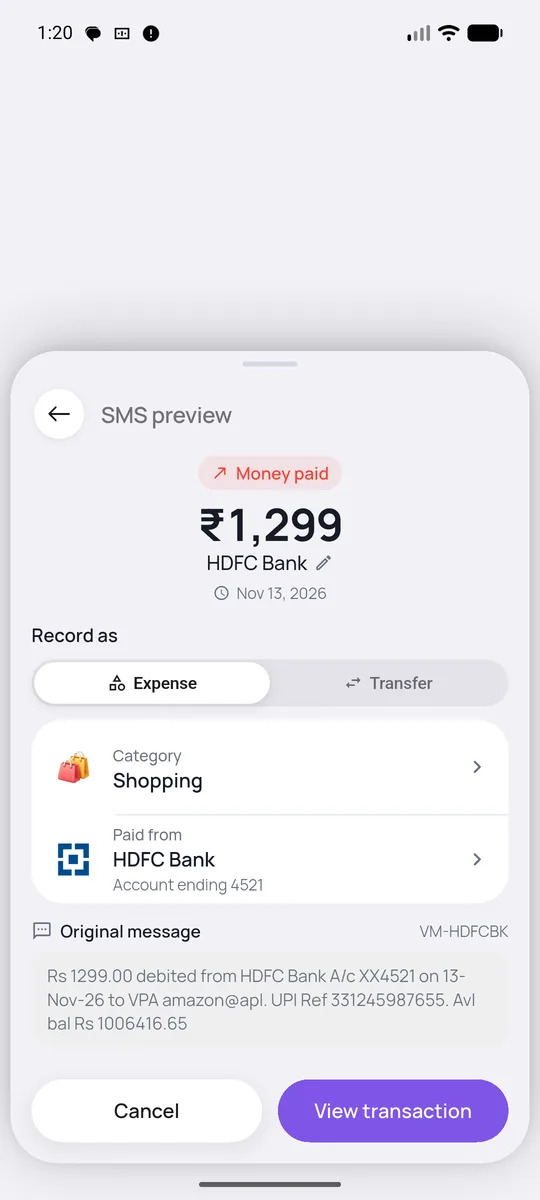
You pay ₹1,299 on a shopping app by UPI. Seconds later your bank sends an SMS. SimpleMoney adds a ₹1,299 expense to the right account and shows a notification asking what it was for.

How to turn it on
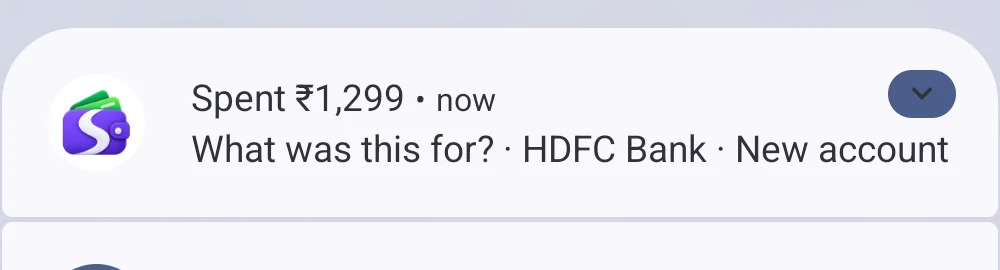
Allow it in the welcome steps, or later in More → Settings → Transactions from SMS. Your phone asks for SMS and notification permission.
A new bank SMS becomes a transaction. The notification says what was spent and from which account. Tap it to check.
The preview shows the amount, date, category and account, and the original message. Choose Expense or Transfer, change the category if the guess is wrong, then tap View transaction to see or edit the full entry.

If a message comes from an account you haven’t added yet, the app creates it for you using the last digits in the message. You can rename it later.

Good to know

Only bank transaction messages are used. OTPs and personal messages are ignored. Messages are read on your phone and are never uploaded. You can turn it off any time in Settings, or in Android’s app permissions.

If a bank message was missed or read wrongly, open More → Help → Report SMS. You pick the message and it is sent privately to the developer to improve the reader. Nothing is sent unless you choose to report one.

Your phone may block SMS access for apps installed outside Google Play. If so, open the app’s settings, tap ⋮, choose Allow restricted settings, then allow SMS.

Import a bank or UPI statement

Why it’s there

If you didn’t use SMS, or you want to fill in old months, you can import a statement instead of typing each line.

For example

You download your last three months of Google Pay history and a bank statement. You pick both files, and each payment is added once, even if it appears in both.

How to
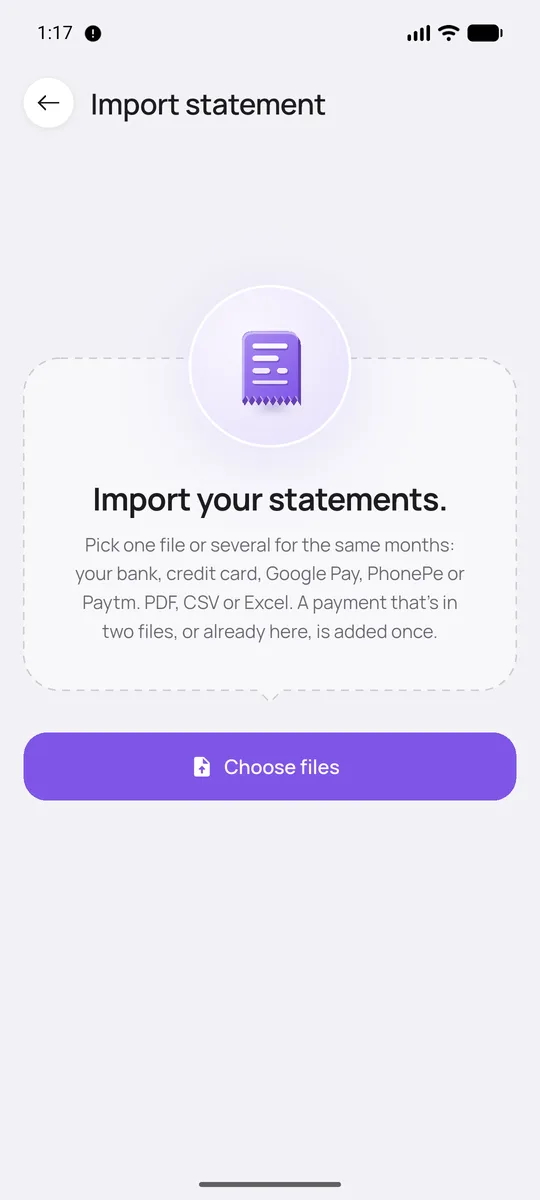
Open More → Import statement and tap Choose files. Pick one file or several for the same months. PDF, CSV and Excel files all work, including Google Pay, PhonePe and Paytm statements.

Before anything is added you get a review. You can see what will be added, which payments are already in SimpleMoney, and which are transfers between your own accounts. If a CSV or Excel file has unusual columns, you are asked to tell the app which column is the date, the amount and so on. It remembers that layout for next time.

Use Claude or ChatGPT with your money

Why it’s there

Sometimes it is easier to ask than to tap. You can connect Claude or ChatGPT and say “add these expenses”, “what did I spend on food?” or “find my subscriptions”. Nothing changes in your data until you approve it.

For example

You paste a loan statement into Claude. It works out the loan details and every payment, and sends them to SimpleMoney as a suggestion. You open the app, read it, and tap approve.

How to
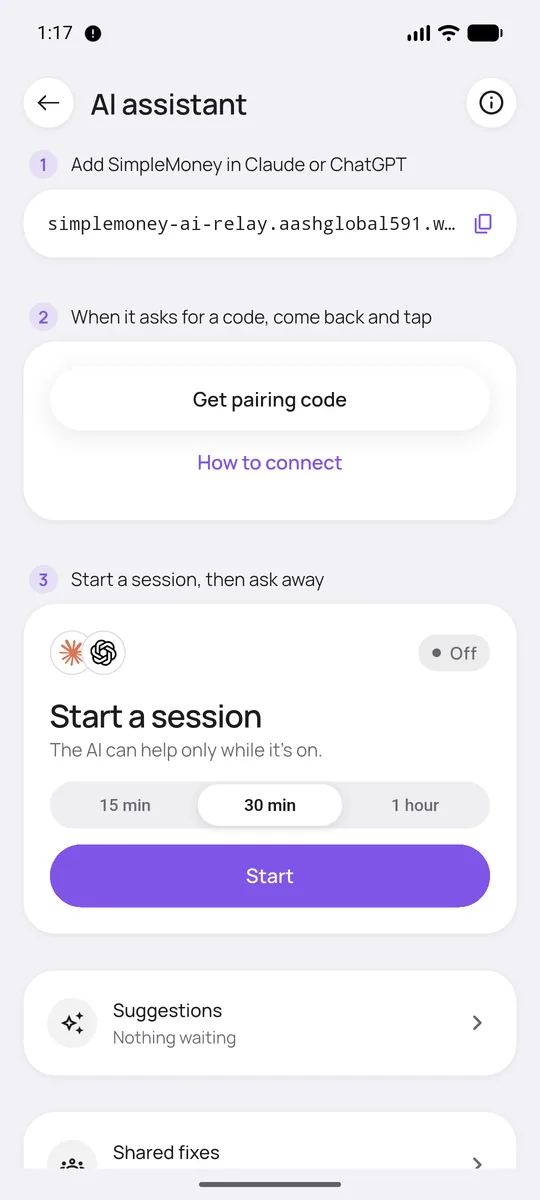
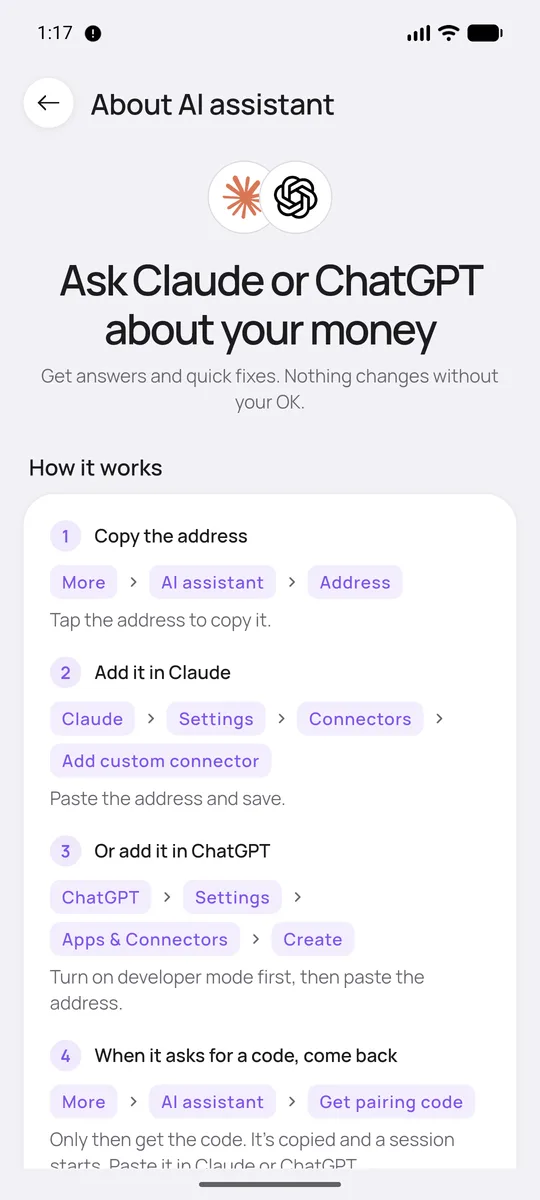
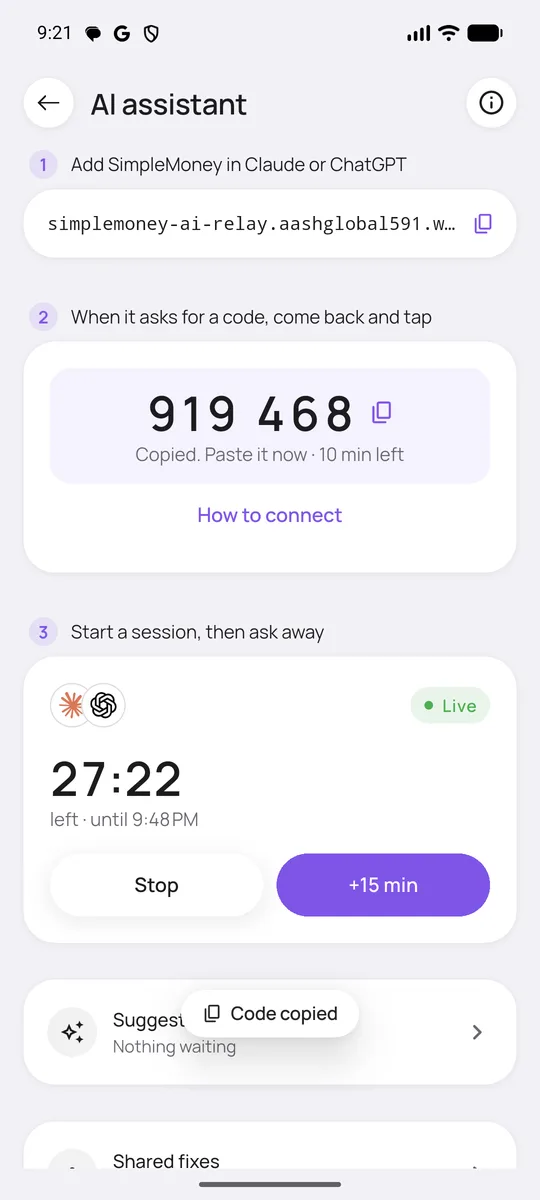
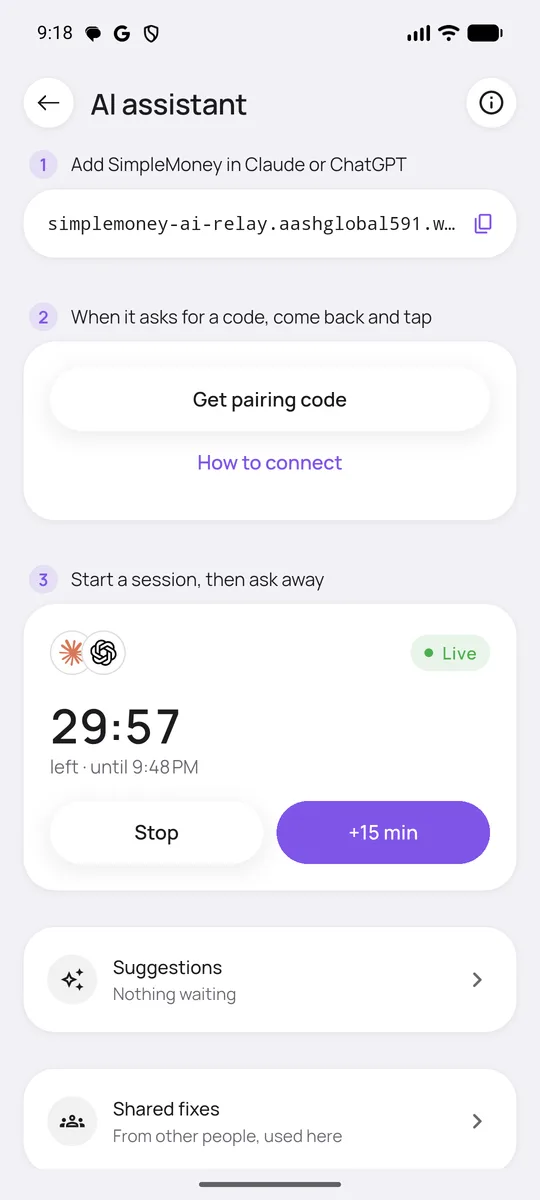
Open More → AI assistant. Step 1 is the address to add in Claude or ChatGPT. Tap it to copy.
Tap the i button for a simple walk-through of where to paste it in each app.
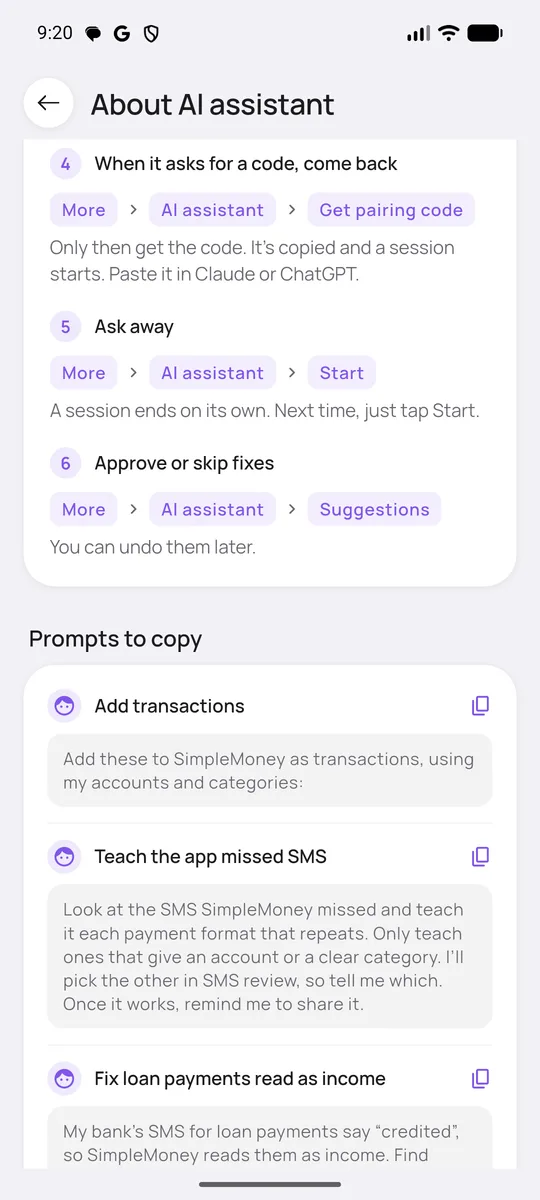
Further down are ready-made prompts to copy, like “Add transactions” or “Teach the app missed SMS”.

When Claude or ChatGPT asks for a code, come back and tap Get pairing code. Then tap Start and choose 15 minutes, 30 minutes or 1 hour. The AI can only help while the session is on, and it ends by itself.

Anything it suggests waits in Suggestions until you approve or reject it. Suggestions you decide on are kept for 30 days, so you can look back.

The AI assistant is free for now. It is listed as a Pro feature in the Free versus Pro table.

Connect Claude to SimpleMoney, step by step

Why it’s there

Before an AI can help, it has to be connected once. You do this on the Claude side, and the app gives you a one-time code so that only you can link your own phone.

For example

You open Claude on your laptop, add SimpleMoney as a connector, type the 6-digit code from your phone, and from then on any chat can use it whenever you start a session in the app.

How to
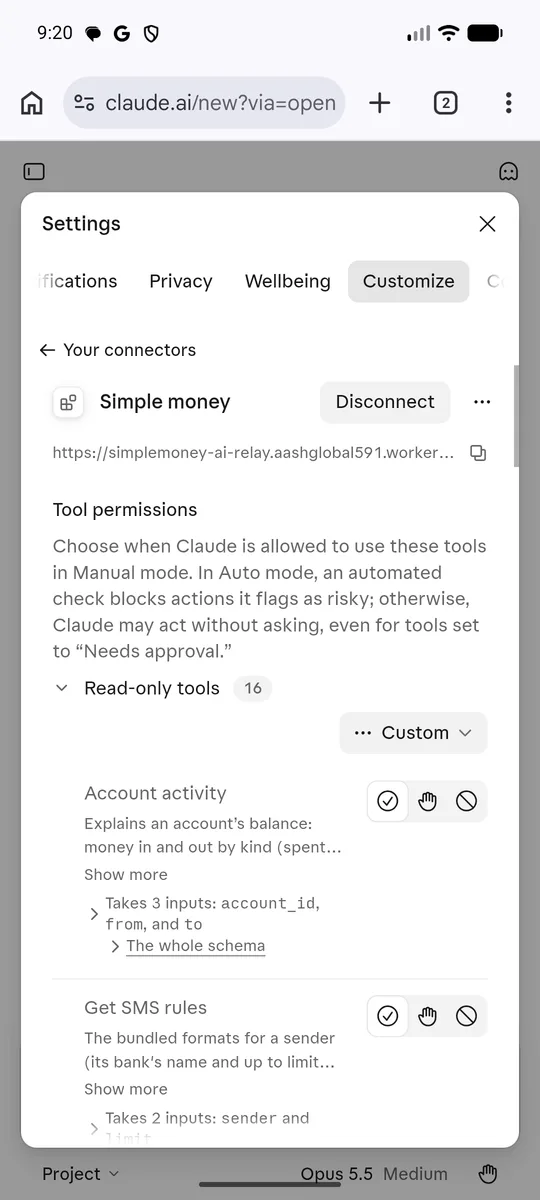
In the app, open More → AI assistant. Step 1 is the address to add. Tap the copy icon.
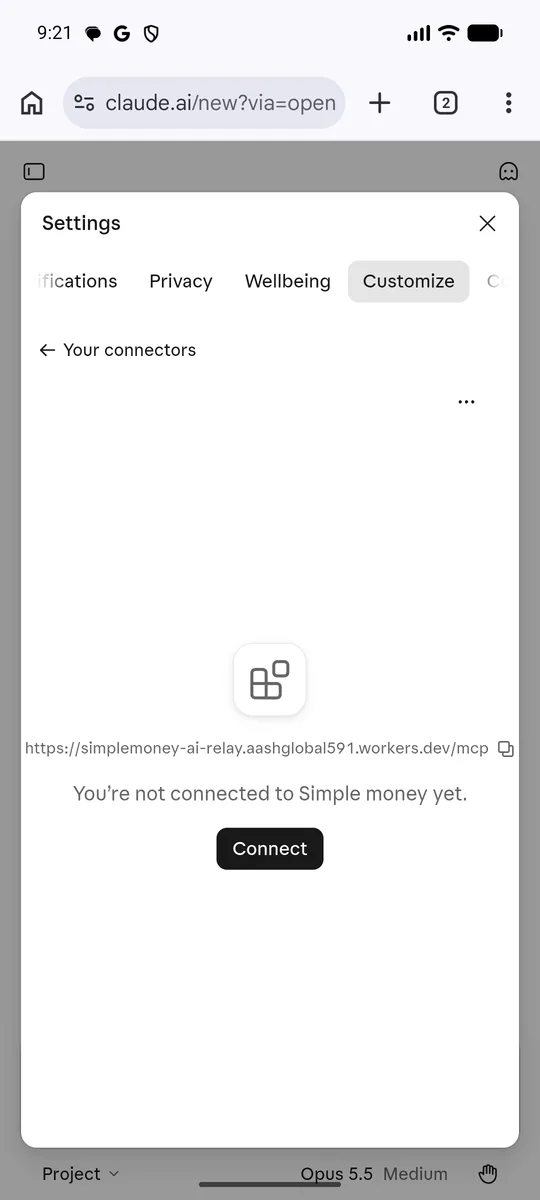
In Claude, open Settings → Customize → Connectors and add a custom connector with that address. Here it is added. You can also choose, tool by tool, whether Claude has to ask you first.
If it says You’re not connected to Simple money yet, tap Connect.
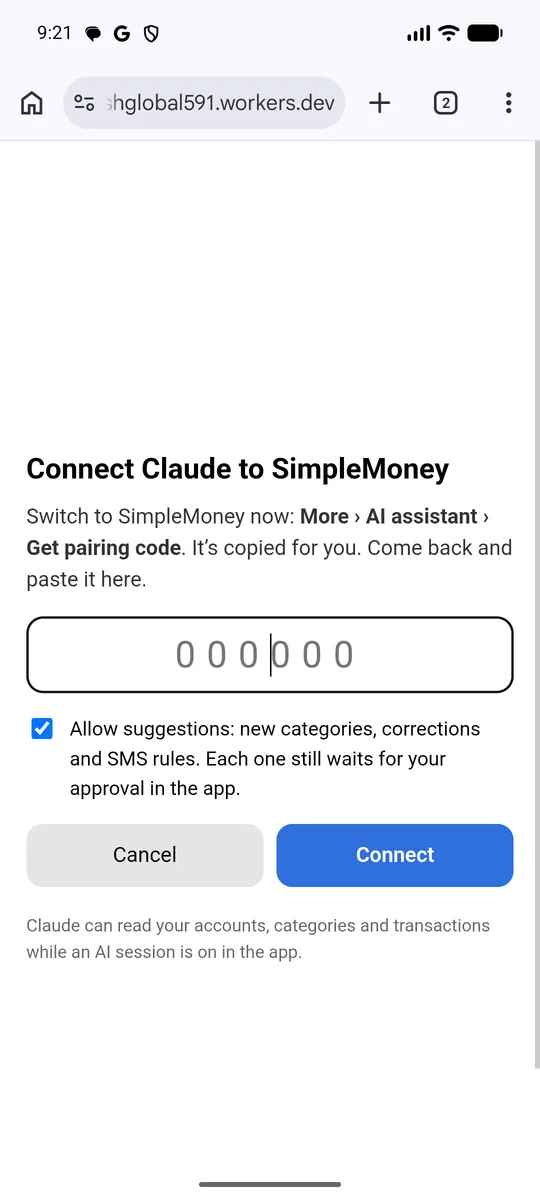
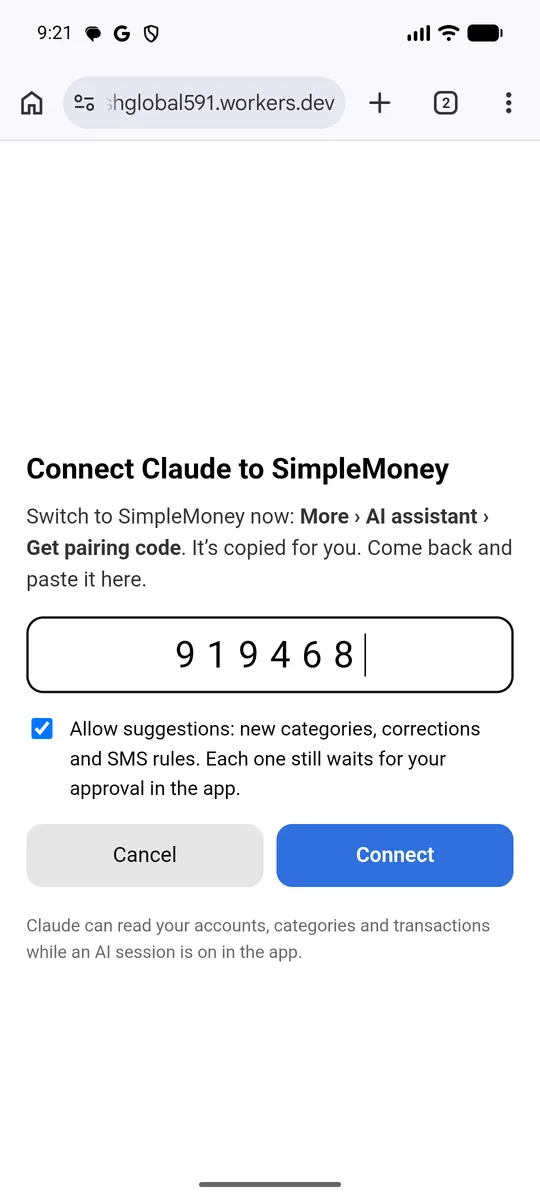
Claude opens a page that asks for a pairing code. It also has a tick box, Allow suggestions. Leave it on if you want the AI to suggest SMS rules and category fixes. Each one still waits for your approval in the app.
Switch back to the app and tap Get pairing code. The code is copied for you and works for 10 minutes.
Paste or type the code in Claude and tap Connect.
In the app, tap Start and pick 15 minutes, 30 minutes or 1 hour. While the session says Live, the AI can use the connector.
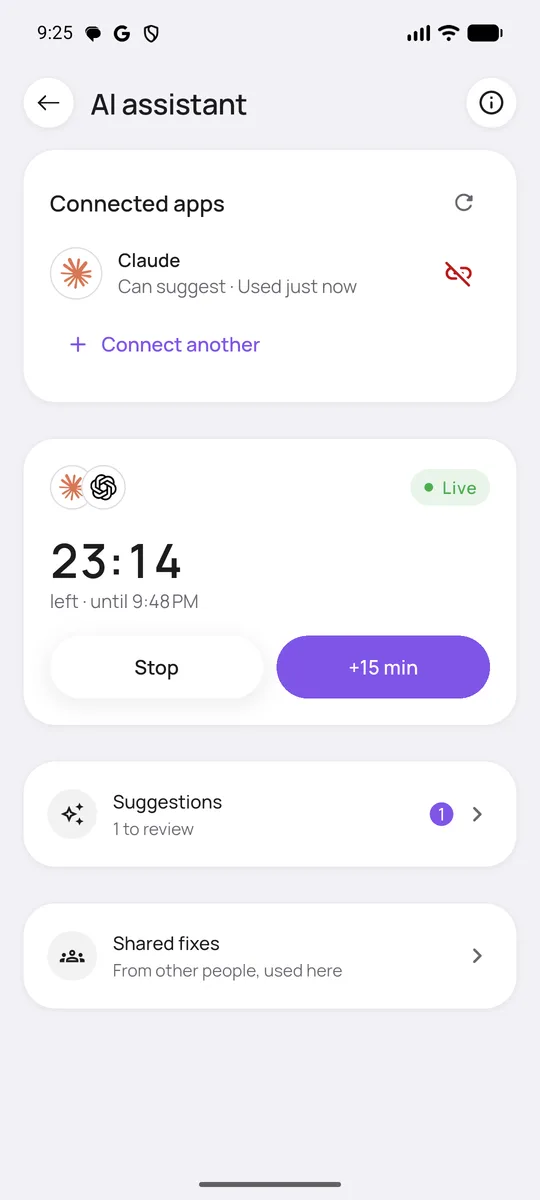
Claude now shows under Connected apps. Suggestions from it wait under Suggestions.

Disconnect any time

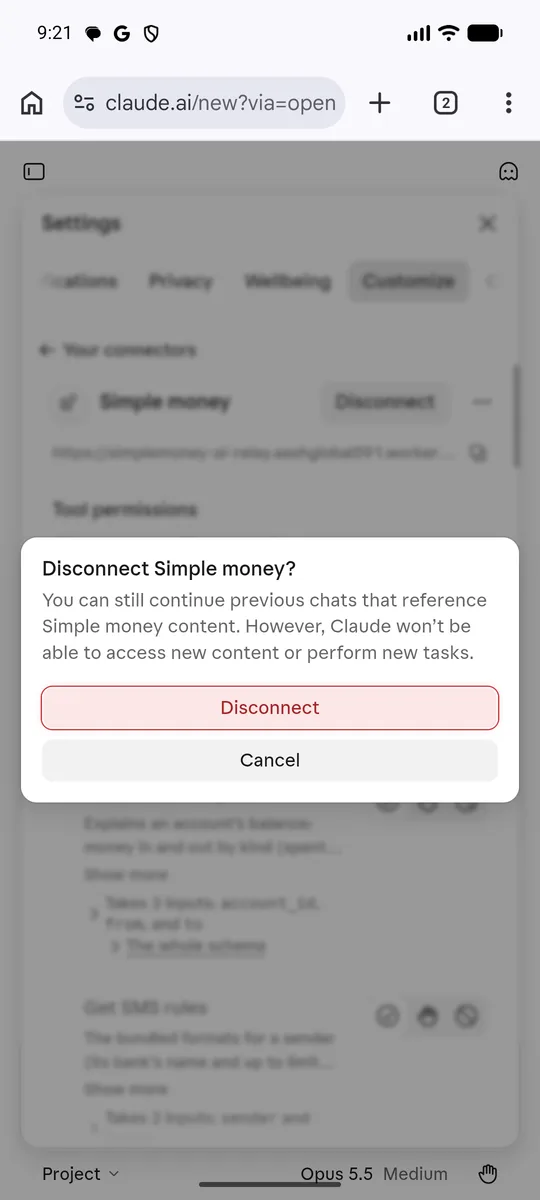
In Claude, open the connector and tap Disconnect. Claude can no longer reach SimpleMoney, even if a session is on.

In the app you can also tap the unlink icon next to an AI app under Connected apps. Ending a session with Stop cuts access at once. A session also ends by itself when its time is up.

Using ChatGPT? The steps are the same idea: add the address as a custom app in ChatGPT (turn on developer mode first), then paste the code when it asks.

Teach the app a bank SMS it can’t read

Why it’s there

The app already reads SMS from many banks. A small bank, a new message wording or a wallet may still be missed. Instead of waiting for an app update, you can ask the AI to write a reading rule for it. It uses only your missed messages, tests the rule first, and nothing is saved until you approve it.1

For example

Your bank sends “INR 2,340.50 has been withdrawn from your A/c ending 7788 at ATM MG Road”. The app doesn’t know that wording. After you approve one AI rule, every ATM withdrawal like it is read, with the right account and amount.

How to
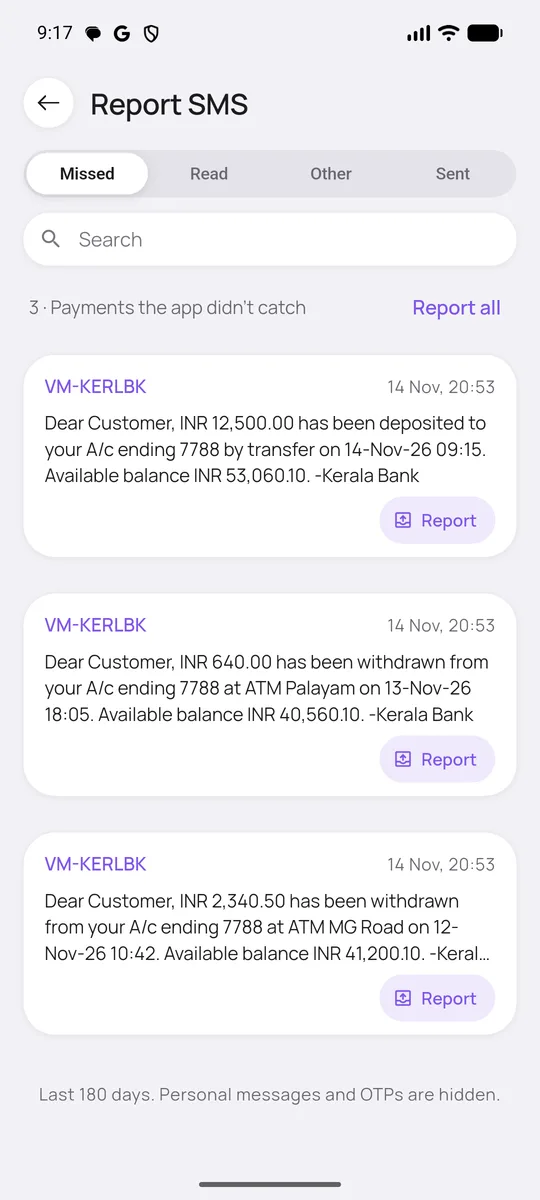
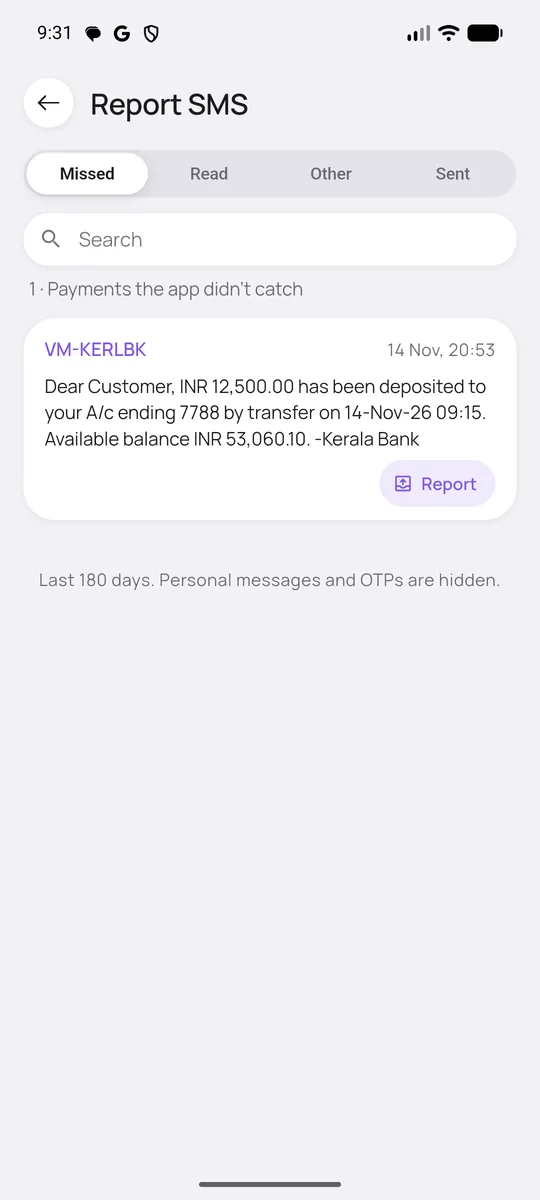
First see what is missed. Open More → Help → Report SMS. The Missed tab lists payment messages the app didn’t catch. Personal messages and OTPs are hidden.
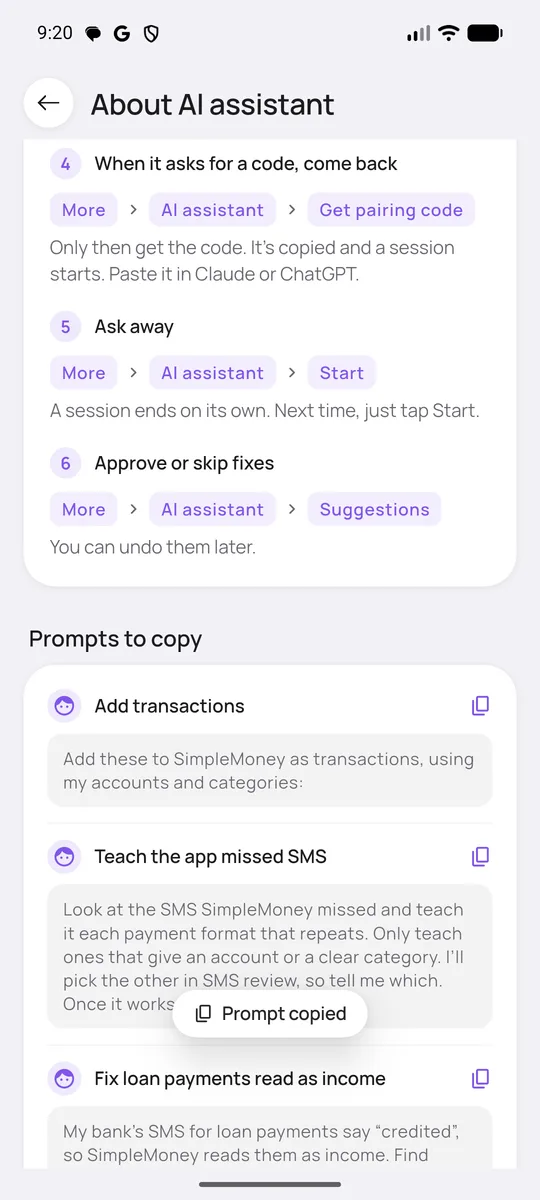
Start an AI session (see the guide above). In More → AI assistant tap the i button. Under Prompts to copy, each card shows what to send to the AI.
Tap Teach the app missed SMS. The prompt is copied.
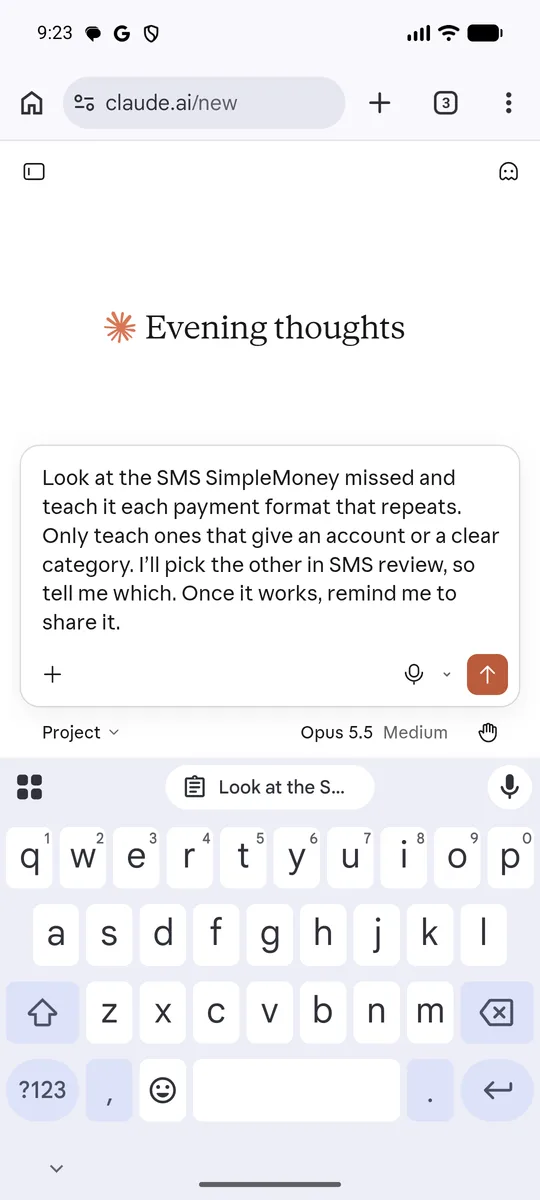
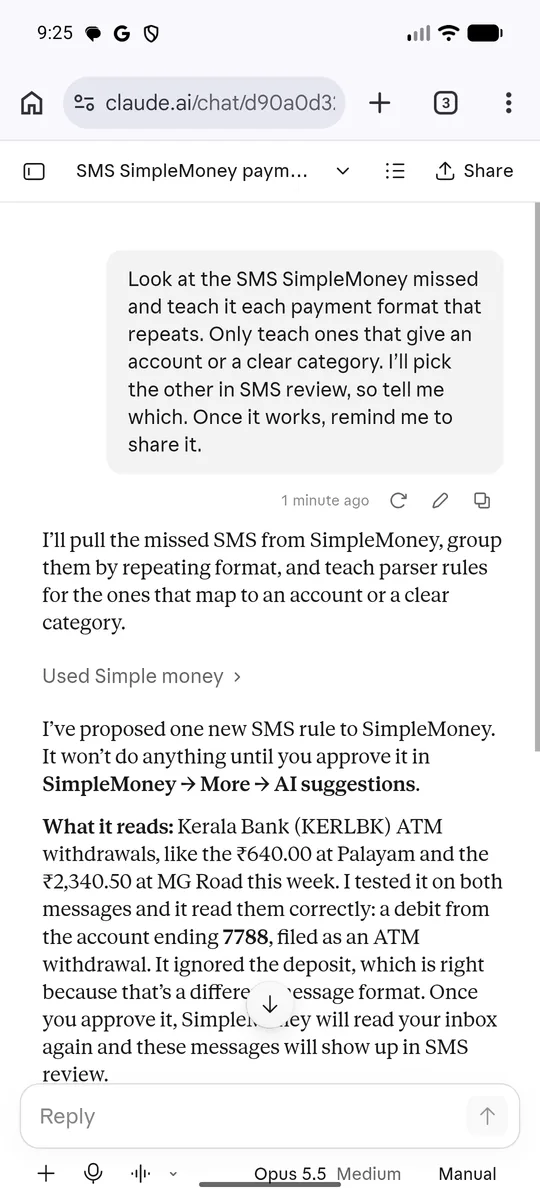
Paste it into a Claude chat that has the SimpleMoney connector on, and send it.
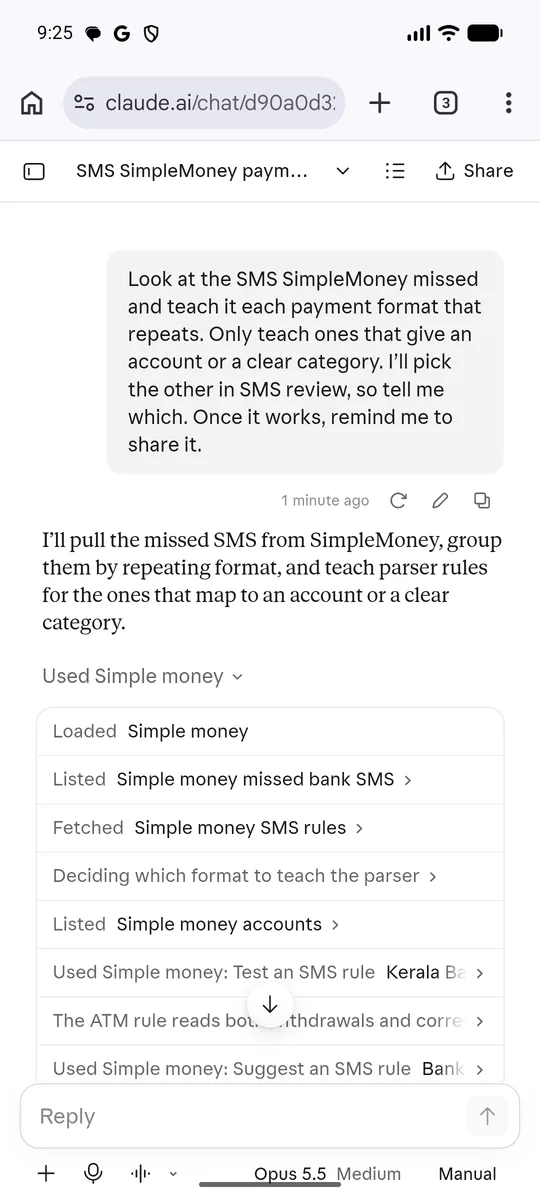
Tap Used Simple money to see what it did: it listed your missed SMS, looked at the rules you have, checked your accounts, tested a rule, and then suggested it.
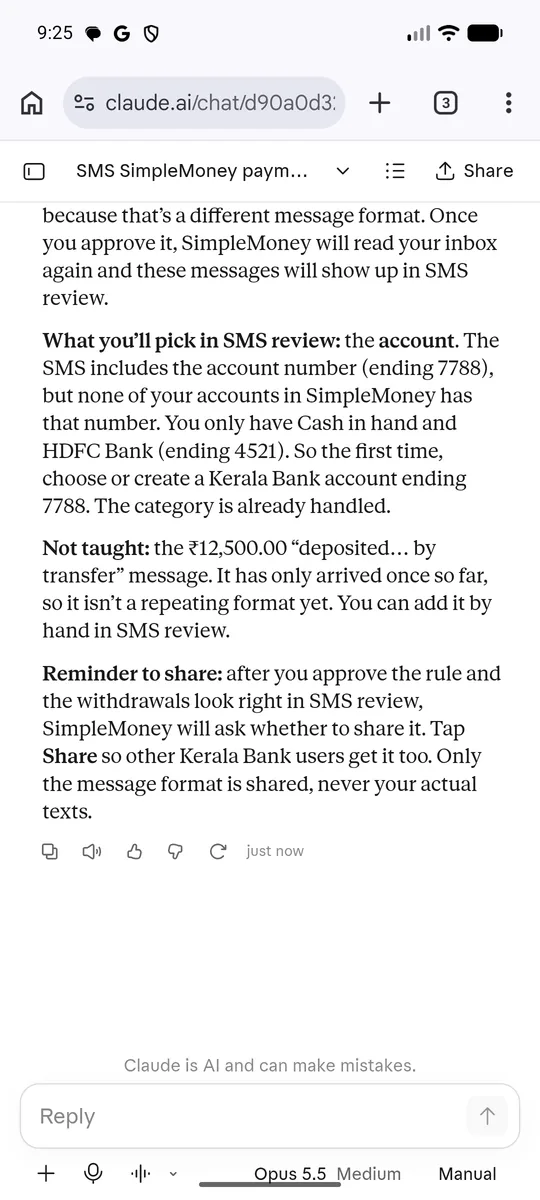
Claude explains the rule it wrote. It tested it on your messages and it read them correctly.
It also tells you what you still need to pick yourself, and what it left out on purpose. A message that only arrived once is not a repeating format yet.
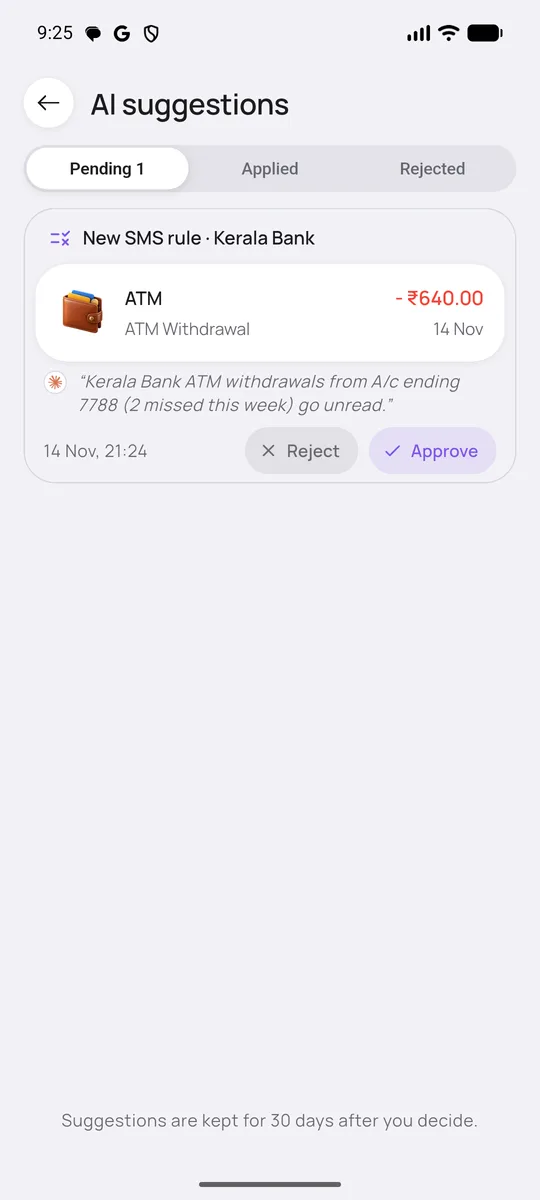
Back in the app, AI assistant now shows one suggestion to review.
Open Suggestions. The card shows the rule, what it would read from a real message, and why the AI suggested it. Tap Approve.
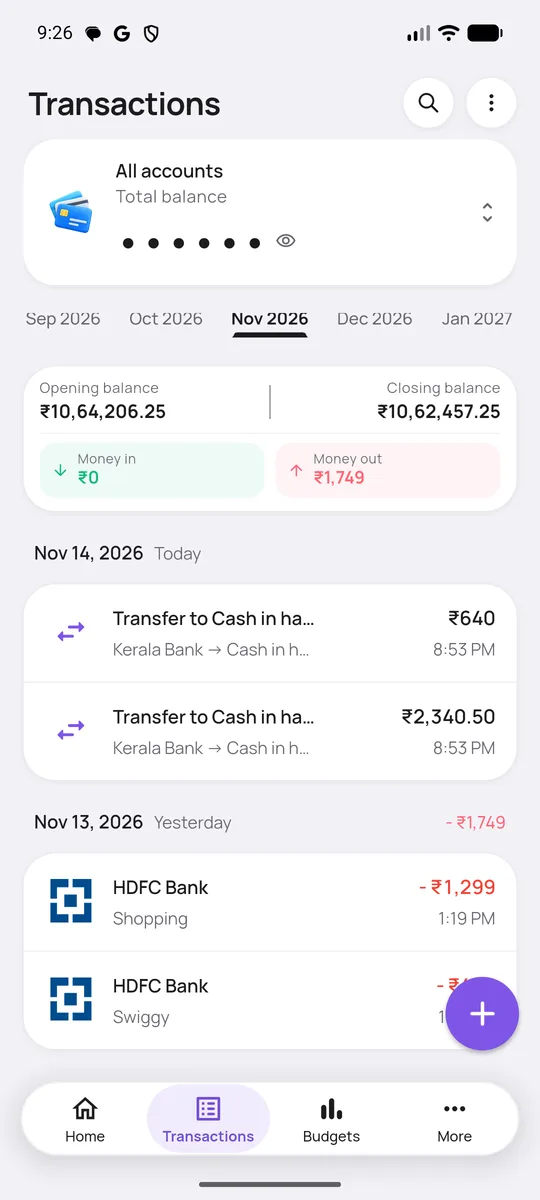
The app reads your inbox again. The messages the rule covers are added. Here two ATM withdrawals became transfers from the new bank account into Cash.
In Report SMS, only the deposit is still missed, as Claude said. You can teach it later when you have a few like it.

Not happy with a suggestion? Tap Reject. Nothing changes. Approved and rejected suggestions are kept for 30 days under the Applied and Rejected tabs.

1 How an SMS rule works. A rule is a pattern for the shape of a message, not for one message. The AI keeps the fixed words, for example “has been withdrawn from your A/c ending”, and marks the parts that change, like the amount, account digits and place, as blanks to fill. It never puts one message’s amount or merchant into the pattern. Before suggesting, it runs the pattern on your real missed messages in the app’s own reader and checks that every one is read right. A rule is attached to the sender ID (like KERLBK) and says if money went out or came in. For this job the AI looks at the messages the app could not read.

Teach the app a new statement layout (PDF, CSV or Excel)

Why it’s there

Every bank lays out its statement differently. When the app doesn’t recognise a layout, it needs to know which column is the date, which is the amount and so on. You can pick the columns yourself, or let the AI work it out. The AI sees only the column names and up to 5 example rows, never the whole file.

For example

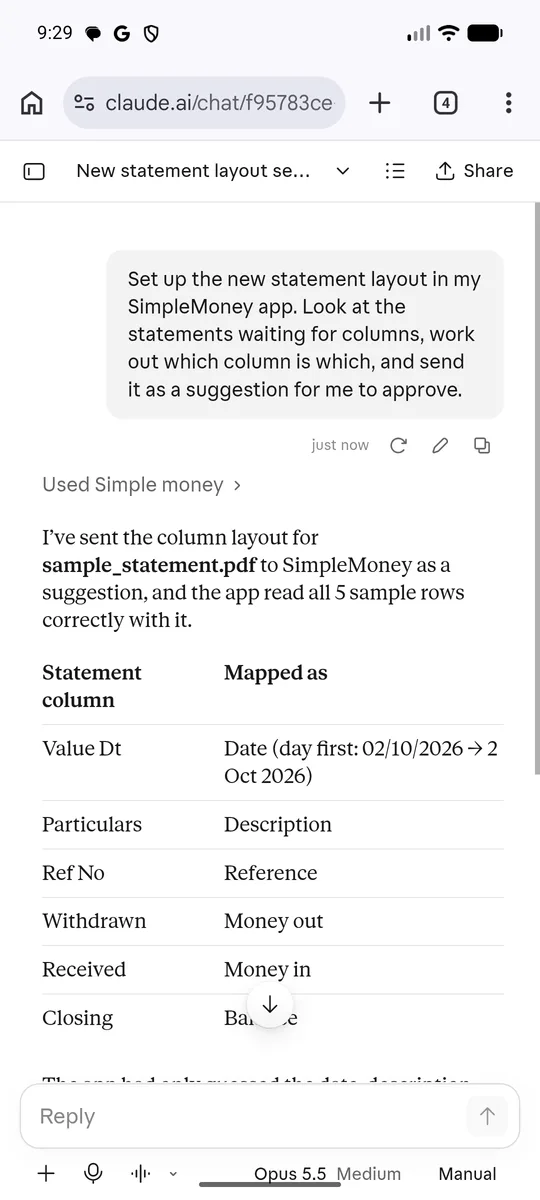
A small bank’s PDF has columns called “Value Dt”, “Particulars”, “Withdrawn”, “Received” and “Closing”. The app finds the date and description but can’t tell which columns hold money in and money out. Claude maps them in a few seconds.

How to
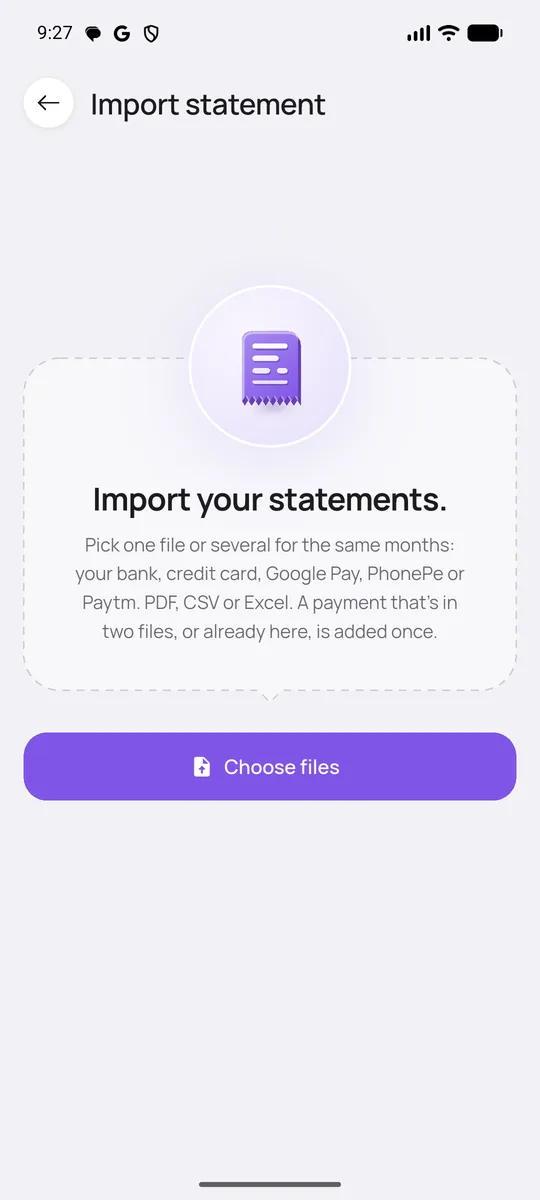
Open More → Import statement and tap Choose files. If a PDF is locked, the app asks for its password. It is often your phone number or date of birth.
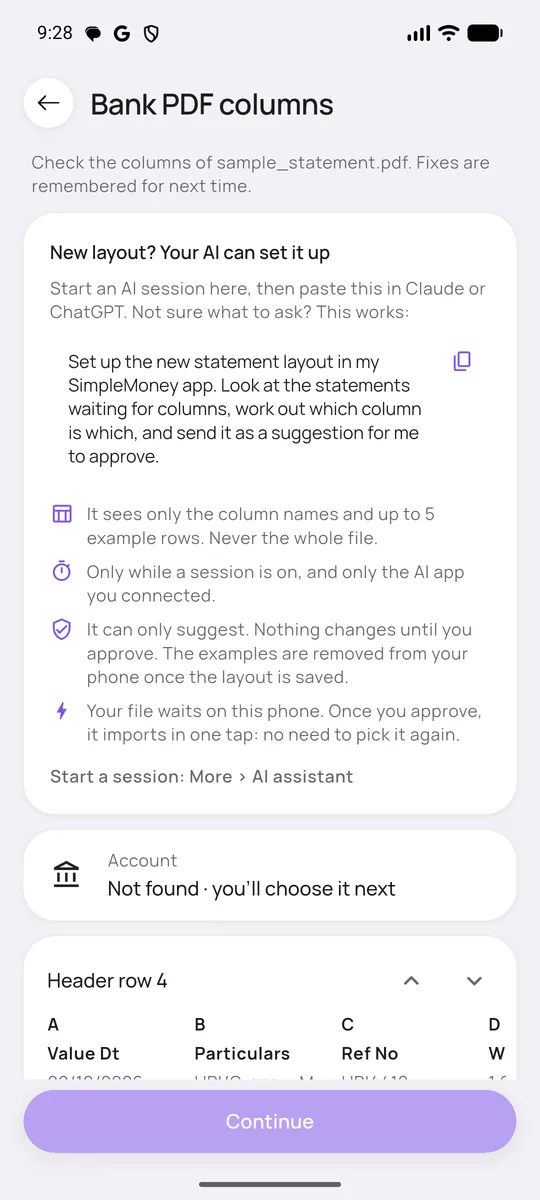
If the layout is new, you see New layout? Your AI can set it up, with a prompt to copy. Your file stays on this phone while you wait.
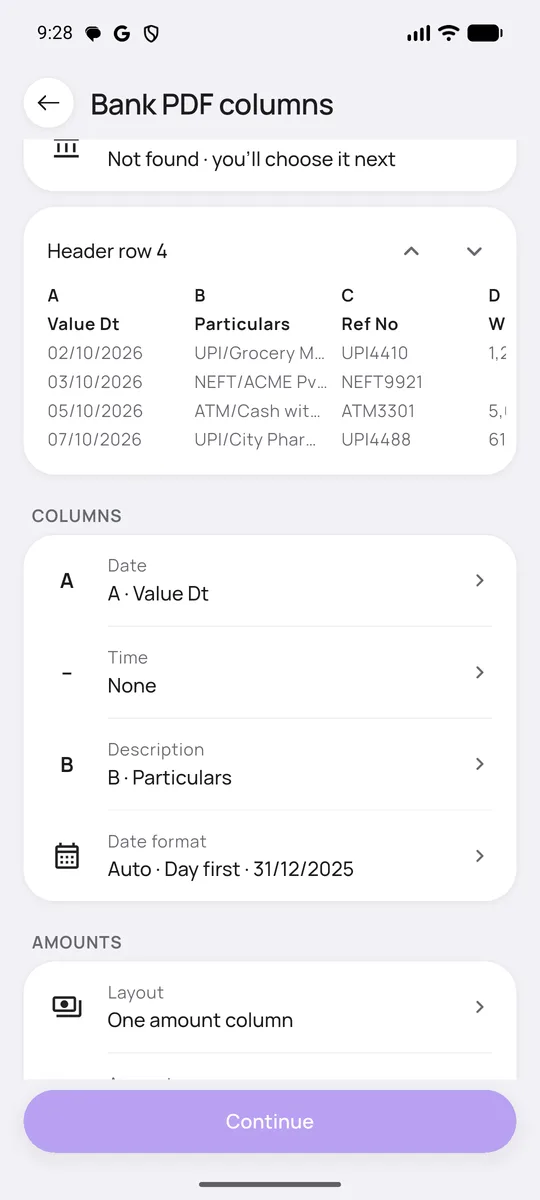
Below that are the app’s own guesses. Here it found the date, the description and the reference.
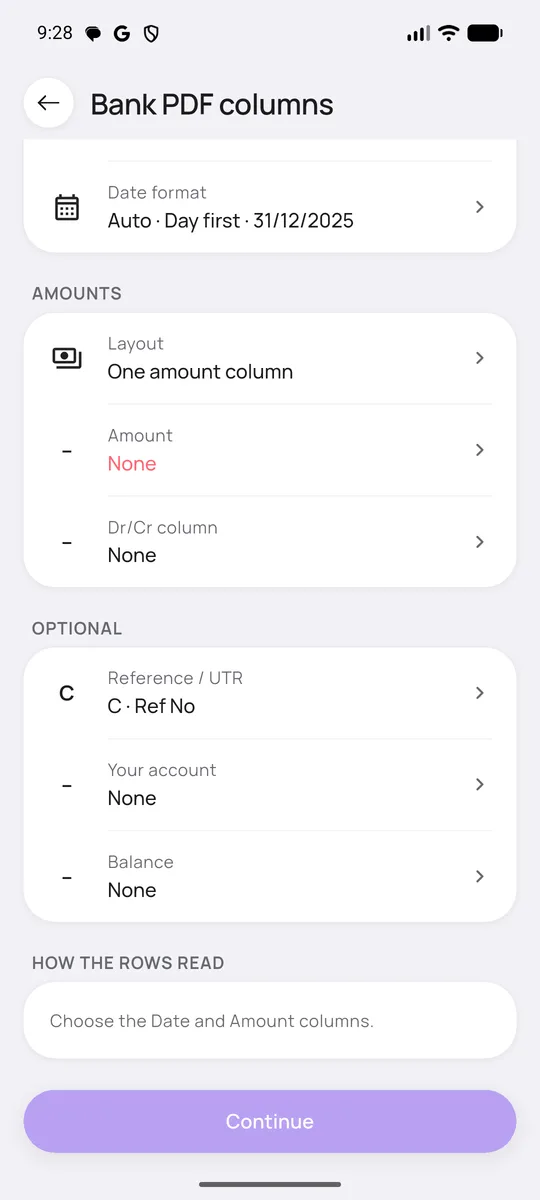
But it could not find the amount, so Amount shows None. This is where the AI helps.
Start an AI session. Copy the prompt, paste it in Claude and send it. Claude works out which column is which.
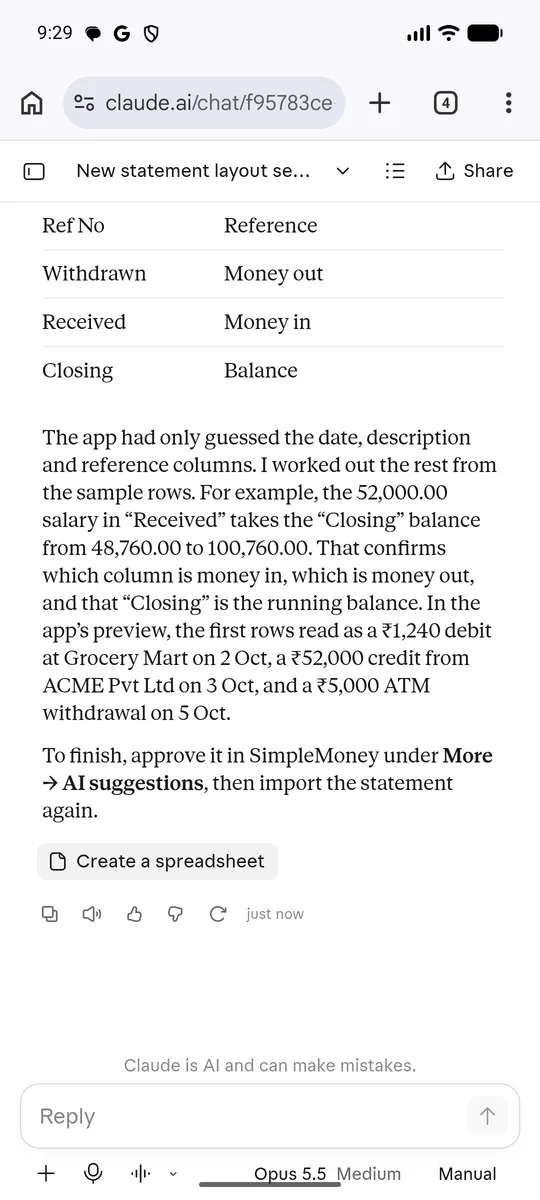
It explains how it knew. For example, a salary credit in “Received” raised the “Closing” balance, which shows which column is money in and that “Closing” is the running balance.
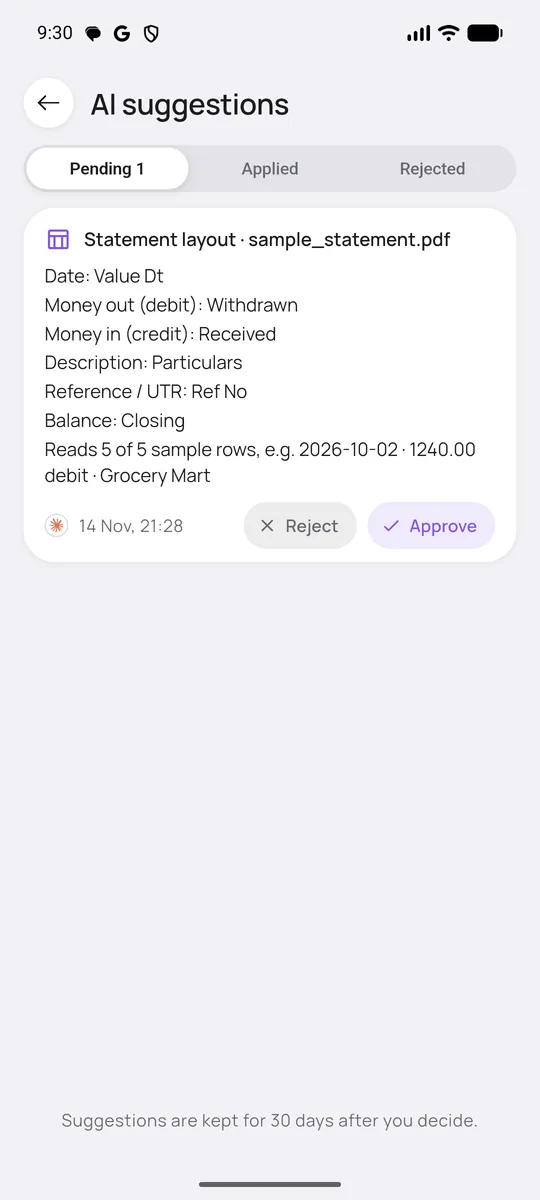
In Suggestions, the card lists each column it chose and how a sample row reads. Tap Approve.
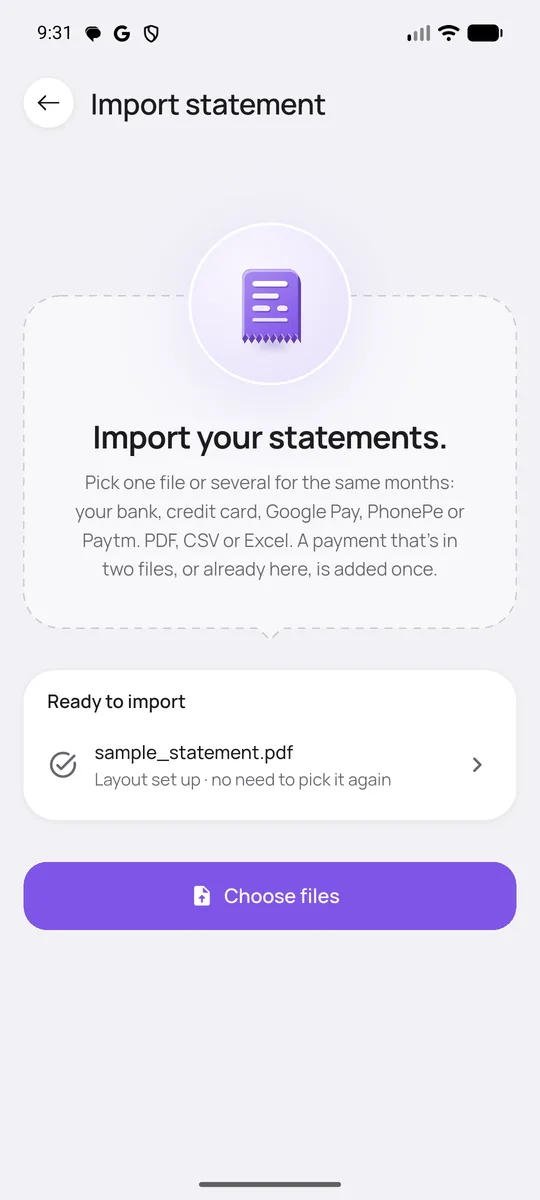
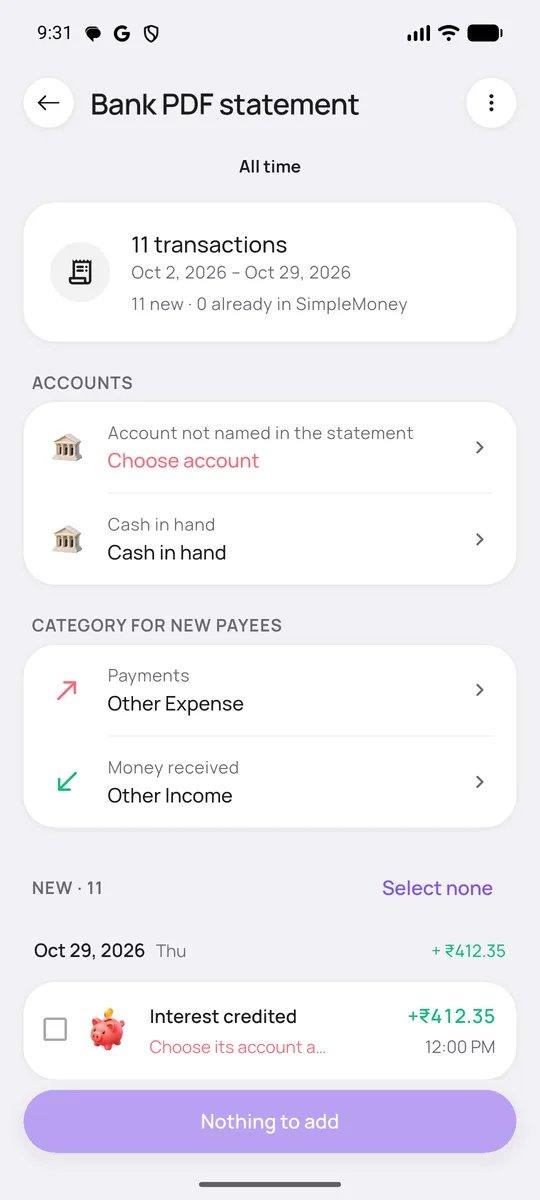
Back in Import statement, your file shows Ready to import · Layout set up · no need to pick it again. Tap it.
You get a review: how many transactions are new and how many are already in SimpleMoney. Choose the account, check the categories for new payees, tick what to add, and import.

You can also fix the columns by hand on the same screen. Tap any column to change it. Either way, the layout is remembered, so the next statement with the same columns imports straight away.1

1 How the app knows a statement’s layout. It does not use the file name, the bank name or the file type. For a table, the app looks for the header row, which is the row of column titles, within the first 50 rows. It lowercases the titles, ignores extra spaces and keeps their order. That list is the layout’s identity. The next file whose column titles match, in the same order, uses the saved column choices. If the bank renames a column or changes the order, it counts as a new layout and you are asked again. PDFs from Google Pay, PhonePe and Paytm are different: the app recognises them from the text inside the PDF and reads them with built-in rules, so they never need this step.

Share a fix, or report one that reads wrong

Why it’s there

A rule that works for you probably works for everyone with the same bank. Sharing sends the format to other users so they don’t have to teach it again. If a fix that someone else taught reads your messages wrong, you can switch it off for yourself and report it.

Share a fix you just approved
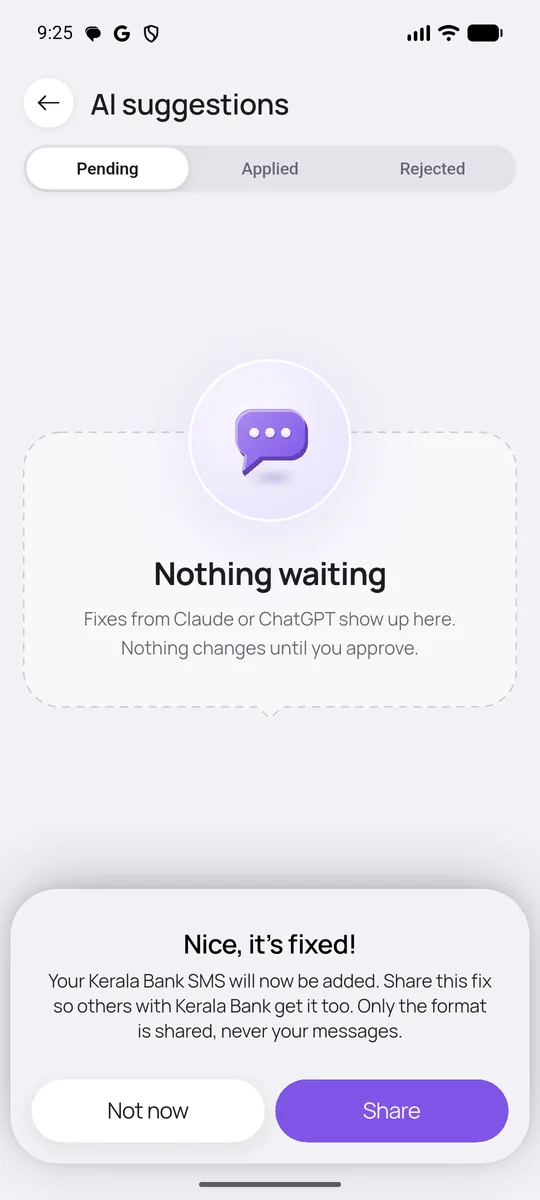
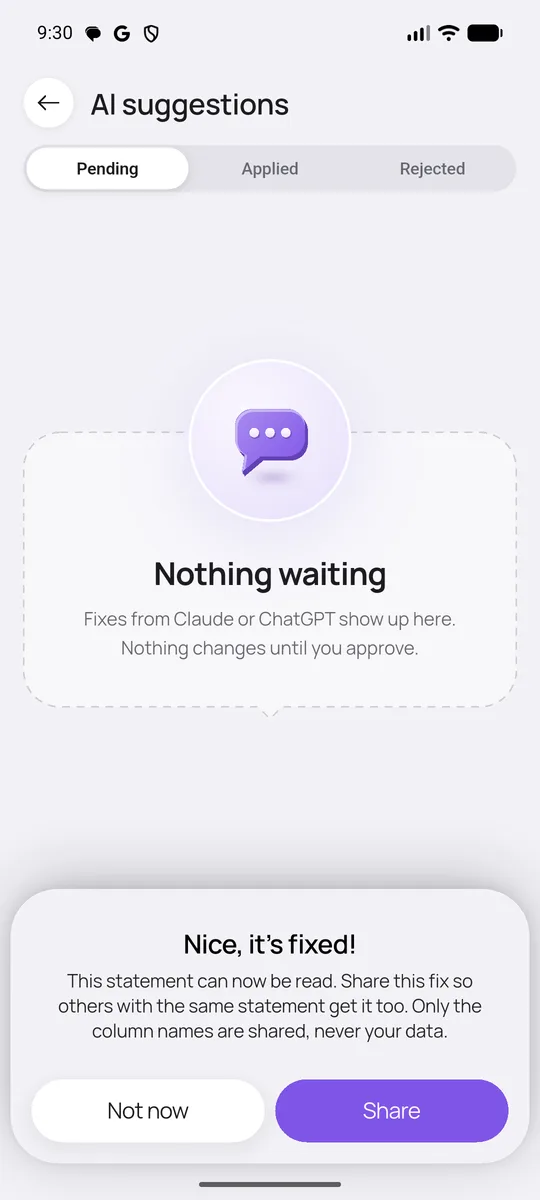
After you approve an SMS rule, the app says Nice, it’s fixed! and asks if you want to share it. Tap Share, or Not now to keep it only on your phone.
The same happens after you approve a statement layout. For a statement, only the column names are shared.

Only formats and column names are shared. Your messages, amounts and data are never sent.1

Use and report shared fixes
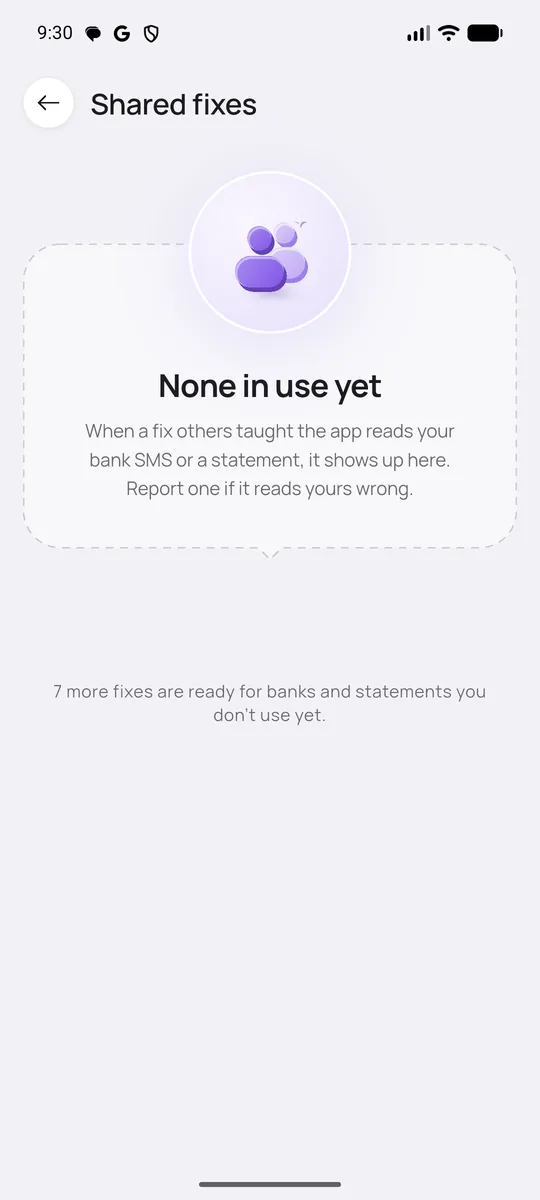
Open More → AI assistant → Shared fixes. It lists fixes others taught that now read your SMS or statements. If one reads yours wrong, report it. That turns it off on your phone and tells the developer.

Report a message the app gets wrong

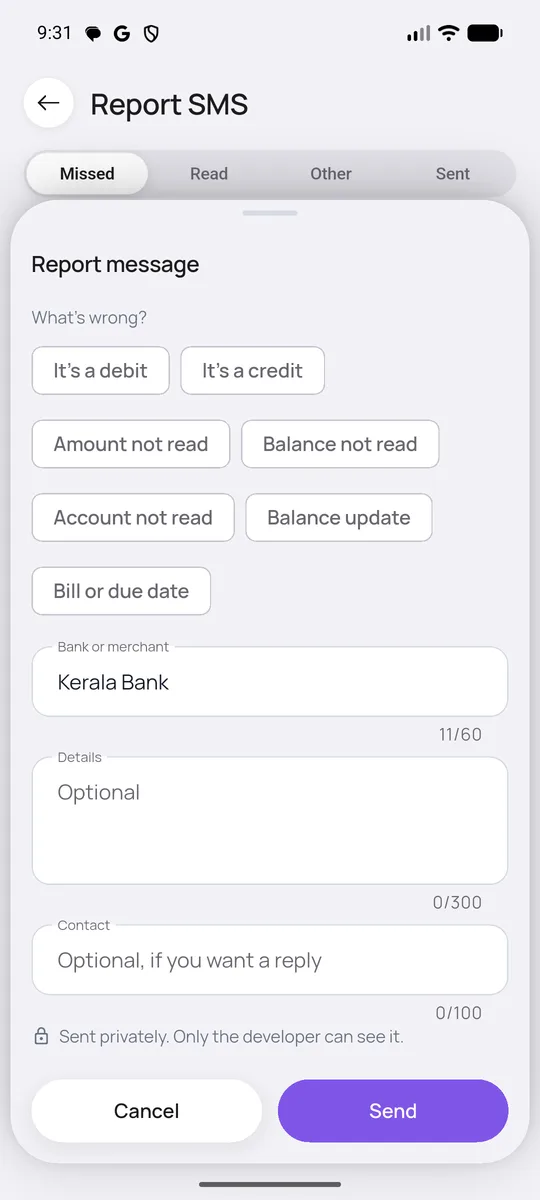
In More → Help → Report SMS use the tabs: Missed (not read), Read (read, check it’s right), Other (other bank and business SMS) and Sent (already reported).
Tap Report on a message. Say what is wrong, such as “It’s a debit”, “Amount not read” or “Account not read”. Check the bank name, add details and a contact if you want a reply, then tap Send.

A report is sent privately, and only the developer can see it. Nothing is sent unless you tap Send.

1 What is shared, and what is not. Sharing a fix sends the pattern only: the fixed words of the message, or the column titles of a statement, and nothing that came from your own transactions. Reporting a message is different. It sends the message you picked, with your note, in an encrypted package to the developer so the reader can be improved. Use it only for messages you are happy to share, and remove personal details from your note.

Free and Pro

Why it’s there

Tracking your money is free, forever. Pro adds a few extras and helps keep the app going.
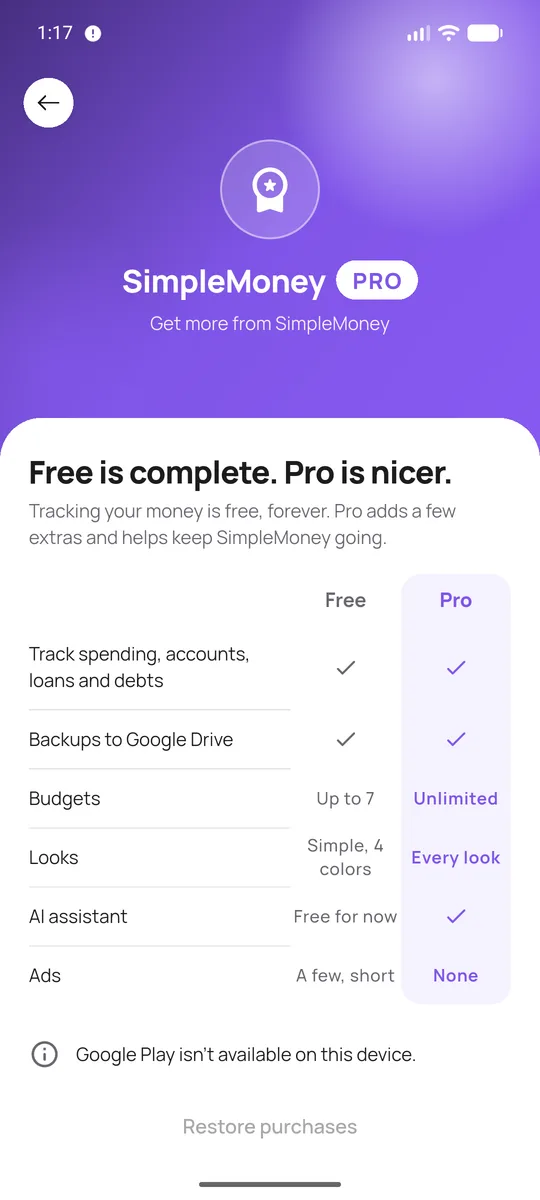
Open More → SimpleMoney Pro to see the full comparison.

Free: tracking spending, accounts, loans and debts; backups to Google Drive; up to 7 budgets; the simple look with 4 accent colors; a few short ads. Pro: unlimited budgets, every look and accent color, the AI assistant, and no ads.

Subscriptions renew through Google Play, and you can cancel any time there. Restore purchases brings Pro back on a new phone.

Pay with UPI (optional)

Why it’s there

The annoying part of UPI is remembering to log the payment afterwards. This joins the two: scan, pay in Google Pay, and record the expense when you come back.

For example

At a shop you scan their QR inside SimpleMoney, pay in Google Pay, return, and add the category. Nothing to remember later.

How to
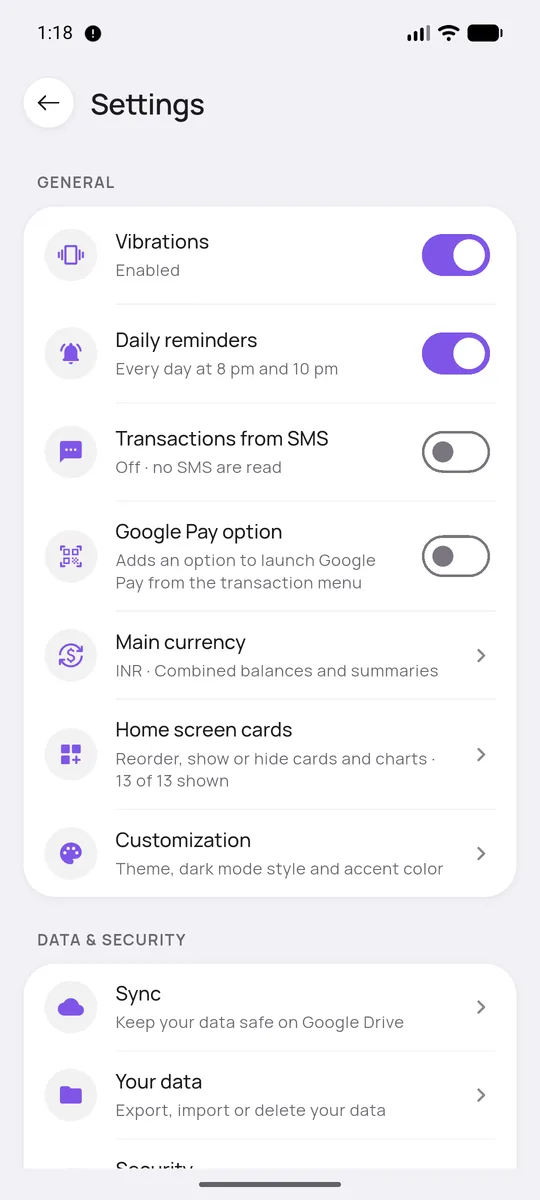
Switch on Google Pay option in More → Settings. It is off by default. Pay with UPI then appears when you tap +.

SimpleMoney never handles your bank or UPI credentials and does not process the payment. The camera is used only for scanning. The first time, you may be asked for approximate location, which is used only to note the nearby area on that expense. You can say no.

Settings & extras

A tour of Settings

Why it’s there

Everything that changes how the app behaves is in one place.

Open More → Settings.

Vibrations gives a small buzz on taps. Daily reminders nudges you every day at 8 pm and 10 pm to add what you spent. Transactions from SMS and Google Pay option are explained above. Then come Main currency, Home screen cards and Customization. Under Data & Security are Sync, Your data and Security.

Reminders for loans, debts and recurring payments are set on each item, and come two days before and on the day.

Use more than one currency

Why it’s there

If you work abroad, travel, or keep savings in another currency, you need both views: each currency on its own, and one combined picture.

For example

You have rupee accounts and a Saudi riyal account. The combined total is shown in rupees with a ≈ sign, and you can switch to riyals alone whenever you like.

How to
Give an account its own currency when you add it.
Choose your main currency in More → Settings → Main currency. Combined totals are shown in it.

On Home and Transactions, tap the account bar to see everything together or one currency at a time. Rates are only downloaded once you actually have two currencies, and the request contains a currency code and nothing else. You can refresh them on the Main currency page. Combined charts use the latest saved rates, so treat them as estimates. Budgets and transactions always keep their original currency.

Back up to Google Drive

Why it’s there

Your data lives on your phone, which is great for privacy and bad if the phone is lost. Backup is the safety net, and it’s entirely optional.

For example

Your phone dies. On the new one you install SimpleMoney, sign in with the same Google account, and everything comes back.

How to
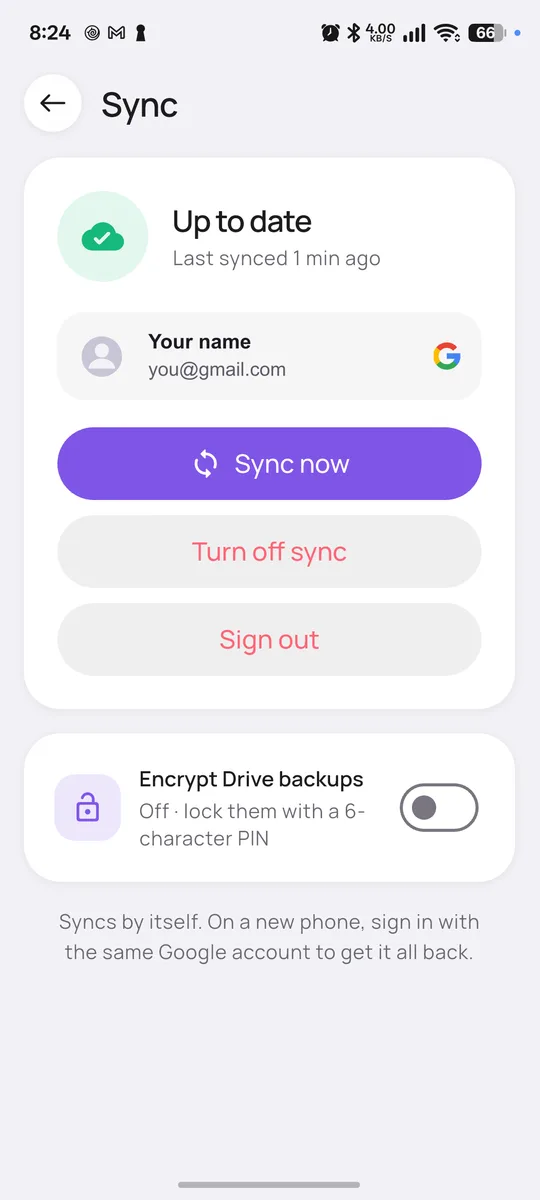
Open More → Settings → Sync and tap Sign in with Google. You can also sign in from the top of More. Once signed in, you see when it last synced, and Sync now backs up straight away. After that, changes upload by themselves.

The backup goes to a hidden app-only folder in your own Google Drive. SimpleMoney has no server and never sees it.

Lock your backups with a PIN

Your Drive backup is private to the app, but you can lock it with a PIN as well, so only you can open it. On the Sync page, turn on Encrypt Drive backups.
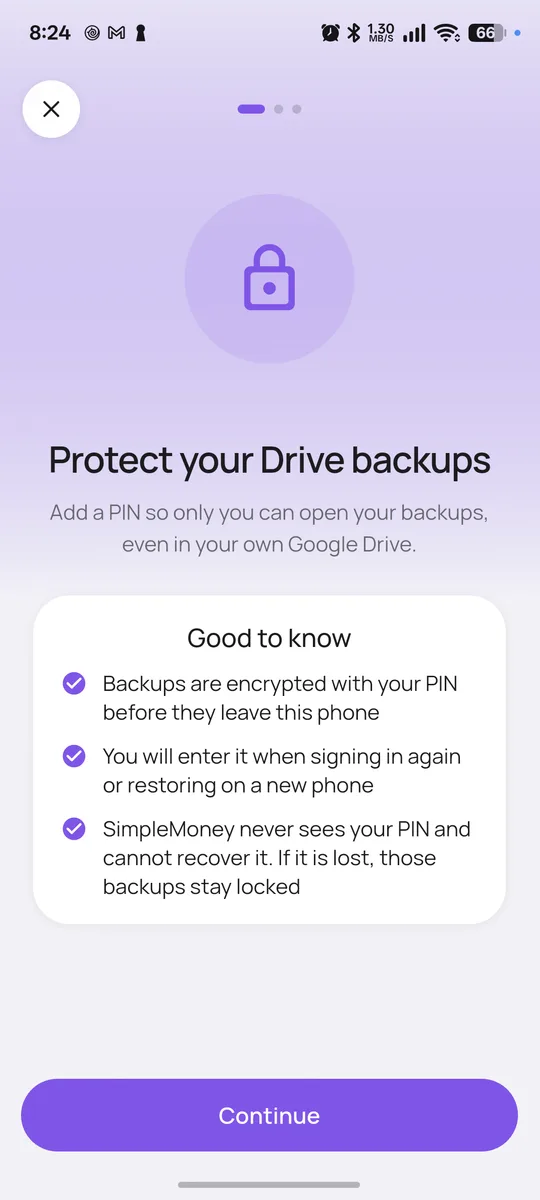
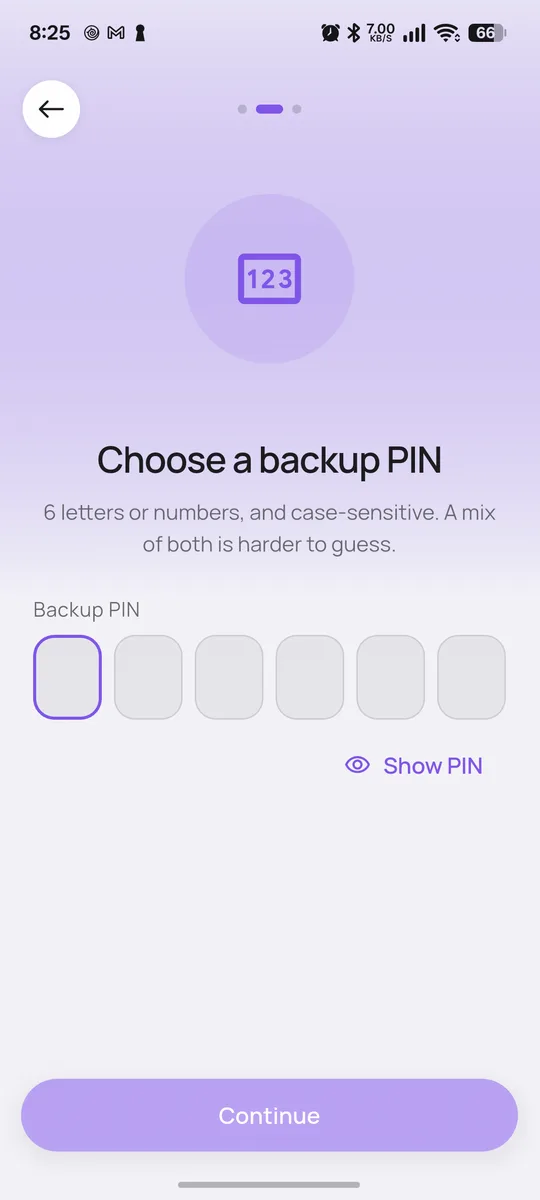
Turn on Encrypt Drive backups. The app explains what a PIN does. Tap Continue.
Choose a backup PIN of 6 letters or numbers. It is case-sensitive, and a mix of both is harder to guess. Tap Show PIN to check what you typed.

You then enter it once more to confirm, and tick that you have saved it. New backups are encrypted before they leave your phone. Older Drive copies keep their existing protection.

SimpleMoney never sees your PIN and cannot recover it. If you lose it, those encrypted backups stay locked.1 Data already on your phone stays available. You will need the PIN when you sign in again or restore on a new phone. You can turn encryption off later with your current PIN.

1 How the encryption works. Your PIN is turned into a 256-bit key on your phone, using a standard method called PBKDF2 with SHA-256. It runs 600,000 times with a random salt, which makes guessing a PIN slow. Each backup file is then locked with that key using AES-256-GCM, a widely used standard that also notices if a file has been changed. This happens before the upload, so Google Drive only ever holds scrambled data. The PIN itself is never saved or sent anywhere. The key is kept in your phone’s secure storage, so you are not asked for the PIN on every sync. On a new phone, the app asks for your PIN and builds the same key again. A longer mix of letters and numbers is harder to guess than a short one.

It is a backup you restore, not live syncing between two phones used at the same time.

Lock the app and hide amounts

Why it’s there

Your balances are personal. The lock uses your phone’s own fingerprint, face or PIN, so the app never sees or stores them.

For example

You hand your phone to someone to show a photo. Amounts are already dots, and SimpleMoney asks for your fingerprint if you turn on the lock.

How to
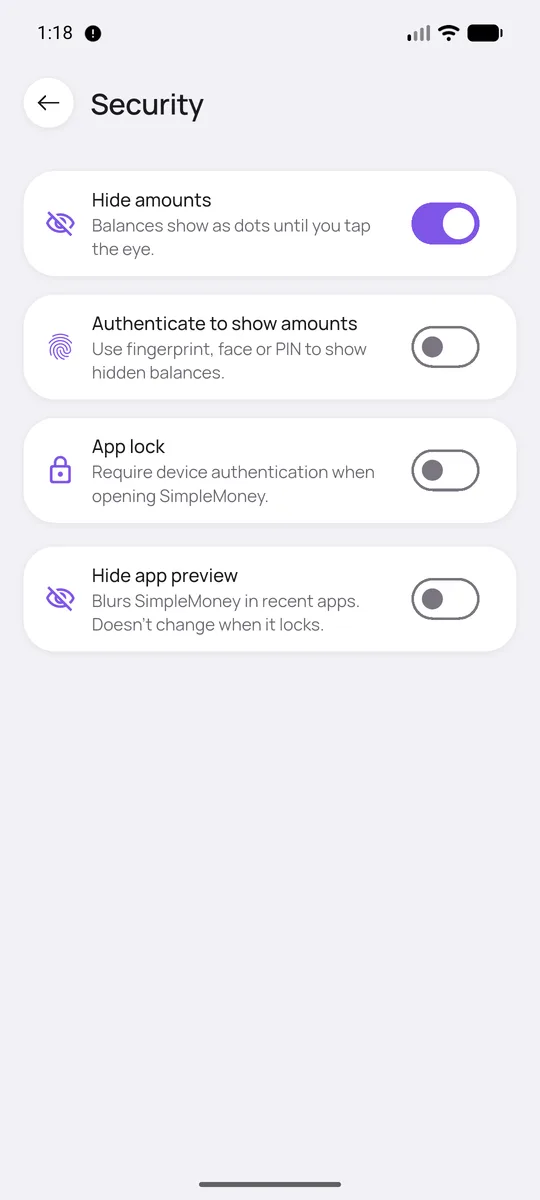
Open More → Settings → Security. Hide amounts is on by default. Turn on Authenticate to show amounts, App lock and Hide app preview if you want them.

Your phone needs a screen lock set up first. With App lock on, you can choose to lock when the screen turns off, when the app is cleared from recents, and after a set time away. Hide app preview blurs the app in the recent-apps view.

Export, import or delete your data

Why it’s there

It’s your data, so you can take it out, bring it back, or erase it. There is no lock-in.

For example

At tax time you export your transactions as a CSV and open it in Google Sheets to total your medical spending.

How to
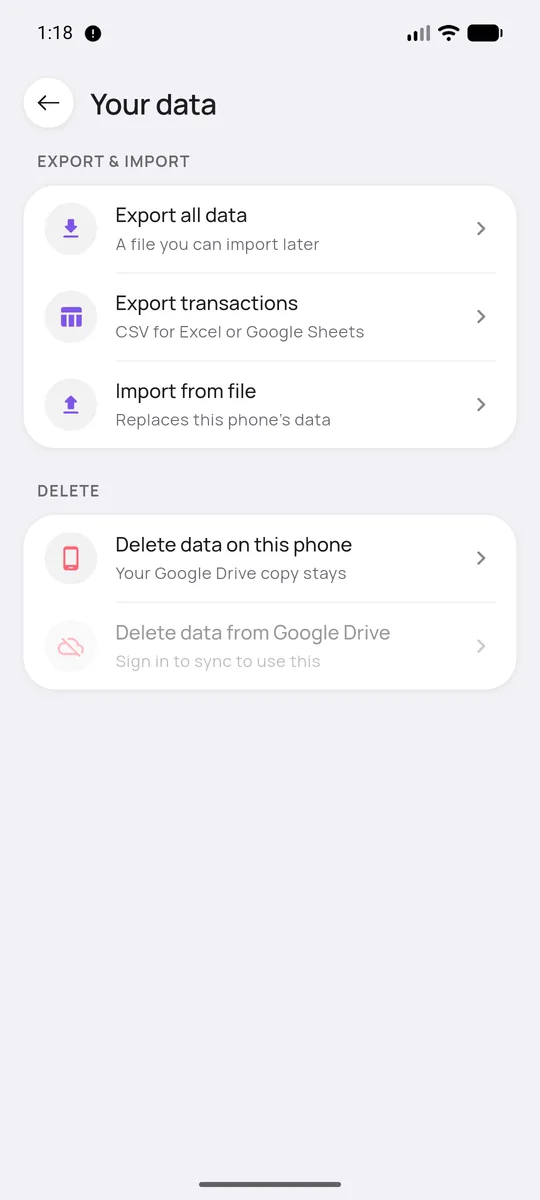
Open More → Settings → Your data. Export everything to a file, export transactions as CSV, import a file, or delete.

Importing replaces what is on this phone, and asks you to confirm first. Deleting from the phone leaves your Google Drive copy alone. Deleting from Drive is a separate button and needs you to be signed in.

Change how it looks

Why it’s there

You open this app every day, so it should feel like yours and be easy on the eyes at night.

How to
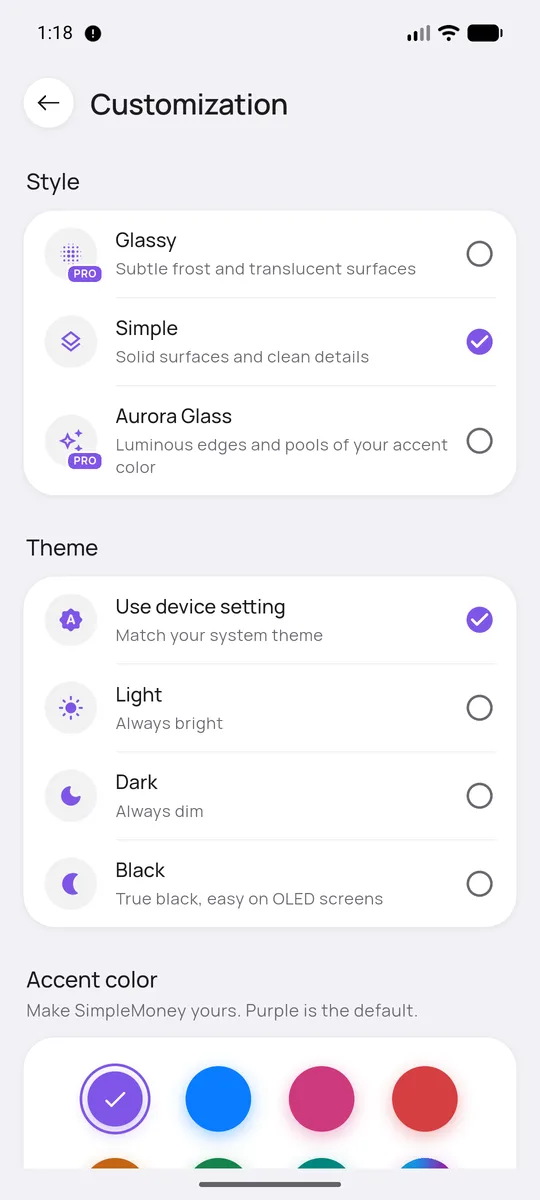
In More → Settings → Customization, pick a style, a theme (device setting, light, dark or true black for OLED screens) and an accent color. Purple is the default. The Glassy and Aurora Glass styles and some colors are Pro.
Get help or send feedback

How to

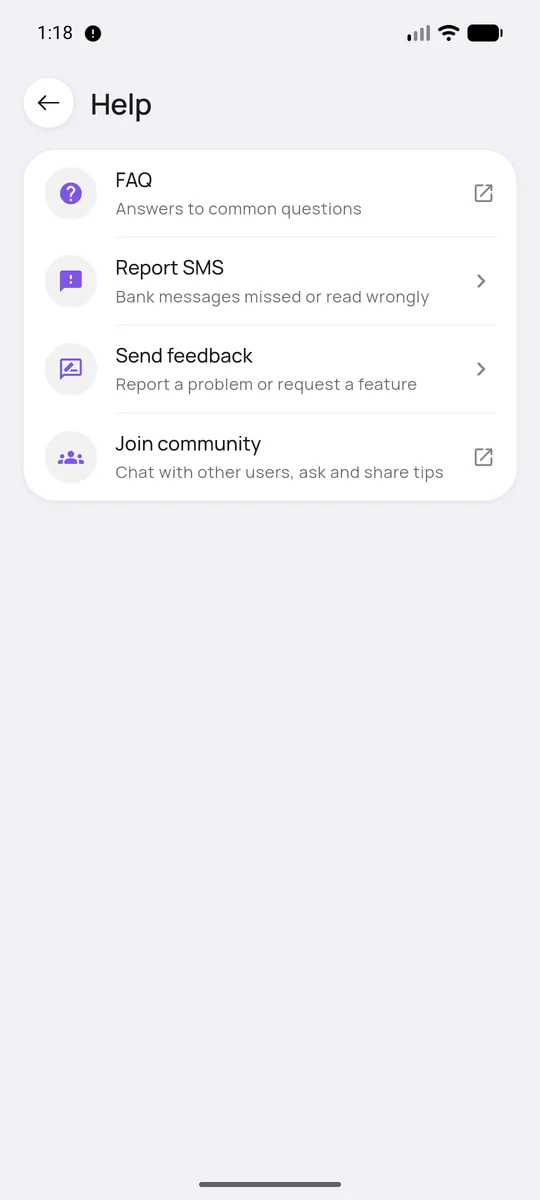
Open More → Help. FAQ opens this page. Report SMS sends a bank message that was missed or read wrongly. Send feedback reports a problem or asks for a feature. Join community lets you chat with other users.

FAQ

Do I need to sign up or be online?

No. There is no account to create and the app works fully offline. The internet is only used for the optional Google Drive backup, for downloading public exchange rates if you hold two or more currencies, and for the occasional ad in the free version.

Is it safe to let the app read my SMS?

Messages are read on your phone and are not uploaded. Only bank transaction messages are used, and OTPs and personal chats are ignored. The only time a message leaves your phone is if you choose to report it from Help → Report SMS. You can turn it off in Settings → Transactions from SMS.

Will I be bombarded with ads?

No. There are no banners, and nothing pops up while you open the app, add transactions or browse. The free version shows a short full-screen ad only after a bigger action, such as importing a statement or saving a loan. Ads are spaced a few minutes apart and limited each day. A few extras, like adding more than 7 budgets, ask first and let you choose to watch one. Pro removes them all.

Where is my data stored?

In a database on your phone. SimpleMoney has no server of its own. If you turn on backup, a copy goes to a hidden folder in your own Google Drive that only this app can read. You can lock that copy with a PIN.

How do I move to a new phone?

If you use Google Drive backup, sign in with the same Google account on the new phone and your data is restored. If you used a backup PIN, you will need it. Without Google, use Your data → Export all data, move the file across, and import it.

Can two phones share the same data?

Not at the same time. Backup is for restoring after a reinstall or on a new phone. Changes made on two phones are not merged.

Why isn’t a transfer counted as spending?

Moving money from your bank to your wallet doesn’t change how much you have. Transfers stay out of income, spending and budgets so those numbers remain honest.

How should I track a credit card?

Add the card as its own account (choose Credit card) and record purchases against it. When you pay the bill, record a transfer from your bank account to the card.

The app guessed the wrong category. What now?

Tap the transaction and change the category. You can also fix it from the “What was this for?” notification.

Does SimpleMoney move real money?

No. It records and organises. With the optional UPI feature the payment happens in Google Pay, and SimpleMoney only saves the expense.

Is there an iPhone version?

Not at the moment. SimpleMoney is built for Android.

How do I delete everything?

Go to More → Settings → Your data. You can delete the data on your phone and, separately, the copy in Google Drive. Uninstalling the app also removes the data on the phone.